How to Replace Rear Brake Pads Rotors 2004-09 Subaru Outback
Created on: 2018-05-21
How to repair, install, fix, change or replace your own worn, squeaky, fading old brakes on 08 Subaru Outback
-
step 1 :Removing the Wheel
- Loosen the 18mm lug nuts with the vehicle on the ground
- Raise the vehicle with a floor jack
- Secure the vehicle on jack stands
- Remove the lug nuts
- Pull off the wheel
-
step 2 :Removing the Brake Pads and Brake Rotor
- Remove 14mm bolts from the brake caliper
- Pry the brake pads into the caliper with a flat blade screwdriver to push in the pistons
- Pull the caliper aside
- Pry the brake pads off
- Remove the 14mm bolts from the brake caliper bracket
- Pull off the brake caliper bracket
- Pull the rotor off
-
step 3 :Preparing the New Brake Pads and Rotors
- Clean the brake pad slides with a wire brush
- Apply grease to the caliper slides
- Clean both sides of the rotor with brake parts cleaner
-
step 4 :Installing the New Brake Rotor and Brake Pads
- Slide the rotor on
- Put the caliper bracket back onto the rotor
- Start the bolts by hand
- Tighten the bolts to 47 foot-pounds of torque
- Put an old pad in the caliper
- Use a large C-clamp and the old pad to push the pistons back
- Apply grease to the brake pad tabs
- Install the new brake pads into the bracket
- Put the caliper on
- Thread bolts by hand
- Tighten bolts to 19 foot-pounds
-
step 5 :Reattaching the Wheel
- Slide the wheel into place
- Start the lug nuts by hand
- Tighten the lug nuts preliminarily
- Lower the vehicle to the ground
- Tighten the lug nuts to 90 foot-pounds in a crossing or star pattern
-
step 6 :Testing the Brakes
- Pump your brakes repeatedly until they feel firm
- Test your brakes at 5 miles per hour and then 10 miles per hour
- Road test the vehicle
Tools needed
-
14mm Wrench
Socket Extensions
Flat Blade Screwdriver
14mm Socket
Channel-Lock Pliers
19mm Socket
Bungee Cord
Anti-Seize Grease
Ratchet
Hi, I’m Mike from 1A Auto. We’ve been selling auto parts for over 30 years!
In this video, we will be removing and replacing the rear brake pads and rotors in 2008 Subaru Outback. We're going to take off the lug nuts. It's a 19mm socket and a breaker bar. We're just going to crack em loose before we lift the vehicle off the ground. Take the lug nuts out. Grab the wheel and pull it off.
We're going to take the caliper off. To do that, we're going to take these two 14mm bolts out, and we're going to use a 14mm wrench, and take the bolt out. Now when you're taking the bolt out, if this stud is spinning, you can hold it with some channel lock pliers and take it out. Before we take this bolt out, we're going to break free at the top too. Now we can take them both out.
If this caliper's really tight, take the screwdriver and pry it against the rotor. Squeeze the piston down a little bit, and you can pull it right out. Take a bungee cord and wrap it around the spring, and the caliper's out of the way and secure. Pull our pads off. To take these caliper bolts out, you use a 14mm socket on an extension. Pull that out and pull the rotor off.
Our rotor's nice and loose. If your rotor was stuck on there, you could use a hammer and hit on all this surface right here. You also have some areas where you could put a couple of bolts. You could push the bolts in and tap it, and it will help you take the rotor off.
These are our old brakes, and these are our new brakes from 1aauto.com. As you can see, look at the rotors first, the configuration is the same, the screw holes are the same, the lug holes are the exact same. The rotors are the same height. It's got the same bore for the parking brake, and we'll take a look at the brake pads. You can see the brake pads are the same. The squealer is the same—it's got the same stop squeak on the back. And get your parts at 1aauto.com and you'll be ready to rock and roll.
Now we're going to clean up our caliper bracket. Pull off these pad slides and take our wire brush. Clean this up a little bit. Pull these caliper slides out. Spray them down with brake cleaner. Wash them off. Take the other one out. Spray a little brake cleaner. Spray a little brake clean down here. Clean that up.
Take a little bit of brake grease, put it on the caliper slides, and stick that back in. Do the same on this one. Take our pad slides.We’re going to clean off the backside a little bit. Stick that back on. Same with this one. They're pretty clean, not too bad. Not really rusty. Put this one back on here. Take a wire brush to the top side. That's good.
First, before we install the rotor, we're going to put it on backwards. So we can take some brake parts cleaner and clean the backside of the rotor. Wipe it off. When they make these rotors, they put a protective coating on them so they don't rust on the shelf. Spray brake cleaner on this side and wipe it down.
Install our caliper bracket. Take the bolts from the backside. We're going to torque these bolts for this caliper bracket to 47.9 foot-pounds. Take some brake caliper and brake pad grease. Put it on the ears of the pads Then we're going to put a little bit on the surface here. Be careful, don't get it on your fingers. We're going to slide that in, in the backside. There we go. Do the same with the front one. Put a little bit on the ears, and then put a little on the face. Install that. Those are in.
Take the bungee cord off of the caliper, and we want to compress the piston. We're going to use some channel lock pliers. You can use a C-clamp or a brake caliper tool. That's all the way down. Install the brake caliper. Install the brake caliper bolts. We're going to torque these bolts to 19 foot-pounds. Do this one up top.
Install our tire. Put the lug nuts on. With the torque wrench, we're going to torque the lug nuts down to 90 foot-pounds going in a star pattern. You want to go in a star pattern so that you torque the wheel to the hub evenly. There you go.
Now before you drive away, you're going to want to make sure that you pump the brake pedal slowly multiple times cause there will be an air gap between the brake pads and the caliper so when you pump it, it will push the fluid back to the caliper and compress the brake pads.
Thanks for watching. Visit us at 1AAuto.com for quality auto parts, fast and free shipping, and the best customer service in the industry.
Shop Products


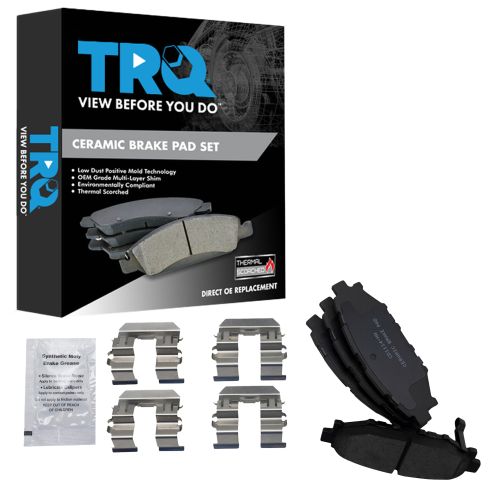
Subaru Scion Rear Ceramic Brake Pads TRQ BFA73153
Part Details:
- Premium Posi
- Contact Point Grease
- Hardware
- No
- Ceramic
- Black
- Yes
- 0.51 in
- Mechanical
- Yes
- Yes
- Yes
- Bonded
- Yes
- 0.51 in
- Yes
- 4
- Yes
- Standard Replacement
- Black
- Yes
- Steel
- 4.37 in
- 0.55 in
- 0.55 in
- 1.46 in
- 4.37 in
- 111 mm
- 13 mm
- 14 mm
- 37 mm
- 111 mm
- 13 mm
- 14 mm
- 37 mm
- N
- R-S-R
- No
- No
- 1.46 in
- Ceramic
- Yes
- Yes
How to Replace Rear Brakes 2013-17 Honda Accord
Watch this video to learn how to install new engineered to fit TRQ rear brake rotors and pads on your 2013-17 Honda Accord.
