How To Replace Rear Brake Caliper 2002-09 Chevy Trailblazer
Created on: 2011-11-23
This video shows how to remove/prepare the brake caliper and also how to bleed the brakes on the 02-09 Chevy Trailblazer
-
step 1 :Removing the Wheel
- Loosen the 19mm lug nuts with the vehicle on the ground
- Raise the vehicle with a floor jack
- Secure the vehicle on jack stands
- Remove the lug nuts
- Pull off the wheel
-
step 2 :Removing the Brake Caliper
- Loosen the 11mm bolt holding the brake line
- Remove the 11mm bolts from the brake caliper
- Pull the caliper aside
-
step 3 :Preparing the New Caliper
- Fill the piston on the new caliper with brake fluid
-
step 4 :Installing the Brake Line to the Caliper
- Remove the brake line from the old caliper with an 11mm wrench
- Hold the copper washer with pliers and unscrew the 11mm bolt to remove the washer
- Place new washers on the bolt
- Insert the bolt onto the brake line
- Insert the brake line onto the new caliper
- Tighten the 11mm bolt
-
step 5 :Installing the Caliper
- Insert the caliper onto the caliper bracket
- Insert and tighten the 11mm bolts to the caliper
- Torque the bolts to 23 foot-pounds
- Torque the brake line bolt from 13 to 15 foot-pounds
- Clean the rotor with brake parts cleaner or mineral spirits
- Fill the fluid reservoir to the appropriate amount
-
step 6 :Bleeding the Brakes
- Pump the brake pedal repeatedly
- Check your brake fluid level
- Enlist the help of an assistant
- Remove the cap from the bleeder valve
- Connect a tube to the bleeder valve
- Run the tube into a plastic bottle with some brake fluid in it
- Instruct the assistant to step on the brake pedal
- Loosen the bleeder valve with a 10mm wrench
- Tighten the bleeder valve
- Instruct the assistant to release the brakes
- Repeat this process until fluid rather than air comes out of the bleeder valve
-
step 7 :Reattaching the Wheel
- Slide the wheel into place
- Start the 19mm lug nuts by hand
- Tighten the lug nuts preliminarily
- Lower the vehicle to the ground
- Tighten the lug nuts to 100 foot-pounds in a crossing or star pattern
Tools needed
-
14mm Wrench
Torque Wrench
Jack Stands
Brake Fluid
19mm Socket
Mineral Spirits
Ratchet
Floor Jack
Brake Parts Cleaner
11mm Wrench
11mm Socket
Brought to you by 1AAuto.com, your source for quality replacement parts and the best service on the Internet.
Hi, I'm Mike from 1A Auto. I hope this how-to video helps you out, and next time you need parts for your vehicle, think of 1AAuto.com. Thanks.
In this video, we're going to show you how to replace rear calipers on this 2002 Trailblazer. This is the same procedure for any Trailblazer, Envoy, Rainier, Bravada or Ascender with the aluminum rear disc calipers. Pretty common problem since they're made of aluminum. They tend to start leaking after about 100,000 miles. Tools you'll need are jack and jack stands, 19mm socket and ratchet (or your tire iron), 11mm and 14mm wrenches ,and you'll need sockets as well as a 10mm wrench, brake cleaner or mineral spirits, some brake fluid, and also a torque wrench. Obviously, we show you how to do one side, the opposite side is the same procedure.
Start by removing the rear wheel. I'm using an impact tool so it's a little easier. If you're just using regular hand tools, start with vehicle on the ground, loosen the lug nuts, raise and secure the vehicle, remove the lug nuts, and then remove the wheel and tire.
First, you just want to loosen this bolt that holds the brake line to the caliper. This bolt is 11mm. I got an 11mm wrench. What I'm going to take another wrench, put it on like that, and just loosen it. It's just a lot easier to loosen it while you have the caliper still mounted. Now, I'm going to take my 14mm wrench, and loosen up my caliper bolts using a little wrench for some extra leverage here. Fast-forward here while I just remove those two bolts that hold the caliper to the caliper bracket. I'll remove my caliper, you can see I'm leaking out a little bit of brake fluid already.
With my 11mm, tighten that up a little bit. I'm going to prep my new caliper by taking some nice new brake fluid, carefully just fill the piston. I've got my new caliper right here upright and waiting. I'm going to take my old caliper and remove the line. A pair of pliers, try to hold that crush washer. Now all I'm doing right here is holding the copper washer with the pliers and then unscrewing the bolt to get the washer off. That little bit, pull that bolt out, stick my line up as high as I can. I've got to get the other washer off.
We'll take some new copper crush washers, along there and bring this down, put the bolt through, a new washer on here. I'm going to grab our caliper, just start the bolt in, make sure it starts straight, then it should be nice and easy. I'm just going to go this way so that won't have to come up like that, make sure we get it on here correctly. To better explain what I did there, I just put the caliper down into the way it would be so I can make sure that the hose is routed correctly, and I'm tightening it up the way it wants to be on there. I got some fluid all over the place, so I'm going to pull this relatively tight. Try and wipe the extra fluid down so it's not dripping all over the place.
Now I can put this in place. Now, here, I'm just putting the bolts that hold the caliper in place back on. I'm sorry I didn't realize that my angle was as bad as it is. A good shot of my back and the 1A Auto logo though. I'm going to torque my bolts here to 23 foot-pounds. Then I'm going to torque the bolt for the hose to 13 to 15 foot-pounds.
Now I use brake parts cleaner or mineral spirits to clean up any fluid you may have gotten on the router. Be sure to fill your fluid reservoir. Now you're going to need to pump your brakes a bunch of times to get those rear calipers seated. Speed it up a little bit and as you can see here it takes a few pumps before they get seated and the pedal is firm again. Check and fill your reservoir, it looks good.
Now you need to bleed the brakes. The bleeder valve is right here. I've got a little water bottle with a little bit of brake fluid at the bottom, I'm going to put my wrench on. Then I'm going to put this hose right on there and then I've got an assistant in the car and I'm going to tell them to hit the brakes. They'll press the brakes, and then I'll loosen this and allow any air to come out. Let me loosen it, make sure it loosens first. Hit the brakes hard. Let off the brakes, and when you loosen the thing, you want to look in the bottle and look for air. Hit the brakes, let off the brakes, hit the brakes, let off the brakes. Hit the brakes one more time, let off the brakes, hit the brakes, let off the brakes. Then once you don't see any air, then that's bled. Do the other side and we'll be all set.
Now put the tire back on. One point of clarification is if you are going to replace both calipers, you want to replace both calipers first, and then bleed the brakes after you've replaced both calipers. Back to the wheel: put the wheel on, start the lug nuts by hand first, and then I'm using my impact wrench just to preliminarily tighten up those lug nuts. Then with it back down on the ground, tighten the lug nuts with a torque wrench to 100 foot-pounds. I use a crossing pattern, doing the opposites, and then I go right around in a circle just to make sure that they're all tight. Replace the cap and you're all set.
We hope this video helps you out. Brought to you by www.1AAuto.com, your source for quality replacement parts and the best service on the Internet. Please feel free to call us toll-free, 888-844-3393. We're the company that's here for you on the Internet and in person.
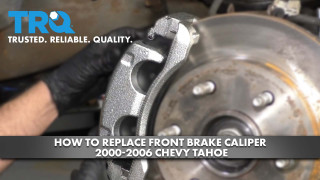
How to Replace Front Brake Caliper 2000-06 Chevy Tahoe
This video shows you how to a (front/rear)brake caliper on your 2000-2006 Chevy Tahoe.
