How to Replace Radiator Overflow Tank 2004-08 BMW X3
Created on: 2020-03-10
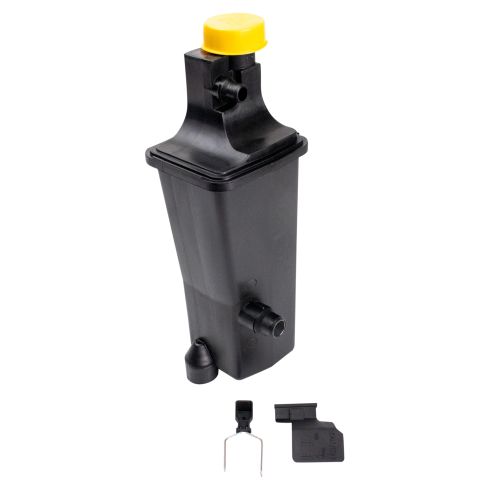
Watch this video to learn how to install a new coolant reservoir on your 2004-2008 BMW X3.
Tools needed
-
Socket Extensions
Trim Tool Set
Pocket Screwdriver
Coolant Funnel Set
Pick
Flat Blade Screwdriver
Socket Driver
Phillips Head Screwdriver
8mm Socket
10mm Socket
Drain Pan
T30 Socket
Ratchet
T25 Torx Driver
I wanna disconnect the battery. So, get the battery in the back, just use a 10-millimeter socket. Remove the negative cable. Loosen it up. Slide it off and out of the way. And make sure it doesn't arc out on there.
I'm gonna take this cover off. I wanna take these four screws out. I'm gonna use a T30 socket. Grab that cover, slide off. And take these two screws out, use a T30. And these two, same T30. And just grab right here and just slide it out. You can grab this intake duct right here. Try to pull it off. Just get that out of the way.
Disconnect this this connector right here. Just push on that tab and just try to slide that off, just like that. Then, it's held in right here, just slide that clip off. And take this connector off. Push on those two tabs and slide it out. Set that aside. And there's a screw right here. Just use a T25. Remove that screw. Pull that out. Just pull this pushpin out right here. Just grab this fan shroud and just slide it up. Be careful of the radiator.
Disconnect this connector right here. I'm just gonna use a pocket screwdriver. Slide that clip out. Use a straight blade screwdriver, loosen up this worm clamp, and then slide this snorkel off, just like that. And just grab the air box right here and just pry up. Just like that. There's some rubber grommets right there. And I'm just gonna take this cap off, the coolant reservoir, just so the coolant drains out a little faster.
We're gonna take the shield off. There's all these screws all over along here. They're 8-millimeter. There should be one there, one there, and then the same on the other side. Use an 8-millimeter socket. Take all these out. There should be one right there as well. All right, and then just pull this down. Slide it back.
And I'm gonna find the coolant drain right over here and I'll just use a Phillips head screwdriver. Make sure you have a drain bucket underneath. There you go. At the base of the reservoir, I need to pull this clip out. Just grab it. Just slide it towards the passenger side of the vehicle, just to that location right there.
Now, I'm gonna have to pull these coolant hoses off over this junction right here. I'm gonna use a pocket screwdriver, get underneath these clips right here, and just slide it up. And same with this one right here. Slide it up. I should be able to wiggle this back and forth. Just be careful. You don't wanna break it. Just put a little bit of pressure, just pushing it towards the back of the vehicle, and there it goes. Just be careful. Don't force this too much. And that's good.
All right, on this bottom clip right here just use the pocket screwdriver. Slide that up. And do the same, take this hose off. Use a straight blade screwdriver or a pry bar. Just pry that one out a little bit. Just be careful again. All right, now, we're just gonna rock this back and forth, pull a little bit of pressure upwards. Remember, don't pull too hard. There is a connector that's still connected, the electrical connector for the level sensor. So just put a bit of pressure. Rock it back and forth. All right, and eventually that'll pull up. And you can disconnect the connector right there. Just push down on the tab, and slide that out. Pull the whole thing out. Take this clip, just slide it in position just like that, and it's gonna sit right there. Once you get this locked in, then you can push it down like that. And this piece is gonna slide just like that.
Just lubricate these O-rings. Just gonna push this clamp down like that. And make sure you connect the electrical connector right there. Plug that in first and just slide this in position. I'm just gonna support from underneath and just press down. And make sure that's locked in place. Looks good. Slide this on, lubricate that, and same with this hose. It's good. Slide the fan in. There's some slots down below you need to get lined up. Just make sure you grab the fan and try to pull towards the back of the vehicle and make sure it's in there properly. And this bolt's gonna go right here. Connect the connector. Lock it in place. Lock that pushpin up in place. And connect that connector right there. Just push this little retainer tab right there.
Take the air box. Just line these two grommets up with these two tabs right there. Make sure you pull the wire out of the way. And those are lined up. Just push down. Lock it in place. Take the hose, line that up, connect the connector, lock that in place, and just tighten down this worm clamp. And take this air intake and just slide it into position. Just like that. Reattach it over here on the air box. That's good. And line those screws up. Get these all started and then you can snug them down. And slide this in position. Put these screws in. And tighten those up and put the drain plug back in. And just snug it, not too tight. Now, reinstall this panel. Just get it lined up. That's good. Take all the bolts and get those all started first. Now, just go around and tighten them all down. Now, we're gonna reconnect the negative battery cable and tighten up the nut. Just make sure you wiggle it. Make sure it's tight. That's good.
And you wanna fill the system with the appropriate coolant. There's a bleeder screw right here. If you need to access it, you can take this piece off right here and then you can loosen that up. And when coolant comes out of there, then you can close it up and make sure this is topped off right here. There's a little key here telling where the min and the max is. At this point, I'm gonna start the vehicle up, let it run, let it idle for a little bit, let it stabilize, and I'm gonna put the coolant cap back on before it gets to operating temp.
So the coolant level dropped a little bit, so I'm gonna top it up. Cap on. Let it run. Let it heat up. Make sure you're constantly monitoring the temp gauge. It's always a good idea to turn the heat up while you're warming this up. And just make sure you feel heat coming out, especially when the temperature gets up. If you see the temperature's already up there, just make sure the heat is coming through. You can always hold the RPMs up a little bit while you're doing this. Just constantly monitor that. Just make sure the temp doesn't go in the red.
After the vehicle's run for about 10 minutes, it's warmed up and you actually feel heat in the dash, then you can shut the vehicle down and let it cool down. You don't wanna take this cap off while it's hot. Once that's cooled down, take the cap off, and adjust accordingly.
Shop Products


How to Replace Radiator Overflow Bottle 1996-2007 Ford Taurus
Follow along with this video to find out how to replace the coolant overflow bottle.
