How to Replace Radiator Fans 2010-17 Chevy Equinox
Created on: 2019-06-17
Watch this video to learn how to replace the radiator cooling fans in your 10-17 Chevy Equinox with the 3.0L V6. 1A Auto shows you step by step!
-
step 1 :Draining the Radiator
- Make sure the coolant is cool
- Remove the overflow tank cap
- Raise and support the vehicle if necessary
- Place a drain pan below the radiator petcock, which is on the passenger side lower corner of the radiator
- Open the radiator petcock
- Allow the radiator to drain
-
step 2 :Removing the Bumper Cover and Headlights
- Remove the four push pin retainers from the driver side engine compartment trim
- Remove the driver side engine compartment trim
- Repeat for the passenger side
- Remove the 10 mm headlight bolt that is recessed
- Remove the two 7 mm bolts securing the headlight to the radiator support and the fender
- Remove the four T20 screws along the top of the grille
- Remove the four push pin retainers securing the driver side wheel well shield; two inner, and two along the fender
- Remove the two T20 screws securing the driver side wheel well shield
- Pull the wheel well shield away from the fender and bumper edge
- Remove the inner 7 mm screw securing the driver side bumper cover to the fender
- Twist counter clockwise to remove the fog light socket from the driver side light housing
- Remove the two 7 mm screws securing the driver side wheel well shield to the underside of the bumper
- Pull the wheel well shield away from the underside of the bumper
- Repeat the driver side steps for the passenger side
- Pull the bumper off, separating the clips along the underside of the headlight and fender
- Remove the lower 7 mm headlight bolt that is behind the bumper cover
- Disconnect the headlight assembly electrical connector
- Repeat on the other side
-
step 3 :Removing the Radiator Cooling Fans
- Remove the four 10 mm bolts along the top of the front engine compartment cover
- Lift away the front engine compartment shield
- Slide away the black cover ring on the upper transmission cooler line on the driver side of the radiator
- Remove the retainer spring clip on the transmission cooler line
- Remove the upper transmission cooler line from the radiator
- Replace the locking clip
- Repeat for the lower transmission cooler line
- Release the transmission cooler lines from the plastic retainer clamp at the bottom of the fan assembly
- Squeeze the lower radiator hose clamp to slide it away
- Remove the lower radiator hose from the radiator
- Disconnect the two radiator fan electrical connectors
- Pry the fan wiring retainers from the fan assembly
- Remove the 13 mm bolt on each side of the fan assembly mounting it to the radiator
- Lift the radiator fan assembly out of the support bracket at the bottom of the radiator
- Squeeze the upper radiator hose clamp to slide it away
- Remove the upper radiator hose from the radiator
- Remove the 13 mm bolt from the radiator mounting bracket at each top corner of the radiator
- Remove the two radiator mounting brackets
- Remove the 13 mm bolt securing the AC condenser to the radiator on each side
- Remove the push pin retainer from each side of the plastic shroud mounted to the AC condenser
- Remove the plastic retaining pin from each bottom corner of the AC condenser
- Lift the AC condenser to separate it from the radiator
- Disconnect the hood latch electrical connector
- Remove the two 13 mm bolts securing the hood latch to the frame
- Remove the hood latch to allow clearance for removing the radiator
- Remove the radiator fan assembly
-
step 4 :Installing the Radiator Cooling Fans
- Install the radiator fan assembly making sure it seats on the support brackets on the radiator, and the upper clips fit over the radiator top
- Place the four insert nuts into the four bolt locations on the radiator for the fan assembly and the AC condenser
- Tighten the 13 mm bolts securing the radiator fan assembly to the radiator
- Replace the radiator fan wiring retaining clips into the fan assembly
- Reconnect the two radiator fan electrical connectors
- Insert the upper transmission cooler line into the radiator, making sure it engages the locking clip, and replace the plastic cover ring
- Reconnect the upper radiator hose
- Slide the hose clamp back into position, using the indentations as a guide
- Place the upper radiator mounting brackets on the mounts and tighten the 13 mm bolts securing them
- Replace the hood latch and tighten the two 13 mm bolts securing it
- Reconnect the hood latch electrical connector
- Seat the AC condenser onto the mounting brackets on the radiator
- Tighten the two 13 mm bolts securing the AC condenser to the radiator
- Replace the lower plastic shield onto the bottom of the radiator
- Reconnect the lower transmission cooler line and replace the plastic cover ring
- secure the transmission lines with the plastic retaining clamp
- Reconnect the lower radiator hose
- Slide the hose clamp back into position using the indentations as a guide
- Replace the plastic radiator shroud and secure it to the AC condenser with the two push pin retainers
- Replace the front engine compartment cover and secure it with the four 10 mm bolts
-
step 5 :Installing the Headlights
- Reconnect the electrical connector
- Set the headlight assembly in place using the guide pin on the outer mounting tab as a guide
- Tighten the lower 7 mm bolt
- Tighten the two upper 7 mm bolts
- Tighten the recessed 10 mm bolt
- Repeat for the other side
-
step 6 :Installing the Front Bumper Cover
- Carefully set the bumper cover in place
- Loosely start the top T20 screws to hold the bumper cover in place
- Press the bumper cover retainers into the clips along the headlight and fender on each side
- Tighten the four T20 screws along the top of the grille
- Replace the 7 mm bolt securing the driver side bumper cover to the fender
- Replace the four push pin retainers securing the driver side wheel well shield to the fender and bumper cover
- Replace the two T20 screws securing the driver side wheel well shield to the bumper wheel well edge
- Twist the driver side fog light socket clockwise to lock into the fog light housing
- Reposition the driver side lower wheel well shield onto the underside of the bumper
- Replace the two T20 screws securing the driver side lower wheel well shield to the underside of the bumper
- Repeat the driver side steps for the passenger side
- Replace the driver side engine compartment trim
- Replace the four push pin retainers securing the driver side engine compartment trim
- Repeat for the passenger side
-
step 7 :Filling the Coolant
- Connect the vacuum system to the coolant reservoir
- Turn on the vacuum until vacuum level is achieved
- Turn off the vacuum and wait several minutes to check for leaks
- Insert the fill hose into a coolant bottle
- Open the valve to fill the system
- Switch bottles before the first one empties
- Run the engine to remove any remaining air bubbles
- Top off the coolant reservoir
- Replace the cap
Tools needed
-
13mm Socket
Socket Extensions
T20 Driver
Plastic Fastener Remover
7mm Socket
Drain Pan
10mm Socket
Ratchet
Pliers
Pick
Coolant Funnel Set
Hey friends, it's Len here at 1A Auto. Today I'm working on a 2015 Chevy Equinox. We're going to be doing a fan shroud, or fan assembly. It's going to be a fairly easy job. I want to be the guy that shows you how to do it. If you need any parts or instructional videos you can always check us out at 1aauto.com, thanks.
Okay. So, one of the first things that we're going to do is we're going to relieve pressure right here. If the vehicle's been running and it's hot there might be a lot of pressure, and there's going to be hot coolant in there. So, when you go to release this it might want to release pressure towards your face. So, make sure that everything's cool. This engine hasn't been running a while, so it should be good to go. I'm just going to hold it down while I go just in case there is pressure. Cool, we'll remove that.
We'll take a look at it, check to see if the gasket in there looks like it's torn, or ripped, or cracked. It looks pretty decent, don't worry about any of that, it's no big deal. We'll set this aside, take a peek inside. I don't see any creamy colors or anything like that. Sometimes if you look inside your cooling system you'll see a cream, that could be oil, or some other type of contaminant inside your cooling system at which point you would want to make sure that you flush it, okay? This one looks great. So, we don't have to worry about that. We've got the cap off now we're going to go ahead and bring up the vehicle, we're going to raise and support it so it's nice and safe.
Okay, so right here this is your coolant petcock, it's on the bottom of the radiator on the passenger side. We're going to turn this to the left, coolant's going to come out of this little nub right here, okay? It's going to come down, it's going to make a mess, probably splash. So, you want to have a recycling receptacle, something that you can recycle your coolant with. Hand safety, eye safety, okay? Safety first.
I'm just going to take it, I'm going to try to turn it to the left, see if I can break it free. Sometimes they turn, sometimes they don't. If you weren't replacing the radiator, but you were just trying to drain the coolant it might be better just to try to pull the lower hose, because sometimes these do break. In which case, you have to replace the radiator.
So, we've got the radiator draining down there, it's going into our recycling receptacle. We're going to let it continue doing its thing. But, what I want to do is I want to try to get to where the radiator is from up here, okay? So, I'm going to start taking things apart while that's draining. Why waste any time, right?
There's some little push clips here. You just find the little tab, lift up on it, it should just pull right out. The way these work is the center of it pulls up and out from the outer part, and it releases these tabs, okay? So, I'll set this aside. I'm just going to do the same thing, I'm going to pull all these little tabs. If you have one of these little forky looking tools these are great.
Under the edge of this there's going to be some little clips. I'll show you what they look like. There it is. Right here, okay? If you happen to notice that one of these ears right here is missing one of the clips they're probably right inside these slots. If they are just take them out of the slot, put them back on the plastic, that's very important. You can't leave them in here and try to force the plastic in there, it really doesn't work out as well, okay? So, that's easy enough. We'll put this aside, we're going to do the same thing to the other side over there, and then we'll come along the front as well.
So, the headlamp assembly is held in by a few bolts. There's a 10 millimeter head down inside this hole right here. You're going to need something with a long extension I'm sure to get down in there. Then, you have a seven, a seven, and then there's another bolt hidden right behind this fender that we're going to get to in a minute. But, first, we'll take off the top three. Then, we'll go ahead, and we'll try to find the one under there. I'll show you what it looks like, we'll get it out, and we'll keep on rolling from there, okay? So, here we go.
Ten, I'm going to turn it to the left. See if I can grab a magnet down in there. There's our 10, okay? Easy peasy. We'll set this aside, we'll go ahead and remove the others. We've got the seven, seven and then like I said we've got another bolt hidden behind the fender here that I'll show you how to get to in a minute.
I've got our two, seven millimeter head bolts out. One from there, one from here. We can move this around a little bit. So, now I'm going to use a Torx bit 20, that's called a T-20, looks like a little star, it's kind of pretty. I'm going here, I'm going to remove these four. There's what they look like, they're all the same, can't mix them up. Easy peasy. Put those aside. Give this a little tug, it moves nice and easy now.
So, we're going to do some push clips here. We got a push clip right there, okay? There's going to be another one right in front of this tire, right there, here, and here. After we remove those there's a T-20 and a T-20 there, same tool that we used up top we're going to use down bottom. Okay?
So, I got my little forky tool, I got a little pocket screwdriver. I'm just going to see about trying to pull out the centers of these push clips. I showed you how they worked already. And, move down the line. Grab this guy. This one's going to be a little harder to get too, because of the tire. But, I'm sure it can be done. Okay, got our push clips, we'll set is aside. Got our T-20 here, here. They both look the same, easy peasy, can't mix them up. That feels pretty great, just take a peak under here.
We've got that bolt right there. I'm going to grab the size for that real quick. I'll let you know what it is. Once we get that out we're going to do the same exact thing for the other side of the vehicle. Then, we'll lift it up more, and we'll grab everything from underneath.
So, we got our seven millimeter. I'm going to blast this out of here, there it is. Set that aside. Okay, you can give that a little tug, perfect. So, now, like I said, we're going to go do the same exact thing on the other side of the vehicle. We'll raise it up, we'll continue on releasing the rest of this bumper cover, disconnect the fog lights of course, then we should be clear to bring it back down and pop it all right off.
So, under here we've got our fog light assemblies. You can see it from the back side we've got some wiring that goes to the bulb. We're just going to turn the bulb to the left, counterclockwise, until it stops. Then, we're going to carefully pull it out. Let's see, all right. So, something to note, you want to be very careful not to touch on that glass, especially if you've got oily hands or anything like that. Even gloves isn't really the best to touch the glass, so if you can avoid it that's always great.
Take a look, see if it looks like it's black in any way, or discolored, or swollen, or the film inside looks like it's got any crusty buildups on it. If that was the case you'd want to replace it and right on the back of the bulb you can see what the bulb number is, it's a H11 on this particular vehicle. So, I'm sure it is on yours as well if you're working on the same thing. I'm just going to leave this down to dangle, that's a funny word, but anyway we're going to leave it so it can hang like that. I'm going to do the same to the other side.
Then, we'll just go ahead and we'll remove a couple more bolts here. This part right here is part of the inner wheel well that we were taking apart up there. So, we want to remove these two bolts. We're going to continue with our seven millimeter, turn these to the left obviously. Come right along. This little electric took is amazing. Slides out, it's clear to come off. It's got a little triangle here, okay? So, when you pull it off you can see. That just means when you're putting it back together that triangle's going to go back under there, okay? Just holds it and you can put your bolts back in. Easy peasy, okay? Cool.
So, this is wobbling around pretty easily now. I would say we're clear to bring it back down and we'll start pulling it off. We're going to hold our bumper cover, make sure it doesn't want to come loose too much on us until we can figure out exactly what's going on. Now, don't forget we have our fog lamp bulbs just hanging under there, okay? So, the less that we jiggle this around probably the better overall. So, let's see if I can get this off. There we are.
Now, we've removed our front bumper cover. So, since we removed all the top bolts already we are down to just having one left. It's in the third hole down, okay? Just a seven millimeter, same tool we've been using. Turn to the left and get that right out of there, maybe. There it is, about the same as all the rest of them. Put it up where we can find it.
Now, I'm going to take our unit, I'm just going to lift it up. Got a little bit of wiring back here, let's see if I can turn it so we can all see it. There it is, and use our pocket screwdriver again. I love this tool. This gray thing right here is just a lock, okay? So, you want to try to push it in and up, okay? That's all it is. That just prevents this from being able to get pushed like that and pulled out. Now that we have it off just take a peek inside here. This is the wiring harness of course. If you see any funny colors, rainbow colors, rust, debris, water, anything, you want to make sure it's cleaned up or replaced.
So, we've got 10, 10, 10, 10. We're going to go ahead and remove those. There we are, got all four bolts out. They all look the same. Put those aside all in one pile. Grab this, right here is your tranny cooler line, okay? It comes down, connects into the radiator right there. Then, there's another one, a lower one that's down next to the lower hose. We won't worry about that yet. I'm going to show you this one.
This black thing right here, it's just a cover, it's plastic. It can be fragile, and it is important by the way, so if you break it, well, you're going to want to do something about that. Because, underneath it there's this little clamp, it's almost like a C, like that, and it just kind of goes inside this little groove right here, and it holds the line in.
So, what you're going to want to do is you're going to want to take that clamp, separate it, and get it off of there. There's spring tension, so once you get it, it seems like it's coming off, it might come off and go "pewooom" and go some place, we don't know where. So, you want to make sure you wear your safety glasses. You're going to want to have a magnet handy, so once it starts coming up you can just grab it with a magnet, that'll be helpful for you. You can use the tool that's designed for it, it looks something like this. Maybe yours is a little less mangled or maybe you don't even have one, which is fine. All you do is you just put this on the line, like that, and then just kind of turn it and push at the same time until it gets locked in. Then, give it a twist and it lifts up on the little ears of the clamp for you, okay?
You can go about doing it that way, or if you're a regular person and you just don't happen to have this thing, which is pretty possible, or probable, just do something like this. You can take a pick, okay? I'm just going to come around from this side. I'm going to try to lift up on the ear. Once I get this off I'll show you exactly what it looks like. That way it'll be easier to figure out how to do it once you know what it looks like, okay? So, I'll just get this in here real quick and then I'll get my hand out of the way. There we go, okay.
So, I've got my magnet up against the clip now. I'm just going to try to work it off. Okay. So, here's what the clip looks like, okay? Spring tension, [imitates spring noise], bends. If you took it apart, and it's very rusted, and it's very weak, it doesn't have anymore spring tension you'd want to replace this, okay? Because, what this does, I'll put it aside for now, is it holds the line into the little adapter here.
So, now you just pull out the line, the clip sits inside that groove, and grab my screwdriver. There's a groove right here, it goes all the way around, okay? Has little slots. Then, this right here has a lip. I don't know if you can see it with the camera, but there is one. Then, you slide the line in, it goes clip, and then once it locks in you just go ahead, and put that clip, and it sits on the backside of that, okay? So, there's that. That ones off.
We're going to bring the vehicle up. I'm going to do the same thing to the other line that's under there. I can show you that as well if you want. Then, we're going to go ahead and we're going to keep on moving.
So, right here's the other tranny cooler line that I told you about, it goes to the bottom of the radiator. That's this. We got the radiator hose here with a clamp. Okay. So, all we're going to do, we're going to take this plastic off like I told you. Then, I'm going to remove this clamp just like I did the upper one. I'll get the line out of there and we'll move along.
So, right here, this is our tranny cooler lines that we just took off from the radiator, right? This is where they mount to the fan shroud. The fan shroud connects to the radiator. So, we're just going to make sure we have plenty of room with those lines, so they don't get tugged, or pulled, or anything. So, all I'm going to do is I'm going to use, this is just a bent screwdriver, but you can use whatever you've got. We just want to try to separate this so we can get the lines out. There's just a little hooky-do there. See right here, comes out and then back up. It looks almost kind of like it goes up at this angle and it just slides into there, okay? So, now we got the lines so they can move around.
We're going to go ahead and we're going to take off this little radiator hose. So, we're going to move our coolant recycling receptacle over here. Then, we'll take off this clamp and it's going to let coolant out, so watch your face if you're going to be underneath it. Of course, wear your hand protection still. So, here's our radiator hose, the lower hose. There's our clamp. You can use something as simple as pliers if you want. They also have a clamp tool that you can use. Not everybody has access to that, so I'm jut going to go ahead and use something that generally speaking most people do have access to, pliers. A little squeeze, just going to try to work it over a little bit. Okay.
Now, like I said, when we take this off of the radiator there's still going to be coolant inside here, okay? So, it's going to come down, get all in here, come splashing down, maybe get in our face. Please make sure you're wearing safety glasses, eye protection of some sort. I'm going to grab the hose. I'm just going to wiggle it, try to break it free from the radiator. There we are. This is a little anticlimactic. I was kind of thinking more was going to come out, but that's okay. All about safety, not about the fun of it, I guess.
Now, I'm just going to wiggle that lower transmission cooler line, break it free too. Cool. So, here we have the fan shroud, right? We've got our little connector on here. This is on the passenger side. There's also one for the fan on the driver's side obviously. But, I did want to specify that there's two.
So, what I'm going to do is I'm just going to push on this center tab. I'm trying to poke at it with my screwdriver right here just to show you, but what I'm actually going to do is do it with my hand. So, now that I've shown you it I'm going to try to get my hand up in here and give it a little squeeze. I'm going to try to pull, just give the harness a little tug, there we go. Work it out, take a look at it, see if there's any funny colors. I don't see anything that looks out of the ordinary, it looks nice and clean. Perfect. I'm going to go ahead and I'm going to take out this little clip right here, and something like a little forky tool if you have one. Just try to pull it out of the shroud. They got all these little teeth on them that really grip in. Everything's harder on camera I tell you.
Okay, well, I'm going to grab my cutters and I'm going to grab onto it, try not to cut it, but just grab onto it, and then try to pry it. That'll be helpful. Like I said, I'm going to be careful not to cut it. All I want to do is grab it and just give it enough to pry and twist. There we are, still reusable.
There's another one that looks like it's up here. Probably be easier to get from up top, so I'll do that. We can come over to the left side and see if we can find the other one. That one I believe is going to be easier from the top as well. Yeah, that'll definitely be easier from up top. So, we'll go back up top.
So, here we go. We're over on the driver's side now. We've got our electrical connector that leads up to the fan shroud right here. We've got our little clippy-do that holds the wiring to the fan shroud. So, we're going to be removing that and we're going to be taking this off of the fan shroud, okay?
So, to do this, same thing as the other side, passenger side. You squeeze in the center right here, it's a little tab. Then, you just kind of rock it back and forth as you're pulling out. It should slide out. This one right here, I'm just going to use our little fork tool and maybe our cutters again. We're just going to pry it right out. So, here we go. I'm going to stick my hand it and try to use my index finger. There we go.
We always take a look at electrical connectors, make sure there's no funny colors, rust, or rainbow colors. Nothing like that's good in there. It looks pretty great, so that's definitely reusable. If it wasn't we could clean it or replace it, but it looks good.
Now, I'm going to use my little forky tool. I'm just going to try to pry this out of here. There we go, got the majority of it out before it broke. So, I'll just push that back through, and then I'll use whatever's left, and it should hold in well. I'm not worried about it. Perfect.
So, we got both fans disconnected now. That looks great. Show you where we're going next. So, right here the fan shroud mounts to the radiator. There's a 13 millimeter head bolt, okay? Over on the passenger side there's going to be a bolt that looks about the same, 13 millimeter. We're going to remove the pair of these, and we'll set those aside. Then, we'll move on for the next step.
All right, so I got my 13. I've got a small ratchet, a little extension on there. I'm just going to remove this bolt, and then I'm going to go over, and do the same thing on the other side of the vehicle. There it is. Easy peasy. This side's a little bit harder to get to. You've got your upper radiator hose here, your AC lines there.
That's another thing to speak of, is we're going to have to try to finagle the radiator out around some AC stuff. You want to be very careful with any AC lines when you're moving them around. It's under high pressure, and the refrigerant in there is dangerous to your health, of course, and the environment. Save the penguins, and unicorns, and sasquatch, and all them.
There we are, bolt number two. I'll set it with the other one. Just give it a little wiggle, cool. I'm going to lift it up, try to get it out of its hooks on the radiator. I'll show you what I'm talking about. Let's see if I can see them, I can. Grab my little tool, right down, oops, sorry. Right down here, I got my tool. On the radiator there's these little hooks, okay? The shroud just basically sits down inside those. There's one on the driver's side as well, okay? Once you slide it down in there you bolt in the top up here, it's nice and secured. So, there's only two bolts going across the top and then down at the bottom there's the little hooks.
So, now we're going to go ahead, and we're going to use our pliers again. We're going to squeeze this clamp, and we're going to remove the upper radiator hose from the upper portion of the radiator. I'm just using these pliers. I'm just going to grab the hose and see if I can work it off of here, mm-hmm. See if we can get the clamp out of the way. There we go, cool. That down, awesome. Move it out of the way, wherever we need to put it.
We're going to take out these two. We'll just use our 13 that we were using earlier. One bracket there, set that aside. That's what our bolt looks like, put that aside as well. Come right over here, there we are. Same as the other one, ill put them both right next to each other, be super easy to find that way.
When it comes time to put everything together it's nice to have all the bolts that you take apart from a certain job together. That way there when you look at it you can say, "Okay, I've got two of these, and I got two holes. I got four of these, I got four holes." Well, easy peasy. Cool. So, now everything's moving around all willy-nilly. That's kind of nice.
Next, what we're going to do is we want to separate the AC condenser, which is this right here, from the radiator, which is this right here. We've got a bolt there. We'll come across, there's going to be another bolt right behind here, okay? What I'm going to do since they're a little rusted I'm just going to spray them down with some penetrant. I'm going to let them sit for a second and then I'm going to go ahead and try to loosen those up. These are your AC lines that come down, they got right into here, okay?
Even though there's rubber, that makes is so everything's pretty flexible, so you can move stuff around like this, that's always good. There is also a possibility that you might put a tug on something and if you break this line free right here ... like I said before, this is all under pressure. So, you don't want to breathe this in if god forbid something did happen, and it did end up leaking, but you want to make sure that you're safe. Safety first, of course, okay? So, eyes, hands, if it does start leaking make sure you don't breathe in any of the vapors, okay?
So, for this I'm going to use a 13 millimeter ratchet wrench. You can use whatever you have access to. If you needed to you could probably take this plastic shroud right off of here, it's just a little push clip and stuff. I'm not going to worry about that. I have access to a ratchet wrench. So, I'm just going to try to give it a couple bumps and break it free. There we go. I'll remove this bolt completely, and then I'll move over to the other side, and do the same.
We got the passenger side out, I'm over on the driver's side now. I'm going to use my 13 millimeter wrench of course. This one right here's a lot more rusted than the other side. That's why I started with the other side. I sprayed the heck out of this thing with my penetrant and all I'm going to do now is I'm going to turn it a couple cranks to the left and then bring it a couple cranks to the right. Back and forth a bunch of times until I get it so it comes completely out.
I want to be careful not to break the plastic on the radiator, not because I'm worried about the radiator so much as that I need this clip right here, and it might be harder to get off once it's all broken apart. So, we're going to just go ahead and take our time on it and see what we can do. Go team blue. Just try to get that penetrant worked in there, let it do its job. Almost there, see if I can get it out. There we are, bolt number two. We'll set this aside.
Just like the fan shroud when we were putting it into the radiator, the radiator had a little hooky-do. On the other side of the radiator the AC condenser does the same thing. The radiator has a hooky-do, and the bottom of the condenser slides right into it, okay? Once it's slid in you go ahead, and you tighten up the upper bolt, and it locks it in nice and firm. So, since we just removed the uppers, right? The upper bolts, now we can just take this ... I'm going to put down my light. Then, we can do this. That's nice isn't it? So, that's going to release from down there in one second, and we're going to do the same thing on the other side. Once we get it so it's all moving freely we'll move onto the next step.
So, right here there's a little push clip. There's one over there as well. We're going to try to get this plastic piece up and out of the way, because behind here where those forks are, or the little hooky-do on the radiator that the condenser slides into, has a little prong. It's a little locking prong to make sure that you can't lift up on that condenser too much. We need to get to there and move that prong, so we can relieve pressure from the condenser.
So, I'm just going to take out this, use my little forky tool or whatever you happen to have. Just want to try to pull it out. Maybe it'll be easier coming from this side, I don't know. Here we go. All I did from the backside there was just go between the condenser, and the plastic, and push the plastic away, okay? Easy peasy. Come over here, I'm going to do the same thing. I'm going to loosen that there, that little plastic [inaudible 00:28:07], cool. Get this all separated, cool.
So, we're going to grab our little forky tool. We're going to pull out these ones down here. It's just more of these little itty bitty push clips. And, another one over on this side, the same thing, see if I can get it. Nothing special, cool. It's looking pretty good. I just want to try to grab the condenser now, pull it out of the radiator itself, there we are. Cool. Still got more coolant coming, so just tip it a little bit. Try to get out as much coolant as possible. Hopefully we won't get any on us or on the ground, contaminate the environment or anything like that.
The condenser separated from the radiator, hopefully get the fan shroud pushed away enough. So, we're going to just try to move this AC condenser around, right? Make sure that it's free from the radiator. We're going to try to grab our fan shroud, try to move it. You will notice that this clip right here's still kind of attached to the condenser. So, just kind of move it, it gives you more room. That's cool. Grab our fan shroud, try to pull it away from the radiator, nice.
All I'm trying to do at this point is just try to weasel the radiator out without trying to lift up too much on this line. If I lift up on the radiator I could bend this line and then break it some place, and I'm going to have an issue, okay? Theoretically, if you had an AC machine, not everybody has one of those in their garage or driveway, you could hook it up to your AC ports. There's one here, the other one's located around here some place. I could probably look a little harder for it, but I got my hand on the radiator here. So, I'm just going to continue on with what I'm doing, which is trying to get this radiator out of here, right? That's what we're trying to do.
Now, your particular vehicle might put up a little bit different of a fight than this one, because who knows, maybe you got your radiator to get into a different area than me. We all got our own fight to get through here, right?
So, we're going to have to start moving things around. I want to get this out of the way. Hopefully I'm going to get the fan shroud up and out. The hood release is in the way, so I'm just going to disconnect the wiring here, pull that off, and pull this out of here just like that. 13 millimeter, 13 millimeter get it out of the way, okay?
We'll turn these to the left just like everything else. When you're taking it off you turn it to the left. There we go. Two more bolts for our collection. Put them over here, so we can't mix them up with all the rest of them somehow.
Now, I'm just going to see if I can get my fan shroud to weasel its way up and out of here. Hopefully it'll give us some more room to get the radiator out, is my plan. Put a little connector right here or you know, push clip thing. Let's try to get that out of there. There we go. I'll do everything I can not to break this obviously. Cool. Now we've removed our fan shroud.
Okay, so now it's time to go ahead and reinstall our fan assembly here, fan shroud, whatever you want to call it. I'll call it a fan assembly. I'm just going to basically bring it in like this, slide it in. Once I get it down I'm going to try to weasel it like this and then slide it into position where it's sitting in the little hooky-dos on the radiator, and it lines up with the mounting holes here.
Also, these clips right here, let's see if I can show it from the side, they kind of do this, right? Those sit over the lip of the radiator, okay? So, just keep that in mind. So, let's do it. Mm-hmm. Once again I'm going to be careful for the radiator fence. I'm just going to try to pull this. If it doesn't seem like it wants to go far enough, well, maybe just try pulling the radiator up and out of the little slots that it's in, you know? Just move stuff around a little bit, you do you boo-boo. Whatever it takes to get the job done. Nice and easy.
If it seems like it's getting caught on something, well, just work it because it could getting caught on a radiator fin or something. You really don't want that. Mm-hmm, bring her over. Okay, mm-hmm. Cool beans, okay. Loving it, loving it. So, we got that going good. Let's see if we can get this on this side. I don't know if we really have to latch that in, right? We've just got to get the fan shroud up high enough to get it into the hooky-do on the radiator. Close. Let's see if we can move this side. Let's see, it looks good. And, we have this side, looks good.
Okay, now I'm just going to lift it back up. I'm going to try to get these up and over that. So, nice, love it. It's looking great, it's in down there. It's in on that side, I checked it. We've got our hooks, we can go ahead and bolt this in right here, okay?
So, I'm going to grab my bolts. So, we've got four of these. There just little nut inserts, and they slide into the radiator. There's a little slot for them, okay, they just drop right in. You can push them in if you want. They just kind of line up with the hole, okay? There's another one on the backside here. I'm going to do the same thing, I'm just going to slide them in, click it in, it was right there. One right here, you should hear it click in, let me see. All right, one right here, there we go. Cool.
So, now we'll grab our fan shroud bolts. That's these two, we remember when we removed them. Okay. I'm just going to move this around a little bit until it lines up with the nutserts there. That one started in. Now, these nuts that we just put in, they were only mounted into plastic. So, it's easy to over tighten something like this and give yourself big issues down the line. So, basically once it's tight ... Let me get this thing, this fell out. Once it feels like it's snug, and it bottoms just give it maybe a teeny bit more. Just enough so it's not going to come lose on you. But, you definitely don't need to reef on it. I wouldn't use a ratchet any longer than this, just because you don't want to break your new radiator.
If you were going to have to replace it I guess now would be the time where everything's pretty much apart already. You have to say that you want to do it [inaudible 00:37:11]. So, it's pretty much bottomed, just give it a little bit. That's good. Move over to this one. We're using our 13 millimeter socket of course. Okay, bottomed. There we are, nice and snug. We're still in all our little ... we're in the hooky-dos down there. We got our hooks here. A hooky-do down here, feels good. Fan shroud nice and firm to the radiator, perfect.
So, now we're going to go ahead, and we're going to put in our fan wiring, okay? We already checked it, there's no rust or any funny colors in there. We're just going to put them back in the holes we got them from. It should just slide right in, hopefully. Oh, this one goes down here, duh. See if I can get it, there it is. We'll listen for a clip noise, there it is. Give her a tug, feels good. I'm going to do this one. Same situation over here. I'm just going to see if I can ... I'm going to push that end through, there we are. And, my clip, we already checked it, made sure there was no funny colors, rust or anything. Looks great. I'm going to line it up with where it's supposed to go, you'll listen for a click, good. Give it a little wiggle, it's not coming off, wonderful. Let's keep moving.
Let's see, we've got our tranny lines. Put our upper one here, lower one here. Got to switch them around, there we go. Let's see if I got it going the right way. This one's going to go ... if I could get my head out of the way. Okay. All right, so the one that goes to the upper goes on the engine side, basically as it comes around. Then, the one that goes to the lower runs along this way. So, it's not lower one and then upper one, it's vice versa. So, the lower one stays closest, okay? Then, the upper one kind of rides around the outside of that.
So, all you're going to do is you're going to take your lines and line them up where they're supposed to go. When you put these in you have to make sure that you really try to give them a tug afterward, because you can think you got them all the way in and sometimes you just don't, okay? So, I'm going to leave this one off, so we can get it from the bottom, and I can show you what I'm talking about. I'm going to try and get my arm out of here.
I'll do this one real quick hopefully with my little black thing. What in the world is that? Right? Okay, I'm just going to bring it in, try to get it lined up. Now, it can look like I've got it in all the way, but really I don't. I give this a tug, right? I didn't get that lip past our clip. So, I'm just going to push, and wiggle. Sometimes this is much easier when it's actually attached into the vehicle, so that way there you can pry and do all that. There we go, I felt it click in. I can't see any yellow sticking out past there. That ring's definitely in there.
One way to double check really is if this thing you can't push it up and over then you know it's not all the way locked in. So, I'm just going to go like that, slid right over nice and easy, so that means that that clip is in. If it wasn't in it would be sticking out like this and this plastic wouldn't go over. So, we got this one. We have not done the bottom one yet, so keep that in mind. Grab this, work that in, come around, looking pretty good here, can grab our hose if we want, push that in and grab our clamp. We've got our clamp right here. We're just going to go ahead and pinched down on it. We can use our pliers again, they come in handy for a lot of things. See if I can get it one of these times, huh Lynn? Geez. There we go.
Now, it's important to make sure you line up the clamp where it was sitting on the hose, okay? I'll move it back away again, you can kind of see where it was. You want to get it back to lined up to where it was from, okay? Just like when you find a turtle out in the wild, or whatever, it's cute, you want to pick it up, you want to play with it, whatever. You're not really supposed to, but anyway, you always want to make sure you put it back where you got from. Good, so it looks good. That's its home, its happy there, let's put it back. That looks pretty great.
We've got these. Remember how these went? Boom, boom, okay. Looks pretty good. We'll grab our bolts, we'll go ahead and put those in just like that. Do the same thing on this side. We'll tighten them right up. Feels like it's bottomed out a little bit, bottomed out, little bit.
Got our two black bolts there. These go for this. Go ahead and put these in. You should be able to see kind of an outline on these where the bolts were, whether it's just from dust or maybe it was scuffed away from the washer. Let's see if I can move it. You see where it was scuffed right there? So, that's where I want to try to line it back up with. Just like I said before, if you put things back from where you got them from everybody's much happier in the long run. Bottomed out, little bit. Bottomed out, little bit. Cool. Grab this, put our little connector on our lock, click. Shove that in there. Feels pretty great, okay.
So, now we're going to put our condenser onto the radiator. Don't forget we have the hooky-dos on the bottom of the radiator there that go like this. That's where the condenser sits into on the bottom. So, we're going to see if we can lift it up, slide it into the holes, give it a little wiggle. These right here, try to put them through, continuing with our 13 millimeter, there we are. When you're putting these in you want to make sure the bolts don't go through too far, hit up against the radiator. They shouldn't, but life's like that sometimes. Bottomed out, little bit. Feels great, give everything a shake. Yeah, feels great. Cool.
We got our little thing down here, let's see if I can get it maneuvered. Come on baby, okay. Cool. Okay. So, it looks pretty good like that. We'll leave this like this for now until we get everything else situated. I just want to kind of get it up to where it's going to go. We're going to have a couple little push clips that are going to go in, but we'll do those in a minute, okay? Let's go ahead and get underneath this thing. We'll put on the bottom hose, and a couple of other things on the bottom, and we'll continue.
So, we've got our bottom line here. I've got my little black clip, super important like I said. We're going to take this, we're going to see if we can get it lined up with the hole. Wiggle it while we try to push it and see if we can get it in, okay? Sometimes, there it is, it can be a fighter. You just got to keep pressure and wiggle the line around, okay? Little bit this way, up, down, left, right, whatever you got to do to get that line in. It needs to be in all the way though, okay? Transmissions are expensive and that's not as easy of a job, and I might not be the guy that shows you how to do it.
So, I'm going to push this back over. Like said before, if it doesn't go all the way over you know you got an issue. We got our own little clip here, just need to make sure we've got everything lined up the way that it needs to go. Just give this line another little push. I'm going to grab this, I'm just going to spin it, see if we can get it clicked in. All the way around. I can't feel ... looks like not yet on this side. That's okay, just do what we got to do to get it clipped in. Yours might just slide right on. There it is. Double check, make sure it's on all the way. Looks pretty great to me.
We got both our lines in this clip right here, so I'm going to take this, and I'm going to put it back up, lock it in. We got that on there, right? Looks good all the way around, even on the top. Grab this, a little wiggle. I want it to line up to where it was before, keep that in mind, right? So, right here lines up with those little prongs. Okay. Yeah. Feels pretty good, it's not going anywhere.
Time to install this bad boy right here. Call it what you want and let me know, because I don't know, whatever it is. I'm just going to stick these little ears, okay? There's two of them. One hole there, one over there. Just have it be said what I'm doing, because to be able to see it might be kind of difficult. Try to slide it in, that's my plan at least, whether it happens or not ... Okay, cool.
I have some little push clips. We took them out, so they must go in here somewhere. That one looks like it goes right there. That puppy in there. Just going to find all our holes, and we're going to put in all our little push clips. All right, this one right there, see if I can get it in. Looks pretty great. This side right here fell out, that's okay, not mad about it. I had a Snickers today. Cool. My little clippy-do right here, it's going to go onto the power steering cooler just like that and that'll hold that up for now. There's a couple more push pins under there we'll grab in a minute. That looks pretty great.
Let's grab the top piece that goes up here. We'll get that mounted in. Here we are, we got it. Looks like a happy little smile. Going to slide it in like this. You got a bolt hole, bolt hole, bolt hole, bolt hole, bolt hole, bolt hole, bolt, yep, cool. Mm-hmm. Cool. Okay, so that's just going to go on the outside like that, all right.
Now, we know we got four bolts that go across here. We're going to have other bolts that go right here. These are much smaller. So, these are four bigger bolts, we'll grab those real quick. Four bolts, four holes. Let's do it. Mm-hmm, one, just get them started. If you need to you can use a little penetrant in there. Feels good. Just going to do the same to all four of these, there we are. Feels great, it's going nowhere.
We still got our holes lined up. This right here is where our headlight's going to be going in, right? That bolt that we came through to get all the way down in there goes right here. Cool beans. So, here we go. I just wanted to show you on the top ear up here where it slides in up here it's just got a little, like a little prong, okay? Six down goes in that hole, just kind of keeps it anchored, okay? So, when you're putting this in you want to obviously be careful not to mess up the paint on your fender, right?
Well, I guess while it's out I'll show you this actually, sorry. While it was in I could probably do it on my own, but to show you I've got my little clip here, goes right there. So, I'm just going to slide it in. There we are. Just to make sure it's down and in, okay. Grab our lock, there we are. We're locked in. We give the connector a little tug, it doesn't slide out. If it slides out obviously it's not locked in right. Make sure you get it right, okay?
Like I said before, being very careful for the paint on our fenders ... I mean, it's your paint job, you can do what you want. But, I'm going to be careful. I'm just going to try to bring this up, get it into our little hole that I showed you. There it is. Everything's sitting down nice and flush. We've got our hole lined up here, hole lined up there. Looking down in there it's lined up. Let's look along the bottom, make sure we don't have any wires or anything hanging, getting caught. This is still good, that's our little fog lamp, right? That looks like it's lined up.
So, now we'll go ahead, and we'll put in our bolts, and we'll move along. Seven millimeter, nice and snug. There we are. Now, we'll go ahead and do the top ones, get that one down there. We'll do the same to the other headlamp assembly, and we'll get the cover back on.
So, here we go. We've got our bolts for up top. We got our two smalls, right? We used a seven millimeter to take those out. Boom, boom, okay? Then, we have this big one around here, that's the 10, it goes down there, okay? Easy peasy.
So, we can start on the ones that we can reach, why not? Then, all the way down in there is the 10. That one's going to be the fun one to try to get in. So, I don't know, I'm just going to wing it. You want to get it at least on the hole, get my magnet out of there, okay. I got it on the hole. I'm just going to tighten it right down using my 10 millimeter. I don't want to say anything to jinx myself, because I still have to do the other side, but first try. Whoop, whoop.
Okay, just check it, make sure it's all lined up along the fender. This looks pretty great. We've got our one, two, three, four mounting bolts. They're all nice and tight. We'll do the same thing to the other side headlamp and then we'll move along.
So, here we go. We've got our bumper cover. We're going to lift it up on here. We're going to be careful of these edges to make sure that they don't go hitting up against the fender, you know? I mean, this one's a little damaged, but that wasn't me by the way. Just playing, it really wasn't though. Anyway, I'm just going to keep those edges low, and I'm just going to scoop the top in up here. Just get it kind of settled in. I'm going to start a couple of these bolts just to hold it for me. Then, I'm going to work my way along the edges there, get everything settled in along the top. Then, I'll go down to the bottom and do the same thing.
So, what size is this? 20, Torx bit 20. I'm going to keep it loose just in case we have to move some stuff around, right? I just want to make sure that it can't fall down, hit the floor, damage anything, hurt me. Here we are. Let's see, this I think ... no that went on top, yep. See if I can get it in there. That doesn't go there oh well. Like I said, I'm keeping all these loose. I'm just starting them in, so I can move everything around as I need to, okay? Nice and loose.
Okay, it's coming along here. Right up along the headlamp we have the little scoops, right? Then, you come over here, and you got a little clip, clip, clip, clip, clip. Okay? So, that's where you're bumper's going to want to ride in. So, you're going to need to bring it up, bring it right up along your headlamp. The bumper cover itself has all these little slots in it, right? That's where those clips are going to want to ride. So, you're probably going to need to give it a little tug just to get it in to where it needs to go. Okay. Looking good, and do the same thing to the other side.
So, we've got the bumper all lined up. It looks great, couldn't ask for better really. I'm just going to take my Torx bit 20, snug these puppies up. Very nice. All right, now lefts lift it up to our working height, so we can get to those wheel wells. We'll get all those put together, then we'll bring it all the way up, we'll plug in our fog lights, and finish up along the bottom.
So, we remember that we had the one, seven millimeter head bolt, it goes right up through here, right? It goes through the bottom of the bumper cover up into the fender. So, I'll just use my little tool, you can use a ratchet, whatever you got. I'm just going to find the hole here, there it is. Nice and snug, okay. And, grab this, slide it back into position here, okay.
So, now when we look at it you can see behind there there's a metal piece. That's where there's a screw. This one's just a big gaping hole, that's a plug, screw, hole, hole, hole. All right, so let's see what we got for parts. We got two screws, perfect. I remember saying we needed two screws, and we got four little push clips. So, we didn't lose anything, we're doing all right. There we are. Let's do the push clips first, because they'll kind of keep everything kind of, generally speaking, where it should be, right? Then, we can worry about putting in all those screws after. There we go.
So, two screws. I'm just going to grab my little Torx bit, I got it right here. Sticking with my 20, okay. Turn the wheel, no I'm not. See if I can get this in. I'm going to grab a ratchet, I'll finish that one off in one second. There we are. Okay, grab my ratchet. Feels great. Okay, all those are still in, perfect. We'll do the same to the other wheel well, and then we'll bring it up and continue.
So, now we're going to put in our fog lamps. Once again we're going to be very careful not to touch that glass, okay? We'll just check them one more time, make sure the filament's not broken. We did a lot of moving around. I'm just going to take it and put it up in here. Just start by going all the way as far counterclockwise as I can. Then, I'm going to turn it to the right, so it locks in. It should be straight up and down in the locked in position, okay?
So, ill come over, I'll do the same thing over here. Check it, looks pretty great. The filament's not broken, nothing moving around. I didn't touch the glass. I'm going to bring it over, I'm going to turn it all the way counterclockwise as far as I can until it grabs, then I'm going to bring it back to the right. Once it sets in I'm going to bring it down, it's locked, it's in the straight up and down position. All ears are in, cool.
So, now we're going to grab this. We got our little triangle ear here. It's going to slide over that just like this, sets in. We're going to do the same thing to the other side. W'e;ve got two bolts, okay? Easy peasy. So, I've got my bolts. I'm just going to take them, and I'm just going to put them in, good.
So, now it's time to put these up along the top, right? Got our little clips here, right? Like I said, if you looked at this, and you didn't see the metal clip it's probably inside these holes right here. If that was the case you'd want to just take them out, okay? You can use something like a pocket screwdriver or whatever you have to do. Get them out of there, put them back on this, okay? You can't just go ahead and put this plastic into those metal clips if they're down there. They just don't like to work that way.
So, anyway, we're going to line up these with these holes. Being careful not to scratch any of our pain. Just like always we're trying real hard to do a good job here. That one slides under there, put this up here, get our holes lined up. Just give it a little bonk, bonk, bonk. It slid in there, okay. We've got four push clips. One here, one there, here, and there, okay? You can do them in any order. You do you boo-boo. Slide them in and then push in the center, okay? Slide it in, push in the center. Now, onto the last, slide it in, push in the center. Put this under here, that should go right in there. Very nice.
Okay, and get this puppy lined up. There's just a little hole in it right there. That slides over this, okay? It's just kind of like a rain drip guard type of deal. There we are. Looks pretty great. We'll do the same to the other side and then we're all set. So, I've got my little push clips. I'm going to put them through the little plastic piece and into the bottom area of the radiator. Couple little holes there, so that's where they go. Boo-yah.
Okay, so a quality tool we sell here at 1A Auto is a little refills kit. It's got a whole bunch of neat stuff in here, all sorts of adapters, and pretty much every little do-dad that you might need to be able to fill this cooling system. This is really sweet, and it's great for if you're in a pinch. If you're doing it in your driveway, and you don't have access to all the tools that you may or may not need this is wonderful right here. Here's the part number, whatever you may need is probably inside there. It comes with a whole bunch of do-dads.
I'm going to set this aside. I'm going to show you something a little bit different, because I have access to it. This right here is just going to ... I'm going to hook up an air line to it, it's going to create vacuum throughout the whole system, suck out as much air as it can. Once it creates as much vacuum as it can, it's up past the 25, and it's sitting still, it's not going any higher, I'm just going to pinch off the air, and I'm going to let it sit there for a little while. That's going to let me know if there's a leak in here, like a vacuum leak of any sort.
So, basically if there's a place that air can get into the cooling system or coolant can get out of the cooling system this is going to tell me, okay? It's really wonderful. Also, I can fill the cooling system with it afterward as well. So, that's pretty neat. I'm just going to do this. I'm going to pinch this off, we'll watch our little gauge go up. You want it to be up above the 25. If it stays inside the red, or even the yellow, that's really not so good. Odds are once we turn off the air and pinch off all the lines it's just going to drop right down to zero over time. So, it seems like it's pretty much holding still right about there, it's not going up any further.
Now, what I'm going to do is ima just going to pinch this off. Going to turn that, I'm just going to sit, and I'm going to watch the gauge for a little bit. Some people will say five, some people say 10, some people say 15 minutes. It's your prerogative what you want to do. The longer you wait, obviously, the more you'll be able to tell if there is a leak that's going to cause an issue down the line. So, I would say at least wait five minutes. If you don't have 10 to sit around and hang out, five minutes is the minimum, okay?
In this time you can do something like, I don't know, get the coolant that you're going to need. All right, you can go with something like this. This is the orange coolant, it's recommended for GM cars, trucks, it's the Dex-Cool, okay? So, it's very important to make sure you use the right coolant. You don't want to go ahead and use the green or anything like that in this particular vehicle. Go with whatever's recommended by the manufacturer, okay? Super important.
So, now I got my coolant. I'm ready to go. I'm going to use this hose, which is the one with the little screen on it. I'm just going to put it in. I marked the hose how far into go, so that's kind of cool of me, right? Yeah. Anyway, I'm going to flip this. Now, the vacuum that I just created inside the system is going to just pull the coolant from inside this jug and fill up all the holes and everywhere inside the cooling system, okay?
This is going to help prevent giant air bubbles inside the cooling system. A lot of time if you fill it with just like something like the funnel that we showed you, you might get some big air bubbles. And, you start up the vehicle, and once you start it the impeller on the water pump with start spinning, and it'll turn your big air bubbles into little air bubbles, and you'll notice it'll take forever for you to be able to burp out all the cooling system.
So, I just go with something like this if I have access to it. If I didn't, and it was a pinch, and that's all I had I would definitely use that funnel system that we have there, because it is a really nice kit. You can actually use it even after you do this, you know? Once I do this I can set it up, and I can put it on here, and just run the vehicle, and let it burp out all the air. Can go and do it that way if I want to. So, I'm just going to let it do this, making sure that I don't let it suck the container dry and cause air to go inside the system here. That's going to defeat the whole purpose of doing this in the first place.
So, now I'm going to take my tool off of here, make sure that I keep all the coolant. I don't want to get any on the ground. I'm going to rinse this off and what we're going to do next ... what we are going to do next, sorry, is we're going to make sure that this is safe. We're going to put our recycling receptacle underneath there, and we're going to run the vehicle. We're going to let this burp out any air that's left in there, then we'll test the coolant, make sure it's where it's supposed to be.
Get that topped off real quick. We're going to run it for a little while, maybe 10, 15 minutes, let it get nice and hot, burp out any air that's in there. Then, we'll recheck it. Once it's good we'll close it up. All right, that's warm, just ran it. It's up above where the cold fill is. When it's hot it should be up inside here, so it looks like we're nice and full. Perfect. We got our cap, we already checked it, looks good. Go ahead and close it up. Now, we're clear for a nice road test.
Thanks for watching. Visit 1aauto.com for quality auto parts shipped to your door. The place for DIY auto repair. If you enjoyed this video please click the subscribe button.
Shop Products
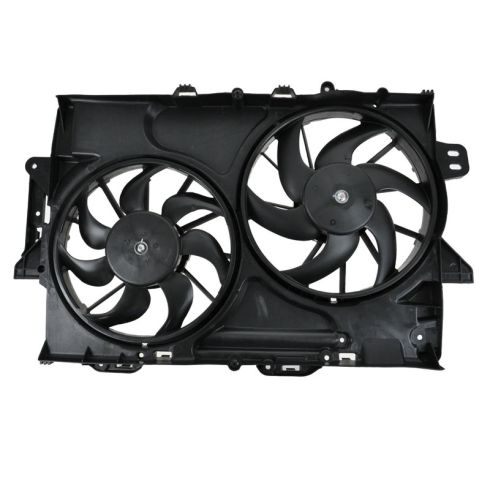
2010-17 Chevrolet Equinox GMC Terrain Dual Radiator & Condenser Fan Assembly TRQ RFA83555
Part Details:
- 2

How to Replace Radiator Fan 2009-17 Chevy Traverse
How to repair, install, fix, change or replace a broken radiator fan. If your car overheats or runs hot and the radiator cooling fan will not turn on then this may be your solution. This video shows the process for the 09, 10, 11, 12, 13, 14, 15, 16, 17 Chevy Traverse, GMC Acadia, Buick Enclave, or Saturn Outlook.
