How to Replace Radiator Cooling Fan and Clutch 1990-2004 Ford Ranger V6 4-0L
Created on: 2016-09-26
If the cooling fan or cooling fan clutch has failed, watch this video and learn how to replace them. Follow the steps and do it yourself!
-
step 1 :Removing the Intake Tube
- Remove the Phillips head screws from the throttle body cover
- Remove the 7mm bolt from the throttle body cover
- Loosen the two clamps on the intake hose
- Remove the intake tube
-
step 2 :Removing the Radiator Fan and Shroud
- Remove the 36mm fan clutch nut
- Some of these next steps are necessary if you don't have the fan clutch nut removal tool
- Familiarize yourself with the route of the serpentine belt
- Insert the 3/8 inch drive ratchet into the tensioner
- Turn the tensioner clockwise to tighten the belt
- Remove the two 10mm bolts on the water pump pulley
- Remove the 36mm fan clutch nut
- Remove the two 10mm bolts atop the fan shroud
- Remove the fan and shroud together
-
step 3 :Removing the Clutch
- Remove the 10mm bolts from the fan
- Remove the fan from the clutch
-
step 4 :Installing the Clutch
- Insert the fan over the fan clutch
- Tighten the 10mm bolts to the fan
- Torque the bolts to 15 foot-pounds in a crossing pattern
-
step 5 :Installing the Radiator Fan and Shroud
- Insert the fan shroud into place
- Turn the 36mm nut a couple of threads and hand tighten it
- Reinstall the two 10mm bolts atop the fan shroud
- Insert the 3/8 inch drive ratchet into the tensioner
- Turn the tensioner clockwise to tighten the belt
- Tighten the fan clutch nut
- Tighten the two 10mm bolts to the water pump pulley
-
step 6 :Reinstalling the Intake Tube
- Insert the intake tube into place
- Tighten the hose clamps with a flat blade screwdriver
- Reconnect the breather hose
- Insert the cover into place
- Tighten the Phillips screw to the cover
- Tighten the 7mm bolt to the cover
Tools needed
-
Adjustable Wrench
Socket Extensions
Flat Blade Screwdriver
Phillips Head Screwdriver
7mm Socket
10mm Wrench
10mm Socket
3/8 Inch Drive Ratchet
Brought to you by 1AAuto.com, your source for quality replacement parts and the best service on the Internet.
Hi, I'm Mike from 1A Auto. I hope this how-to video helps you out, and next time you need parts for your vehicle, think of 1AAuto.com. Thanks!
In this video we're going to be working with our '01 Ford Ranger 4.0 Liter V6. We're going to who you how to remove and replace your fan or your cooling fan clutch. These parts go together. They come out the same way. It's the same four bolts to change them out regardless of which actual piece you're changing or if you're replacing it with a whole new assembly.
If you like this video, please click subscribe. We have a ton more information on this truck as well as many other makes and models. If you need these parts for your vehicle you can follow the link down in the description over to 1AAuto.com.
Here are the items you'll need for this repair: Phillips screwdriver, 7-10mm socket, 3/8 drive ratchet, socket extension, flat blade screwdriver, 10mm wrench, adjustable wrench, 36mm wrench, and a clutch fan removal tool.
We're going to remove this cover over the throttle body. Use a small Phillip's head screwdriver to remove these two screws, and a seven millimeter socket and ratchet for the bolt in the back. Remove the cover from the intake.
We're going to use a flat blade screwdriver to loosen these two screw-type clamps on our intake tube. We'll then wiggle the tube off of the MAF sensor on the throttle body, and remove it from the vehicle. You'll also have to remove this breather line from the back, so we'll remove the intake tube from the throttle body. And the MAF, pull it straight off the breather and remove it from the vehicle. Ideally, you'll want to use a thirty-six millimeter wrench or clutch fan removal tool, to remove the fan clutch nut from the front of the water pump, but we're going to show you how to remove the fan clutch nut if you don't have the special tools.
Your serpentine belt tensioner is located on the passenger side of the engine, just below the alternator. At the bottom, there's a 3/8 square drive, which we'll use the end of a 3/8 drive ratchet for. We're going to pull it clockwise to put more tension on the belt, as opposed to going counterclockwise, like we would to remove the belt. Then we'll use a long, 10 millimeter wrench to remove two of the bolts on the water pump pulley, and get us some room to get a wrench on there, and remove the clutch fan.
We'll break the two bolts loose with the tension on, and remove it the rest of the way by hand. Once the bolts are loose, you should be able to take them right out by hand. With the bolts out of the way, you can put the thirty-six millimeter wrench, or an adjustable if you don't have one, loosen the nut, and remove it the rest of the way by hand. Remove the two ten-millimeter bolts at the top of the fan shroud with a socket and ratchet. Grab the fan and the shroud together, pull up, and remove them from the vehicle.
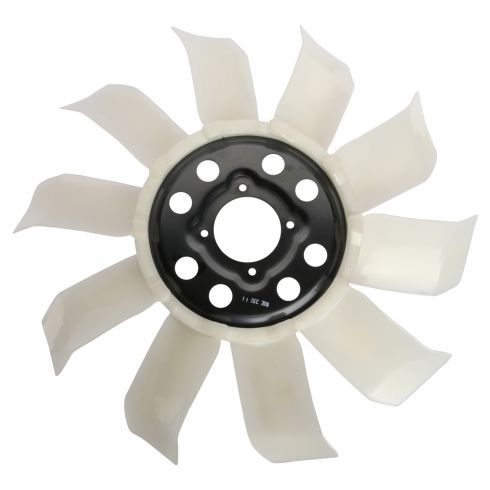
We have a new plastic radiator fan from 1A Auto that we're going to change out. But this process is going to be the same regardless of whether you're changing your old clutch into a new fan or putting a new clutch into your old fan. We use a ten millimeter socket and ratchet to remove these four bolts. Remove the fan from the clutch. We can now either install our new fan onto the old clutch or put a new clutch into our old fan.
Here we have our old radiator cooling fan that we removed from our truck and our new part from 1AAuto.com. As you can see there are some aesthetic differences here but the size of the fan and the direction of the blades are the same so it's going to go in and work just the way it should. We have a universal bolt pattern here so this will fit a few different vehicles including our Ranger so this new fan from 1A Auto will go into direct fit, just like your original equipment and fix you up right.
Layer fan back over the fan clutch. These smaller holes are the correct ones for our '01 Ranger, so we'll start those bolts off. This does sit a little bit deeper than our factory unit so you are going to have to lift up on the clutch here. It's not just going to lay in flat like it did with our old one but that's no big deal. The manual shows that these bolts can be torqued from fourteen to nineteen foot pounds. We're going to go ahead and torque them to fifteen just to be safe. It's only a ten millimeter bolt. We're going to torque these just the same way you would torque a wheel. Going to go across and across this way to make sure it gets tightened down flat. It doesn't pinch on one side. Rotate out of balance and create a vibration.
We'll reinstall our fan shroud. A little tricky to sneak past the transmission lines. We'll lay our fan shroud back. Sneak our fan in. Reinstall it onto the threads on our water pump. You may have to physically turn the nut for the first couple of threads. You may have to turn the nut a few time by hand to get it started on the threads.
Once it's going, we can spin the entire fan assembly to get it on the rest of the way. We'll set our fan shroud into the tabs at the bottom, and reinstall the two ten millimeter bolts at the top. Tighten the bolts down with a ten millimeter socket and ratchet. We've got our 3/8 drive ratchet and our tensioner again. We're going to turn that clockwise to put a little extra tension on the belt.
Put our adjustable wrench onto the fan clutch nut, and tighten that down as best we can. Now, we'll take that same wrench and rotate this around a hundred and eighty degrees or so, whatever you need to do to get to the other two water pump bolts and reinstall them.
We'll start our two ten millimeter bolts in by hand. We'll put the tension back on the belt, and snug up our ten millimeter water pump pulley bolts. Reinstall the breather line and both ends of the intake tube to the throttle body and the air box. Tighten down the clamps with a flat blade screwdriver. Reinstall the engine cover. We'll tighten down the front two screws with a Phillips head screwdriver, and the rear with a seven millimeter socket. You're ready to go.
Thanks for tuning in. We hope this video helped you out. Next time you need parts for your car, please visit 1AAuto.com. Also check out our other helpful how-to and diagnosis videos.
Shop Products

How to Replace Radiator Cooling Fans 2008-12 Ford Escape
How to repair, install, fix, change or replace a broken dual radiator fan. If your air conditioning doesn't work, this may be your solution. This video shows the process for the 08, 09, 10, 11, 12 Ford Escape
