How to Replace Radiator Cooling Fan 2005-10 Pontiac G6
Created on: 2013-08-02
Watch this video if you need to replace the radiator cooling fan on your 04-10 Pontiac G6. Learn how to do it yourself and save some money!
-
step 1 :Disconnecting the Battery
- Remove the battery cover
- Disconnect the negative battery cable
-
step 2 :Removing the Engine Cover
- Twist off the oil fill cap
- Pull off the engine cover
- Twist on the oil fill cap
-
step 3 :Removing the Headlight
- Remove the plastic clips from the bumper cover
- Remove the two 7mm bolts from the passenger side headlight
- Pull the headlight up and out
- Disconnect the headlight wiring harness
-
step 4 :Removing the Radiator Closeout Panel
- Remove the four 10mm bolts from the radiator closeout panel
- Pull the panel forward
- Remove the three 10mm bolts from the hood latch assembly
- Pull the clips out of the radiator panel with needle nose pliers
- Pull the hood latch forward
- Pull off the radiator panel
- Pull the hood latch aside
-
step 5 :Removing the Air Duct
- Pull the pin out of the air duct with needle nose pliers
- Pull the air duct forward and out
-
step 6 :Pulling the Radiator Aside
- Remove the two 10mm bolts from the radiator mounts
- Pull off the radiator mounts
-
step 7 :Removing the Air Intake Hose
- Loosen the two hose clamps on the air intake hose with a flat blade screwdriver
- Loosen the top air intake hose clamp with pliers
- Pull off the air intake hose
-
step 8 :Disconnecting the Radiator Hose
- Have a drain pan ready
- Loosen the upper radiator hose clamp with pliers
- Pull the radiator hose off the radiator inlet
- Allow some of the fluid to drain
- Put the hose aside such that it stops draining
-
step 9 :Removing the Radiator Fan
- Disconnect the air bag sensor wiring harness safety clip
- Disconnect the alternator wiring harness
- Disconnect the airbag sensor wiring harnesses
- Remove the 10mm nuts from the ground straps
- Pull the ground straps off of the radiator support
- Unclip the transmission line from the radiator fan
- Disconnect the radiator fan wiring harnesses
- Pull the radiator off of its bushings
- Pull the radiator away from the radiator fan
- Unclip the radiator fan from the radiator
- Slide the fan to the passenger side
- Tilt the fan forward
- Pull the fan up and out
-
step 10 :Installing the New Radiator Fan
- Make sure the radiator fan has a clear path
- Angle the fan into place
- Slide the fan into place
- Clip the radiator fan to the radiator
- Clip the transmission line to the radiator fan
- Connect the radiator fan wiring harnesses
- Connect the alternator wiring harness
- Put the ground straps onto the radiator support
- Fasten the 10mm nuts onto the ground straps
- Connect the air bag sensor wiring harnesses
- Clip the air bag sensor wiring harnesses into place
- Connect the air bag sensor wiring harness safety clip
-
step 11 :Positioning the Radiator
- Push the radiator onto its bushings
- Put the passenger side radiator mount into place
- Start the 10mm bolt into the radiator mount
- Push the radiator hose onto the radiator inlet
- Push the radiator hose clamp on with pliers
-
step 12 :Reinstalling the Radiator Mount
- Put the hood latch into place
- Put the driver side radiator mount into place
- Insert the 10mm bolt into the radiator mount
- Tighten both radiator mount bolts
-
step 13 :Reinstalling the Air Duct
- Make sure the hood release cable stays routed underneath the air duct
- Push the air duct into place
- Push the pin into the air duct
-
step 14 :Reinstalling the Hood Latch
- Put the radiator panel into place
- Start the three 10mm bolts into the hood latch
- Position the hood latch
- Tighten the three 10mm bolts
-
step 15 :Reinstalling the Headlight
- Connect the headlight wiring harness
- Push the headlight into place starting on the inside
- Insert the two 10mm bolts into the headlight
-
step 16 :Reinstalling the Radiator Panel
- Push the two pins into the radiator panel
- Insert the four 10mm bolts into the radiator panel
- Push the plastic clips into the radiator panel
-
step 17 :Reinstalling the Air Intake Hose
- Push the air intake hose into place
- Push on the air intake hose clamps
-
step 18 :Reinstalling the Engine Cover
- Twist off the oil fill cap
- Push on the engine cover
- Twist on the oil fill cap
-
step 19 :Reconnecting the Battery
- Reconnect the negative battery cable
- Push on the battery cover
-
step 20 :Refilling the Coolant
- Add coolant to the reservoir using a funnel
- Run the car briefly
- Fill the coolant as necessary
Tools needed
-
Flat Blade Screwdriver
Phillips Head Screwdriver
8mm Socket
7mm Socket
9mm Socket
10mm Socket
Slip-Joint Pliers
Ratchet
Flashlight
Needle nose pliers
Brought to you by 1AAuto.com, your source for quality replacement parts and the best service on the Internet.
Hi, I'm Mike from 1A Auto. I hope this how-to video helps you out, and next time you need parts for your vehicle, think of 1AAuto.com. Thanks.
In this video, we're going to show you how to replace the radiator fan in this 2007 Pontiac G6, pretty much the same for a 2005 to 2010 G6, as well as the Saturn Aura. A radiator fan should come on when the AC is on or when your engine gets to a certain temperature, usually 210 degrees Fahrenheit. If the radiator fan isn't coming on, check the relay, check the fuses and if that's not working then, most likely, your fan needs to be replaced. For this repair, you're going to need a new radiator fan from 1AAuto.com, 7 to 10mm sockets with ratchet, Phillips and flat blade screwdrivers, pliers, flashlight and a drain pan.
Start out by removing the cover that's on the battery and then disconnect the negative battery cable. It's the black cable, or the cable that's closer to the front.
Remove the oil fill and lift the engine cover up and off and replace the oil cap.
You're going to start out by removing a series of clips at the top of your bumper cover right over the grille. For these clips, as you can see, work your screwdriver underneath. Pop up the middle of the clip and then the rest of it will pull out and it may stay behind, so you may use the screwdriver and pry out the second part of the clip.
Now, remove the two 7mm bolts that hold the two tabs at the top of the headlight. Pull on the outside of your headlight, there's a ball and socket on the outer corner that will stick in there. Then, kind of force your headlight into the inside of your bumper cover. Pull it up and out, and then disconnect it.
Now, there are few 10mm bolts at the top of your radiator support closeout panel, remove those. Then, you can pull out slightly on that panel and there are three 10mm bolts that hold your hood latch assembly in place. You want to remove those. You don't have to do this. You can get that closeout panel off there without doing this, but, if you take off the latch, it just makes it that much easier. Then, move that latch and pull that closeout panel right out, and just move your hood latch out to the side and away. Now, you need to remove the engine air duct by removing the pin there, and then you can reach under and pull that duct forward and out.
Two bolts hold the upper radiator mounts in, those are 10mm and I'll fast forward here as we'll just remove those and take the mounts out and put them aside as well. There are two clamps that hold the intake hose on, and the first one is over there. Tthis one, a little hard to see, but the screwdriver's right down on it there. I'll fast forward as we loosen up the two clamps and then take a pair of pliers and there's a squeeze clamp on the top. You can remove the intake duct.
Position a drain pan underneath, and then, with a pair of pliers, you can have easy access to this radiator hose clamp. Squeeze the clamp and then move it back off of the radiator inlet and onto the hose. Now, reach in. What we want to do is to kind of try and twist the hose on to break it free from the plastic radiator inlet and then as you start pulling it out, some of the fluid will come out and you can allow some of it to drain and then pull the hose up and out. If you just walk it up there, it won't leak anymore.
Now, there's a series of electrical connections. To undo the safety clip there, unplug that. Then for the harness that's in the alternator, unclip that, and the further out of the way you move all these harnesses, the better off you'll be. A lot of times, they just get caught up on the radiator fan as you try to lift it up and out. Then, up top, there are the airbag sensors. They have little safety clips that pull out and then disconnect them. You also want to remove the clips from the radiator support and then just move that harness out of the way. There are two ground nuts. Just remove the nuts and remove the ground straps off the radiator support there. For the transmission line that runs down the driver side, pop it out of the clip.
Disconnect the fan on the left side. There's a little tab that you push up and pull out and then there's also a clip that you want to undo. It's the same thing on the other side; there's a tab you pull up. You pull it out and move those to the side. Now, what we're doing here is . the radiator is down in a couple of cushions. What you want to do is pull it up out of the cushions first and kind of remove the radiator towards the front of the vehicle. That just gives you a little extra clearance. Then, you hold the radiator down and pull the radiator fan up and it unlocks from some clips that are in the radiator. Then, you have to . there's tabs on the radiator fan that you've to get by the hoses. So, you kind of have to move it over to the driver side of the car first, actually, over to the passenger side first, to get the tabs up and around. Then move it back towards the other way and pull the tabs up around and then start pulling it out. Now, tilt the radiator fan forward. It's just a matter of getting it pass the clips. Making sure none of the wiring harnesses get stuck on it. The better you tuck them out of the way, obviously, the better off you'd be. There's limited clearance between the radiator support and the AC, but you pull it up through there. Again, if you're encountering a little too much force, just look down in there. You can see we found a harness that was catching on it. Pull that harness out of the way and it'll come up and out.
Before putting the new fan in, just make sure you tuck any wires down and out of the way. Angle the bottom of the fan down in towards to the radiator and then just, gain, make sure it's not getting caught up on anything. Slide it down in. It does require a little bit of force and then once you get it kind of underneath the radiator crossmember, remember you need to move it side to side to get the tabs around the hoses. It's somewhat in place. There's two tabs on each side, you can see right there. Make sure you press it towards the radiator. Lock it down to the tabs. Do the same thing: press the fan assembly towards the radiator and lock it down into the tabs.
Put that transmission line back into its clip. Now, you can reconnect. Start by reconnecting the fan. Make sure you put all the clips back in place that hold the wiring harnesses, so they don't caught up on anything. Reconnect the alternator, and the other connections and also make sure you now reconnect those two ground straps and tighten those nuts up. Reconnect all the airbag harnesses and again, make sure that all the clips are back in place.
Make sure that you get the radiator back into its lower support grommets. You should feel it push down into the rubber grommets and you can start installing the passenger side radiator bracket. Here, we kind of preposition the hose clamp and then put the radiator hose back on the radiator. Pinch the clamp with the pliers. Push the hose on and make sure it's nice and secure. Make sure it's all the way on to the inlet too, in the radiator and clamp is nice and secure.
Make sure you take your cable and latch mechanism. Put it in or just get it routed correctly. Then, put the driver side radiator support bracket on and then tighten them both up. Make sure the hood latch cable is properly routed. It should go underneath the air inlet duct. Reinstall that air inlet duct. Put it in the place, and then, there's a pin that holds it to the radiator support bracket.
Put the upper closeout panel in. You have to pull the bumper cover out and while it's still loose, you're going to want to reinstall the bolts that hold the hood latch support in. I'll go really fast through that. Having it loose just allows you more clearance to get those bolts for the hood latch support back in. Before you tighten up the hood latch you can see the little places where the bolts were, so just slide the hood latch into the same spot on the bolts and then tighten it up. This will help you get a good alignment on your hood. If you should close the hood and it looks too low, then, you'll loosen up the hood latch support or the hood latch and just move it up a little bit. If it's too high, loosen it up, and move it down a little bit.
Reinstall the head light. First connect it, and then, you're going to slide the inside in place behind the bumper cover a little bit first and then push the outside and make sure that that tab lines up. Push it outside in and secure it with the bolts.
Reinstall two clips that hold the closeout panel, underneath the bumper cover. We'll keep fast forwarding here as we put the bolts that hold that closeout panel back on, on top and as well, we'll put the clips back in place. The clips, they're usually two piece. Make sure that the center is pulled about a quarter of inch out and then, put the clips down and in and then push the center down to lock them.
Put the intake hose or ducts back in. Make sure you connect it to the air filter box correctly. Connect it to the throttle body correctly. Use some pliers and re-clamp the tube on top, and then make sure you tighten up the clamps nice and firm.
Reinstall the engine cover by removing the oil cap. Put the cover back on, replace the oil cap. Reconnect the negative battery cable and reinstall the battery trim box. Make sure you re-add the coolant. We're using a funnel that has a filter in it. Put the coolant back in it. Run the car for a little while, check that fluid level, and make sure you refill it as necessary.
We hope this video helps you out. Brought to you by www.1AAuto.com, your source for quality replacement parts and the best service on the Internet. Please feel free to call us toll-free, 888-844-3393. We're the company that's here for you on the Internet and in person.
Shop Products
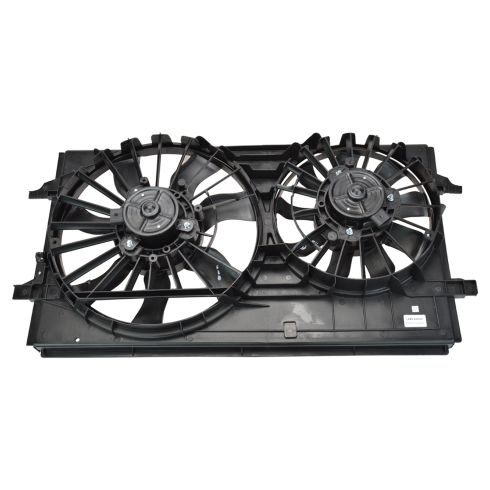
Chevrolet Pontiac Saturn Dual Radiator & Condenser Fan Assembly TRQ RFA83392
Part Details:
- 2
How to Replace Radiator Cooling Fan Assembly 2007-13 Chevy Silverado 1500
If the radiator cooling fan is broken or malfunctioning, watch this video and learn how to do it yourself
