How to Replace Radiator Assembly 2000-07 Ford Focus
Created on: 2019-07-20
Watch this video to learn how to replace the radiator on your 00-07 Ford Focus. 1A Auto shows you step by step, so you can do it yourself!
-
step 1 :Removing the Radiator
- Disconnect the lower radiator hose from the radiator
- Allow the coolant to drain into a drain pan
- Remove the oxygen sensor wiring from the retaining clip on the radiator fan assembly
- Remove the radiator fan wiring harness from the retaining clips
- Remove the wiring harness retainers along the top of the radiator fan assembly
- Disconnect the five radiator fan electrical connectors
- Pry up the air collector push pin retainers to move the air collector aside
- Pry to release the two radiator fan assembly mounting tabs on each side
- Release the wiring from the retaining hook on the fan assembly
- Lower the radiator fan assembly out the bottom to remove it
- Disconnect the upper radiator hose
- Disconnect the overflow tank hose from the top passenger side of the radiator
- Disconnect the hose from the middle of the passenger side edge of the radiator
- Release the transmission cooler from the mounting tab on the radiator on each side
- Remove the 10 mm bolt to remove the horn from the radiator support bracket
- Disconnect the horn electrical connector
- Support the radiator support bracket
- Remove the two 10 mm bolts on each side of the radiator support bracket
- Pry the wire retaining clip from the radiator support bracket
- Remove the radiator support bracket while continuing to support the radiator
- Slide the radiator and AC condenser away from each other to remove the AC condenser from the mounting tabs of the radiator
- Lower the radiator down to remove it
-
step 2 :Installing the Radiator
- Transfer the four rubber mount bushings to the new radiator
- Lift the radiator up into position and rest it on the support
- Seat the transmission cooler into the mounting slots on the radiator
- Slide the AC condenser into the mounting clips on the radiator
- Reinstall the radiator support bracket and secure it with the two 10 mm bolts on each side
- Reinstall the horn onto the radiator support bracket with its 10 mm bolt and reconnect the electrical connector
- Raise the radiator fan assembly onto the radiator and seat it on the mounting tabs
- Reconnect the oxygen sensor wiring retaining clip to the fan shroud
- Reconnect the lower radiator hose
- Reconnect the middle passenger side hose
- Reconnect the wiring retaining clip on the passenger side of the radiator support bracket
- Reconnect the five electrical connectors of the radiator fan harness
- Reconnect the coolant reservoir hose
- Reconnect the upper radiator hose
- Reposition the air collector and secure it with the push pin retainers
-
step 3 :Refilling the Coolant
- Use a vacuum system to apply vacuum pressure to the coolant system, and check for leaks
- Use the filling tube of the vacuum system to refill the coolant
- Attach a coolant funnel to the reservoir and add coolant to the funnel
- Run the engine with the heat on to work any remaining air bubbles out of the system
- Plug the funnel to remove it
- Close the coolant reservoir
Tools needed
-
Socket Extensions
Torque Wrench
Jack Stands
Plastic Fastener Remover
Hose Clamp Pliers
Drain Pan
10mm Socket
Ratchet
Floor Jack
Pliers
Coolant Funnel Set
Hey, friends. It's Len here at 1A Auto. Today I'm working on a 2001 Ford Focus, and I want to show you how to do a radiator. It's going to be a very easy job. I want to be the guy that shows you how to do it. If you need this or any other part, you can always check us out at 1AAuto.com. Thanks.
Okay, so we're underneath our vehicle. We've got our hand protection and our eye protection, of course. Safety first. We're going to remove thew lower hose from the radiator. You do that by grabbing some pliers or a hose clamp tool, whatever you have. Just squeeze it like this. It's spring steel. I bring it over towards the other end of the hose over here out of the way. You can relieve tension.
Okay. You want to make sure you have a collection receptacle under here, so you can recycle your coolant. Don't let it pour onto the ground. I like to just grab the hose, see if I can give it a little twist to break it free from the radiator. This one just did, but if it doesn't want to break free for some reason, you could try to come in from the front or whatever. Try not get in between the hose and the radiator with something, maybe a pick, if you're careful, and you don't poke your hose, of course, or you can use a small screwdriver. Put a little bit of penetrant in there. It'll go a long way, but this seems like it's working. I'm just going to keep doing this. I'm going to tug on the radiator hose. Just let that drain out. Once it's completely drained, we'll move ahead.
Okay. While we're under here, the coolant is almost done. I'm just going to go ahead, and I'm going to remove this clamp right here or clip. This has your O2 sensor wire. That's going to make it so we can lift this up and out of here when we're up at the top. Okay. While we're under here we're just taking a peek. We can get this off. We can move along. We've got some wiring here. These clip is already apart right there, this one right here. Just try to pop it out of there. Over here is another one, just get the wiring over there. There we are. Nothing is attached down here. Everything else looks like we can get from up top. Let's go ahead and go back up top. We'll start doing everything we can to get this out of here, and we'll move along.
Okay, friends. We're back up top. Here we go. We're just going to take a peek. The fan shroud is right under here. We need to get this out, so that way we can get the radiator out afterward. Fan shroud needs to get out of the way, so we're going to have to disconnect everything that's attached to it. You got a little clippy doo there, a little clip over here holding this thing in. Over here, over here. There's a whole bunch of clips.
I'm going to grab my little fork tool. I love this thing. I'm just going to right along the fan shroud, pop that out. That's what it looks like, nothing special. Over here, same thing. See if I can weasel this in there. Pop it out, there we are. Okay. Put this one right here. I'm just trying to twist it, there it is. Okay, plenty of room now. Now to get these clips off all you do is you take a long screwdriver, something with a wide blade. Stick it in between. Give it a little twist. Pull up on your wire. Anytime you disconnect wiring, just take a peek. It doesn't hurt anybody to take a look in there, make sure you don't have any funny colors. That one looks fine. We'll set it aside.
Come right across. There's another one down over here. I'm just going to go about doing it the same way right down like that. Grab the wiring. Pull it up, take a peek. Looks great. Set it aside. Okay, I got a couple more things here. This right here, I'll show you in one second when I get it off. There we go. It's just like those other ones. The clip is underneath it though. All you do is grab it, squeeze it, pull it. Take a peek, no funny colors. Set it aside. This one right here, it's a little push clip right in the center there. Grab that, push it. Pull that out, take a peek. Set it aside.
Okay, what else do we have? We got one more. Let's see if I can grab it maybe. Okay, this one is the same as this one pretty much, a little push clip. I'm going to grab it, squeeze it. Let's see if I can separate these two. Take a peek, set it aside. Okay. All that looks pretty great. We can get this thing out of the way because this is going to have to come up. Just kind of come right along the side. There's like an inner circle and an outer circle. You want to go between the inner and the outer. Lift up the center. Lift up the outer. When you go to lock this in you just push this, and it separates those two tabs, locks it in.
I'm going to put this aside where I can find it. Grab this. I can move this around, if I need to. This should give me a little bit of space to hopefully get my fan shroud out of here. Let's see. Right down along the fan shroud there's this little area where there's an ear on the fan shroud that slides into the radiator, a little radiator clip. You just kind of put your screwdriver, a long screwdriver works great for this, really, in there. You pry the little locking ear away, and then you should be able to lift up on the fan shroud at the same time. This one is a little harder to see. Let's see if I can get this electrical stuff out of my way. Okay. Slide this out of the way. Okay, I have a clear view. I have a clear view. Come on, baby.
Just grab that little ear. Grab my fan shroud. There we are. Okay, fan shroud. This side went and locked itself back in. It's silly. There we are. you can drop the fan shroud right down and out. Okay. To get this out of the fan shroud, you just grab it. You kind of just lift it right up and out of there. I knew there shouldn't have been much holding it on. Grab that. Now we've removed our fan shroud.
Okay, so it's time to take off our upper hose. Your hose may have a squeeze clamp or even a clamp like this one. If it has a clamp like this, it's probably an eight-millimeter. Okay, just loosen that up. You don't want to make it so it comes all the way out. You just want it so it releases from the hose. I can move it away from the hose or from the radiator. It gives me some space. I have this long screwdriver here, so I'm just going to use that, use it as a prying device even though I know it's not. Put on my safety glasses in case any fluid flies around. It's empty at this point, but there's always still fluid. Let me see if I can make it so this will hopefully stay up somehow. Actually, I'll grab my bucket. Push it over. There we go, drain it right into the bucket. Very nice.
We're going to get this clamp right here. This just goes to the top of the radiator, and it comes across. It goes up to our overflow tank. Take that clamp. We'll move it away from the radiator just like before. Use my screwdriver again. Give it a little pry. Check the hose. That looks pretty good. It's not dry, cracked or anything like that. You can set this aside. Okay.
Going down lower, there's another hose right down here along the side. Okay, you got your screwdriver. Right here along the side of the radiator there's another squeeze clamp. I'm going to try to squeeze that with some pliers. If that doesn't work, of course, I can use some hose clamp pliers. I'll squeeze that, try to move it away from the radiator, and then we'll pry it away just like every other one. Just work out of here. I'm sure something good will happen at some point here. That's one of the things about working on cars, is it's rarely easy. Okay, I move that away. Get my clamp pliers out of there.
Once it breaks free, it should come off fairly easily. It's just it's been on there probably since 2001. Yeah, there we go. It's coming right off. We'll set that up out of the way. Okay. Let's just take a peek up along the top here, make sure everything is disconnected while we're up here. It looks like it's good. Okay, so it looks like we're good from up top. We'll get back underneath the vehicle, and we'll continue to work.
Okay, friends, we're back underneath the vehicle. We have dripping coolant. Make sure you're wearing your safety glasses. There's a little push tab right here, it's part of the radiator. You push this away, and then if you go between the A/C condenser and the radiator itself, you can press up against the transmission cooler, lift that up. Once that breaks free from the radiator, and it's not sitting inside the groove, you can move ahead, which would be to the other side over here. We're going to deal with the same thing. Let's see if I can find it real quick. It's right here. I'm going to use my long screwdriver again, just try to push that up. That got it out of the radiator grooves.
Okay, now when we go to take down this radiator bracket right here, that's how you get the radiator out, the condenser and everything is just kind of want to be hanging. You're going to want to pay attention to that stuff. The condenser is going to hang. The transmission cooler is going to hang. It's going to put pressure on all these different things. If you've got lines, or hoses, or anything, you're going to want to be careful. You may need to tie it up with something. I just want to give you a heads up on what's going to happen.
I'm going to remove the whole horn assembly. I'm just going to take the bolt out for the bracket, and then I'm going to hang it down. It'll hang out and wait for me. I'm going to use the 10-millimeter ratchet wrench because it's the easiest thing I can get in here and remove this bolt. There we are. This is our little bolt, super small. We'll set this aside where we won't lose it. You can take this horn assembly bracket right out of here. Let's see if we can get this off now. Yeah, nice. It was clogged up with stuff. Take a look at our wiring. It looks like it's in good condition. I don't see any funny colors in there. It was just dirt and crud, so we'll set this stuff aside. We'll move along.
Okay, so we're underneath the vehicle. I've just go this little jack right here. I'm just trying to apply light pressure to this bar right here. I don't want to go too much because it can crush. That's just to make it so when I take out the two bolts over here and the other mounting bolts that are over there, this won't be able to fall down. Once I get those out, I'm going to try to lower this down slowly. I'm going to maybe try to support the A/C condenser and the transmission cooler with this jack once I have the opportunity to.
Okay, now we're going to remove our 10-millimeter head bolts. See if I can get this on here. Safety glasses, of course. That's what one of the bolts looks like. I can grab the other one. I'm just going to try to leave this one in a little bit just so I can go over to the other side and hopefully, it'll hold it stable for me. I'll set that one bolt aside. One, two. Just grab both of those. Nice and rusted. Okay. It should be able to move around quite a bit. All right.
This piece right here is what is actually holding in the radiator right now, and also the radiator is holding in your A/C condenser and everything else. You need to keep that in mind when you're under here because this can come down, and it could hit you in the face at any given time. You want to make sure that you're as safe as possible. I'm going to put these bolts aside, and then I'm going to try to lower this down, try to give myself a little bit of wiggle room. I'm going to see if I can weasel this out of here, and I'm going to try to get this to hold up the A/C condenser once it's unattached from the radiator.
Okay, we've got the bottom of a clip right here. I'm just going to try to come up along the top. Just pull that out of there. There we are. Okay, I don't think there's anything else attached to this at this point. We'll just take out our one other bolt. Put down my tool. Just put it in a few threads like this. Okay.
I'm going to slowly lower this down. I don't want to go too far because these are your A/C lines right here. Even though they're mounted metal to metal here, there's also a rubber area. There is some room for some flexibility, but of course, you just want to be as careful as possible because this has Freon inside, which is a poisonous gas. You don't want to breathe it in. If, for some reason, something happened and one of these lines cracked or opened up, and you noticed that there was Freon emptying out into the air space around you, you need to get away from it as quick as possible.
Now I'm just going to try to lift up on the radiator. Get this bar out of here. Here's our radiator support. Okay, I'm going to bring this back up a little bit here. Now to get your A/C condenser, that's what this is right here, off of your radiator, you'll notice the radiator has a little hookie doo here and then one over here. They both kind of open up in the same direction. What we need to do is push the condenser towards the passenger side of the vehicle and/or the radiator towards the driver's side, but essentially, [pop noise] ok? They're going to separate. We want to support the condenser and then pull the radiator out.
I'm going to go ahead and grab it. Just going to see if I can push it over. Here we are. Okay. Turn this. Now I'm just going to grab my radiator. I'm going to try to pull it away and bring it on down. Okay. Hanging up on something over here. What could it be? This. Just make sure we empty this out into our recycling receptacle. That's pretty good. I'll let it finish draining in one second, but there's our radiator assembly.
Okay, we've got our radiator over on our bench. These right here, they're just little mounting rubbers. There's four of them, one for each ear. You can just pull them right off, easy peasy. Just remember that the wide end goes away from the radiator or towards wherever the support is. We'll grab all these. We'll set them aside. We'll move along.
Here we are, friends, a quick product comparison for you. Over here, we have our original 2001 Ford Focus radiator. We just pulled it out, it was very easy. Over here, we have our brand new quality 1A Auto part. They're both made the exact same to the same shapes. You've got your mounting ears. These are super important because that's where those rubber bushings go on. There's four of them on the new one, four on the old, awesome. We've got our upper hose, little petcock area. This would be a coolant drain, I guess you could call it. I don't know, call it what you want.
We got our shroud things, okay, little clippy doos that I showed you about pushing out of the way. Lower hose area and the little side hose area. They literally have every single thing that you need on this. With all that said, I don't see any reason why this wouldn't be a quality part to install into this vehicle, so I'm going to go ahead and do it. If you need this, or any other part, you can always check us out at 1AAuto.com. Thanks.
Okay, now it's time to get our rubber mounts back on. All four of them are the same, so it's easy to figure out where they're going to go. The main thing that we need to remember is that the wide top there goes away from the radiator. It just slides right on like that. Same thing with this one. Easy peasy. We'll go ahead and do this. There we are, and then maybe this one. Booyah. It looks like we're clear to install this, so let's go ahead and do it.
Okay, it's time to get the radiator back up in here. It kind of came down at a little bit of an angle. I remember because there was coolant pouring out, so we need to put it back in at a little bit of an angle. We've got our mounts. Mounts are definitely on there, and those go up into the vehicle. There's a spot right here right over there, and then of course, the bottom, which I'm going to be putting on in a minute. We'll just go in an angle here this way. Bring it on up. If it seems like it's getting stuck on anything, just give yourself a second. Figure out what's going on. Like I told you about those fins, it's super important. If you happen to touch on one accident, accidents happen. I'm not going to get mad at you, but try to avoid it. It's going to help you out in the long run.
Okay, I've got that up there. I'm just going to pull this, so it'll hold the radiator for me at this point. This looks pretty good. I'll come around here. We'll get everything situated. The training cooler goes inside the little clip right here, so you can lift it up. It should just slide right down in there. There it is. Grab this one. This one is going to do the same exact thing. It just goes up, sits above the clip. It's going to slide right in. There it is. Okay. We have our A/C condenser. This goes in the opposite way that it came out, so essentially start it being up against each other right along here. You're going to want to check up along the top, see if it's lined up with the top grooves as well.
Yeah, okay. Looking good. Grab some pliers here. I'm not going to try to force anything. I just want to see if it just needs a little bit more pressure than what ... Yeah, that's it. It slid right in. Nice. That's what I thought. It just needed a little bit more pressure than what my hand could offer. Perfect. Grab my light. Check the top. Make sure the top is inside, yeah. It's in its groove grooving. Check this side. Yeah. All right, looks good. We can move on to the next step.
Okay, so we've got our bracket. We've got our four bolts. I'm just going to take it and kind of come and in between here like this. Swing it around into the bumper cover. There we are. I'm just going to try to lift up the radiator and everything, and then I'm going to try to slide this on top of the jack but underneath the radiator. See if I can get it up there. There we are. We're getting the little mounts into their little spots where they want to be just like that. Cool.
All right, you can raise it up. I'll let the jack do the majority of the lifting here. We can just kind of set it where we need it. I'm just going to get all four bolts starts before we tighten any of them down, of course. There we are. Okay. Those are all started. We'll grab our 10-millimeter, and we'll tighten them down. Okay, I'm just going to zip these in. Make sure they're bottomed out into the other two. This one. All four 10-millimeter bolts are tight. That feels good. We'll lower this a little bit. Yeah. That feels great. Cool beans. Let's move along.
Okay, so we just want to make sure we have everything sitting inside it's mounting holes. We've got the lower ones right down here where they belong. The upper ones go inside those holes up there. Okay. Those look like they're in, everybody is in and happy. Perfect. Something you'll notice on your horn bracket is you have this little hookie doo. That's going to go in this top hole right here, and then your bolt goes in this hole right there. Essentially, the horn is going to be sitting pretty much like this inside the vehicle.
We're going to bring the horn up and in. We'll set our hookie doo up inside our groove there. Bring our bolt around. There we are. I'm going to grab my 10-millimeter ratchet wrench. You can use whatever you have that's a 10-millimeter easily. Make sure it's nice and tight. Obviously, we don't want to break the bolt. We don't need to really grip onto it too much. We'll give it a little wiggle, it feels good. If it feels like it's too close, and you're worried it's going to vibrate, just bend it away. There we are. Now it's not going to make any noise. I put in a little bit of silicon paste. It helps everything slide nice and easy. Just wrap this wire right around there, and there we go. Horn is installed.
Okay, so now it's time to put in our fan assembly. It goes flat side against the radiator, obviously. It's basic, but whatever. We've got one hookie doo there, one here. One over there in the same area, and one over here in the same area. When we bring this in we're going to go away from the radiator, bring it up past the hookie downs, push it up against the radiator, drop it down. The top side is the lock side. They have the little locks. Remember that from when we were taking it out. I'm just going to grab my safety glasses, put those on. Here we go. I'm just going to bring it up. Watch for falling coolant. If you push on one of these hoses, they could move around, drop coolant down on your face or in your eyes, in your mouth. Any of that happens, obviously, you need to make sure you take care of yourself immediately. There we go. It seems like it's ready. This side is in. There it is. Cool. Okay, both sides are in.
You can do everything you need to do while you're under here, and then go ahead and bring it down, or get back up top of it, depending on if you're working on the ground or not. Let's grab what we can while we're under here. Try to get this clipped in. That will be a special treat. There it is. You want to make sure you have this clipped in, of course. This is for your O2 sensor, super important. It's not hanging down, going to get caught. We've got our lower hose. Take off this little cap. This just protects the inside of the radiator from any debris that may get in there during shipping, or handling, or anything like that. We've got our little squeeze plant. All I want to do is just squeeze the ears on that clamp, bring it in, so it's up against the radiator again. It looks like it needs to move just a little bit. I'm just trying to line it up. Very nice.
Okay, we got another hose over here on the side. Drain out a little bit of coolant into our receptacle there. I'm just going to take that, slide it onto the radiator. Cool. Let's see if I can grab this with the pliers. Same thing like the other one, right on the two ears. Bring it down. Put it back in its groove where I got it from. That looks good. We've got this little clippy doo that we removed. That just presses into this hole right here. There it is. Pop through. Give it a little tug. That feels good. Okay, everything is situated, so it can't get caught on anything driving down the road. Like I said, you don't want this hanging down. If your clip is broken, and your wire is hanging down, and this gets caught on something, you're going to rip out your wiring for your O2 sensor. That's going to be an expensive problem. Easy fix, expensive problem. O2 sensors are expensive.
We'll just follow it along, see if there's anything else we can do while we're under here. Looks like we got a couple different wiring harness things. We'll grab those in a minute. I'll probably do one from up top. I think we look good under here. Let's go back up top and finish up. We've got this little wiring harness. It's very easy to figure out how it goes back together. Remember, we had these little push clips. Those all go in the center area for the fans and what not. These clips over here come over here. If you want, you can bring it right under now, or we can do it after, whatever. Just throw it like this. Okay.
The short connector goes to the longer wire. The longer connector area goes to the shorter wire. Give them a tug. Those feel great. Slide these down and bring this over. We're going to lift this up. Bring this right down under here. Everything kind of falls into place. You've got the wiring for the fan over here, the wiring for the fan over here, and then this wiring plugs right into this. We're just going to slide everything in, and we're going to listen for clicking noises. There we are. This one. Give it a tug. Let's see if I can see this one. This one is right in front of the manifold. I'm just going to see if I can get it pushed in. Yeah. Give that a nice little tug. That feels great.We've got some wiring here. We're just going to slide this underneath that and this one right under there. It just kind of holds everything, so it's not flopping around.
Okay, so we've got the overflow hose. This goes to the top right side or our top passenger side of the radiator. Obviously, it can't stretch all the way over to the other side. Slide it right in there. Grab that little squeeze clamp. See if I can turn it, so I can grab it here. There we are. Put this up inside the little clip. It can't move around. Lift this stuff up. When we took this all apart this wasn't actually clipped in, but we've got a couple extra clips. I'm just going to go ahead and try to get it mounted in here.
Sometimes getting this all lined up because with these hoses they like to try to twist, so it puts kind of a lot of pressure. Try to push it in the best you can pushing that center. Come over here and do the same thing to this one. There we are, put that on there. If you wanted to, you could put a little wire tie there, try to get this to stay a little better. It's completely up to you. Looks like somebody already tried one right there. There we go. Locked in. Cool. We'll fill up the coolant, and we'll be all set to move along. Take this little protective cover off of here. You can recycle that. I'm going to reach down, grab our hose. Clamp should be right on it still. Nice. I'm going to bring it right up. Try to bring it up to the radiator right along here. It can prove to be a little bit difficult, but it can be done, obviously. Okay, I just want to make sure it's pressed all the way up against the radiator, this. Use my flathead screwdriver, this up. Perfect. Grab this, bring it over. We got our little push clip. Put the outer ring, inner ring. If you had one here, you'd put that one in.
Okay, so now it's time to fill the coolant. I like to use something like this. It's like a little vacuum, essentially. I'm going to create a vacuum inside the cooling system with this unit right here, and then I'm going to draw in brand new coolant with it after I create a vacuum. I'll show you how this works. Hook up your air hose. You have this end closed. We open this up now. Open this. It's going to build up pressure. It's going to make its way all the way up into the green. We want it to be above the 25 and get it to the point where it's just kind of holding steady. All right.
It looks like we got pressure up above our 25 range there. It seems as though the needle slowed down on the vacuum, so it doesn't seem like it's increasing any more vacuum. We're just going to close this off, close off the air. Now we'll just watch the needle. We'll give it a minute or so and see if it drops down any. All right, get our air hose out of here. I've got the strainer end, put it right in here. This is going to fill up the coolant jug using the vacuum from the system itself that we just created. You want to pay attention to make sure that your coolant jug doesn't go empty. You don't want air getting up inside this. It'll ruin the whole reason why we just create a vacuum on this in the first place. Once the jug feels like it's starting to get a little low, just switch it out.
All right, this off of here. Okay. Right now, the coolant is a little full. That's okay. I'm going to get our funnel buddy. I'm going to put a funnel on there with some more coolant in it, and I'm going to run this for a little while. I'm going to let it burp out any air that might be inside the system. Then once we do that, we'll get the coolant down to the level it's supposed to be at, and we should be all set.
Okay, so I'm just going to use this funnel set right here available at 1AAuto.com. Inside, there's pretty much every attachment that you're going to need, or you could possibly need. You can do all sorts of different things with this. It's almost like a Lego set, really. We'll just put all this stuff over here. Okay. Grab that. There. This piece right here is going to screw on here. First, we need to find the insert, the inner adapter. We'll find one that looks like it fits in there good. That one is pretty close. It sits a little lower. Let me see if I can get one.
Okay, I'm going to go with the black one. I'm just going to put it in there. Get this started. It feels like it's starting on kind of tough. It might be cross-threaded. Just snug it up. Give the centerpiece a wiggle. It doesn't feel like it's moving around. I'm going to go ahead and put this on there. We'll get all this stuff out of the way. I'm just going to go ahead and put a little bit of coolant in here. We don't want to fill up the funnel. That right there should be more than enough. Basically, what's going to happen is when the engine heats up it's going to warm up the coolant. The coolant is going to expand. It's going to come up. If we get any air bubbles out of there, bloop, bloop, they're going to come bubbling up. Coolant is going to fill that hole. Work its way down in there.
We'll leave that right about there. We're going to start this up and run it for a little bit. Make sure we get out all of our air bubbles. Make sure that the temperature gauge doesn't fluctuate too much. It should pretty much stay pretty steady once it warms up. We should be all set. I'm going to put the heat in the car to the hot position. Put the blower motor on. Hot position, blower motor. You can set this to wherever you want. I wouldn't put it on defrost because then it's going to kick on and off your A/C. I'm just going to turn this off real quick.
We've got our little plunger. The way this works is it's going to go straight down in that hole right there. It's going to plug up any excess fluid that's in there. What I like to do, the coolant is going to be hot right now. It's going to be super hot, so you want to be careful not to scald yourself. Take a nice rag or whatever you might have, something that's going to cushion you between the heat of the hose and your hand. Give the hose a little squeeze, and we'll just lift up on that. There we are. Now we're just going to replace the cap, and we should be good to go.
Thanks for watching. Visit 1AAuto.com, your place for DIY auto repairs, for great parts, great service and more content.
Shop Products
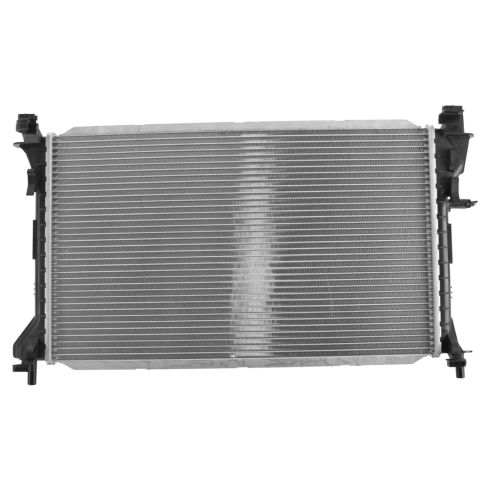
2000-07 Ford Focus Radiator TRQ RDA82825
Part Details:
- Left & Right
- No
- No
- Plastic
- No
- Aluminum
- Cross Flow
- 1
- No
- Bottom Right
- Top Left
- No
- 14.19 in
- 23.63 in
- 1.31 in
- 1.31 in
- 1 in
How to Replace Radiator 2011-14 Chrysler 200
Overheating is a sure sign there’s something wrong with your cooling system. A leak, rust, or obstructions are all cases that may require a radiator replacement. Install a new TRQ radiator that’s engineered to fit your vehicle. How to install one in your 2011-14 Chrysler 200.
