How to Replace Radiator 2006-09 Chevy Equinox
Created on: 2019-04-08
How to repair, install, fix, change or replace a broken, damaged, or leaking radiator on 06, 07, 08, 09 Chevy Equinox
Tools needed
-
Funnel
13mm Socket
Socket Extensions
Flat Blade Screwdriver
Pry Bar
7mm Socket
Drain Pan
10mm Socket
Ratchet
Needle nose pliers
Anti-Freeze
Pick
What's up, guys? I'm Andy from 1AAuto. In this video, I'm gonna show you how to install this radiator on this 2008 Chevy Equinox. If you need this part or other parts for your vehicle, click the link in the description. Head over to 1AAuto.com.
We're gonna take this trim piece off. We're gonna use some trim tools. Just get underneath here and pry this out. This one's coming out very easily. It's been out before.
But you have to get underneath, prying here. Slide that out. There should be some clips that hold all these in. We're gonna take these four bolts out.
I'm gonna use a 10mm socket and a ratchet. Now that's loose. Underneath here, we're gonna use this trim tool. We actually sell this trim tool at 1AAuto.com. We wanna take these three fasteners out.
Slide the center out. Pull that out, and do the same with the others. Then, on the side, I'm gonna take these two trim clips out, on this side, and also on the other side.
Okay, I'm gonna use this trim tool, take some of these clips out. I wanna remove some of this inner fender well. If you need to, you can remove the wheel, if it makes it easier.
Just gonna peel this back a little bit. I don't have to remove it completely. Just get that out of the way. Now there's a screw or a bolt right here. I'm gonna use a 7mm socket and ratchet to take it out.
Take that out. Now I'm gonna use some needle nose pliers. On the inside, here, there's some clips. Right here, and right here. I just wanna squeeze the clip so that I can release the tabs. You might be able to just grab it and pull, but it's a little bit safer to push down with a needle nose.
Just like that. Now we wanna disconnect the fog light. We'll just take a straight blade screwdriver. Just gonna release the connector tabs. Slide that, and as I disconnect this side, the other side clicks back in, and release that side, and just pull it down like that.
And then we're gonna do the same with the other side. And you can grab the bumper on the top and the bottom and just slide it forward. If you need a hand, grab a partner to help you. We wanna remove this piece, so we're gonna take these push pins out.
Right there and right there. Just use the trim tool. Get underneath the backside of here, slide it out. Just a little push pin. Same with this side. Pull that out.
Then I want this piece disconnected right here. I'm just gonna use a straight blade screwdriver. Come up from underneath, slide that up, and there's another piece in the back, and I just have to get underneath that piece as well.
Slide that up like that, and slide this out of the way. Take that off. Now I'm gonna grab this piece, pull it back and forth. Just yank it forward. It's just clipped in right there and right there.
Alright, now we wanna drain the coolant. Make sure you get a coolant bucket underneath here. There's a little drain on the radiator, the petcock. You can grab this and just twist it to the left. Should be able to pull it out a little bit.
Sometimes these get frozen and they don't come out very easily. Just grab some pliers, twist it. Make sure the engine is cold when you're doing this. You don't wanna drain this, you don't wanna open this up, when it's hot.
There we go. Let that drain out. To make it go a little faster, I'm just gonna pull the cap off the coolant reservoir. That'll let the air suck into the coolant system.
I'm gonna take these two bolts out. I'm gonna use a 13mm socket and a ratchet. Alright, I'm gonna pull these brackets off. Slide up. Slide that one up, as well. Now I'm gonna remove this upper hose clamp, on this upper radiator hose.
I'm gonna use this hose clamp remover tool. We actually sell this at 1AAuto.com. It's nice because you can get this started over here, and then with this cable, you just squeeze. Just like that. And then you squeeze that, and then slide it.
Get it past a little bit. Make sure it's past the lip, and then we can release it. Makes it a lot easier to do the job. Now I'm gonna use a large pick to release the seal on the hose.
Just go right around. Loosen this up. Be careful not to stab the hose. Alright, then I can pull it out. Should be able to wiggle the hose back and forth a little bit. Try to twist the hose.
Pull it off, just like that. Little clip right here, holding this wire on. I'm just gonna use some needle nose pliers. Squeeze that, slide that off. Now I'm gonna take a little pocket screwdriver, and we're gonna disconnect this retainer right here.
Just slide that out, pull that wire off. Now we'll disconnect the electrical connector on the fan. Push down on the tab and slide it out. You can do the same on the other one. Push down on the tab.
Slide it out. Pocket screwdriver, release this connector. Set that aside. Just gonna pull the radiator up a little bit, slide it out. Gonna disconnect this little cover that goes over the fitting for the transmission cooler line. Just use a straight blade screwdriver. Slide that off.
Now they do make a special tool to release these clips. If you don't have the special tool, you can always use a right angle pick. Just slide under here, and then slide up, and then once that's up a little bit, just grab the pick. Go underneath here.
Now I should be able to grab this, and that's the retainer. So, before I install that, before I install the hose again, I'm gonna have to reinstall this into the fitting. Now I'm gonna grab that transmission cooler hose and just wiggle it back and forth.
It should pop out. Alright, I'm just gonna use a pry bar. You wanna be careful when you're doing this. I'm just gonna pry it out while I wiggle it a little bit, 'cause there is plastic right here, so I don't wanna break it. Sometimes you can spray some rust penetrant on there.
There we go. Pull that off. So, you might wanna, if this is pretty badly corroded, you might wanna clean this up with a wire brush. Be careful around this area, 'cause that's the sealing surface, but just on the back side.
And then on the bottom side we're gonna do the same with the lower line. Make sure you put a drain bucket or some kind of towel or something to soak up the transmission fluid that comes out. There we go. Slide that out.
Alright, so we wanna disconnect these transmission cooler lines from this little bracket that is attached to the fan shroud. Just take this pry bar. I'm just gonna pry it out. These are pretty rusty. If you were gonna do this job and your lines look this bad, you're gonna wanna replace those lines.
They are leaking a little bit over in that area. Slide it out. Just like that. And that's disconnected. I'm just gonna close this little drain right here. Alright, that's good enough.
Now I'm gonna take this hose clamp tool and slide it on the lower radiator hose clamp right there. Squeeze it. You're gonna wanna put the drain bucket underneath here, 'cause it might leak some coolant out.
And just move that there, and I'll take my large pick, just loosen up this hose. That just breaks the seal on the hose. Now I can twist it back and forth, and that'll drain it into the bucket. Oh, not much came out. That's good.
So, I wanna remove these bolts. There's one right here, another one right here. You wanna make sure you do not remove these nuts right here. That's for the AC. The refrigerant is in the system right now, and if you took those off, it's gonna blow all over the place. That would be bad.
So, I'm gonna use a 13mm socket and a ratchet, take this bolt out. This bolt's pretty rusty, so I'm just gonna use some rust penetrant. Let it soak for a little bit. I'll do the same with the other one.
Alright, I'm gonna take this condenser. Lift it up a little bit. So, with this condenser out, you wanna be careful. If you look down here, there's a piece of the frame right there. You don't want that to stab the condenser.
It would be ideal if we could remove the condenser, but we don't have an AC machine, and if you're doing this at home you probably don't have one either, so I'll just stick a piece of cardboard there to prevent that from getting stabbed. So, that's pretty good.
So, we can push that down a little bit. We just wanna rotate this forward a little bit, and there's two bolts we wanna take out on the fan shroud. There's one right here and then one on the other side, over here. So, we're gonna use a 13mm socket to take these bolts out.
Now I'm gonna grab the fan shroud. Just lift it up, slide it back. I just wanna separate it from the radiator. I should be able to grab the radiator and just gently slide this out.
There we go, and there's the radiator.
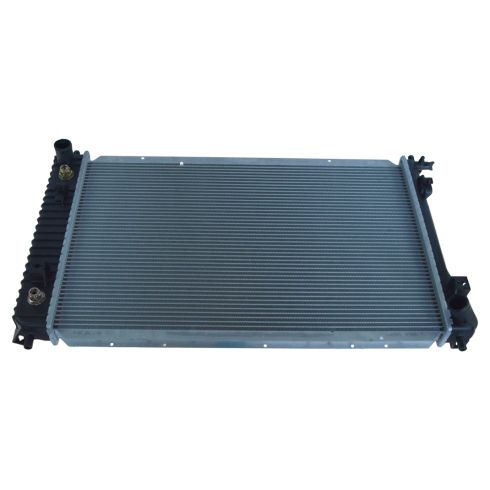
Here we have the old radiator, and here we have the new radiator from 1AAuto.com. As you can see, the shape and the size is the same. You are gonna have to transfer these little grommets over, for the new one. Both sides.
Right there, and right there. And these j-clips as well, you'll have to take these off, install 'em on the new radiator. Get yours at 1AAuto.com and you'll be ready to rock and roll.
Just take a straight blade screwdriver, get underneath here. Just pry up on this j-clip. Sometimes you can just push it off like this. This one's not too bad. Just slide that on there, clip it in, and do the same with the other ones. There's one right here as well.
Slide that off. Lock that in. I'm gonna flip this radiator over, and there's a j-clip over here. We're gonna take this one off. Gonna flip the new radiator over, slide this one over here.
Just like that. Slide that off there. Install that on the new one, and you're good to go. We're gonna wanna transfer this piece over. Just use a trim tool, get underneath here, underneath here. Bring that over to the new one. Slide that in position.
And also, if you have any of these foam pieces, or if you have the ability to get new foam, get some new foam. Do the best you can with this. Transfer this over to the new one. This is obviously not gonna stick, but do the best you can.
And if you have another trim piece on the bottom of the radiator, you're gonna wanna transfer that over as well. If you're gonna reuse the radiator and you need to put these clips back in before you install the [inaudible 00:16:01] cooler lines.
What you wanna do is take this clip, slide it in this way, like this, and then just walk it around. Just like that. So, I'm actually gonna take these off, and I'm gonna slide these into the frame, 'cause they're probably gonna fall off anyway.
Same with that one. Slide that one right there, and before I slide the radiator in, I do wanna take this little plastic cap off. Throw that away. Now, we wanna keep in mind, when we were installing the radiator, the drain was on that side. The upper radiator hose is gonna clamp onto here.
Lower one, down there. Alright, now we'll just slide the radiator into position. Being careful. You don't wanna stab it with the condenser. Try to keep it out of the way.
Now you just gotta angle it just right. And there it goes. I'm gonna try to slide this fan shroud into position. There's some little legs that get locked in down below, there. Get that in right there. Same with this side.
So, I'm gonna bolt up the fan assembly. Just take that bolt and then this bolt. Get that started. Alright, so when you get those bolts in, we're gonna tighten those down with a 13mm socket and a ratchet.
Alright. At this point, you wanna make sure your transmission cooler lines are on the backside here, right here, and right here. I'm not gonna install them yet, but just make sure they're there. Otherwise, it's gonna be harder to get them in, in case they fell out.
These rubber grommets fell out, so I'm gonna reinstall these. Just lift up on the radiator. Actually, before I install those, just gonna slide this condenser into position.
Set those aside. It's just gotta slide into these slots down below. Alright, so that's good. Like that. Now, I'll take these two bolts, get that one started there, and the other one started here. Then I'll take a 13mm socket and a ratchet and we'll tighten these down.
Just snug, not too tight. Now, if these fell out on you when you were installing the radiator, like they did for me, you can install them now. Just lift up and reinstall these. Get that in position.
Make sure those cooler lines stay back there. Like that. And just like that. While I'm down here, I'll reinstall this hose. Slide that into position. Take out a hose clamp tool. If this hose clamp is stretched a little bit, or it seems a little weak, it's a good idea to replace it.
You can use a worm clamp, and just get that in position. Let it go. Feels pretty tight. We're pretty good. If that was worse, if it was rusted pretty bad, then we'd wanna replace it. Alright, so we're gonna line the lower coolant hose up, lower transmission cooler line up.
Let's see. This one's gonna go down there. We can click it into here first, and then get it into the fitting, and push it into the fitting. You wanna make sure it clicks in.
To see this fitting, to see the line in the fitting, you can see, right here, that little clip is over the line. Right there. Now I'm gonna go over here, and that one's over the line right there. Move over here, and you can see it over the line right there.
So, that's how you know that the line is securely in that fitting, and then you just put that plastic cover over to keep that clip from popping up. Just slide this over, and lock it over. Make sure it's good.
Looks good. Alright, so this top line, we wanna clip this into the fan shroud right there, and then there's another clip right here. Make sure this retainer comes up here. Clip that in there, and then line it up with the fitting, and then we're just gonna forcefully push this on.
Lock it in, and put this cover over here, just like the lower one. Alright, it's very important that you don't skip this step. You wanna make sure you plug the fans in, 'cause I've done it before, where you get the job done, go to drive it away, everything works great, and then the vehicle is just gonna overheat.
And that's not good. So, plug that fan in. Get this connector lined up. Lock that in place, and plug the other fan in. I gotta open this connector again, oops. Just like that.
Lock that in place, and let the wire down. Oops. Just like that. Alright, at this point, it'll be easier to get the hose on, so slide this into position. From over here, you can move the radiator out a little bit, before you put the mounts on.
Get that on. Now I'm gonna use this hose clamp tool. Just get this in position. Move this hose clamp, and if this one's rusty, it's the same deal. You're gonna want to replace it. This one's not too bad.
Loosen that up. Do the wiggle, make sure it's nice and tight. Looks good. Okay, at this point, all that stuff is hooked up, so we're gonna put the mounts on. Slide that right there. Take one of these bolts. Get that one started. Do the same with this one.
Okay, now we're gonna tighten these bolts up, both of them, with a 13mm socket and a ratchet. Next we wanna install this piece. Get this lined up with the hole right there, and make sure that's looked in. Looks good.
Take this piece. I'm gonna slide this underneath, here. Lock this in, like that. It's gonna sit right there. Take these little push pins. Right there, and right here.
Alright, now I'll just take this bumper. If you need an assistant, grab some help, and just get this lined up. Just like that. Then on the side you're gonna wanna push those clips in, same with the other side.
Make sure you line these clips up right here and right there. Line those up. Push 'em in. Alright, don't forget to connect the fog lights. You're gonna do that on both sides. Lock 'em in place. Now I'll take this screw and get this lined up.
Get this started, take my 7mm socket and ratchet, tighten this down. You wanna make sure this bumper is lined up with the fender. Take this inner fender liner, get this lined up.
And take the push pins, put those back in. And then we'll do the same with the other side. Alright. Now we wanna push these push clips up over here, on this side, and we'll do the same with the other side.
And then we wanna put the push pins in here. These three.we're gonna put these bolts back in, up top, and there's four of them. And take a 10mm socket and a ratchet and tighten 'em down.
Alright. Now we're gonna take this trim piece. If any of these clips came off, if you still have 'em, you're gonna wanna put those clips back on. Get those lined up, positioned.
And lock it in place. Alright. At this point, we wanna fill up the coolant. We have this special funnel that hooks onto the reservoir, and I'm gonna use the appropriate coolant. It's a 50/50 mix. We're gonna fill this up. After this is all filled, we're gonna start the engine. We're gonna run the car for about 10 minutes.
Make sure the heat is on to make sure that the engine doesn't overheat. Keep checking the temperature gauge. After that, we're gonna shut it down, let it cool down. Before you shut it down, you can always check the upper radiator hose. Make sure that's hot. Make sure the thermostat opened up, so that the coolant is flowing through.
After we let it cool down, we can re-top off the coolant, and then you should be good to take it for a road test and just keep checking the coolant level. You should be good to go.
Thanks for watching. If you want the parts to do it yourself, check out 1AAuto.com, the place for DIY auto repair.
Shop Products
Chevrolet Equinox Pontiac Torrent Radiator TRQ RDA82731
Part Details:
- Left & Right
- No
- Yes
- Plastic
- Plated
- Yes
- Female
- Aluminum
- 6
- Cross Flow
- 1
- No
- Bottom Right
- Top Left
- No
- 16.25 in
- 26 in
- 1.31 in
- 1.31 in
- 1 in
How To Replace Radiator 1992-2001 Chevy Suburban PART 2
Learn how to replace the radiator in your 92-01 Chevy Suburban with this step by step video from 1A Auto. This is part 2.
