How to Replace Radiator 2000-06 Toyota Tundra V8
Created on: 2011-09-13
Check out this video showing you how to replace the radiator on your 00-06 Toyota Tundra V8.
-
step 1 :Disconnecting the Battery
- Disconnect the negative battery cable with a 10mm wrench
-
step 2 :Draining the Radiator
- Remove the eight 12mm bolts from the skid plate
- Pull off the skid plate
- Have a drain pan ready
- Turn the radiator drain plug
- Allow the radiator to drain
-
step 3 :Accessing the Radiator
- Remove the two 10mm nuts from the engine cover
- Remove the 10mm nut from the upper hose clamp
- Loosen the air intake hoses clamp with a flat blade screwdriver
- Pull the air intake hose aside
- Loosen the upper radiator hose clamps with pliers
- Pull the hoses off of the radiator
-
step 4 :Removing the Radiator
- Remove the four 10mm bolts from the radiator fan shroud
- Remove four 12mm bolts from the radiator
- Have a drain pan ready
- Loosen the lower radiator hose clamps with pliers
- Pull the hoses off of the radiator
- Push the fan shroud out as you lift the radiator up and out
-
step 5 :Installing the New Radiator
- Put the radiator into place, using the locating slots
- Start the four 12mm bolts into the radiator
- Start the four 10mm bolts into the radiator fan shroud
- Tighten the bolts
- Put the radiator hoses into place
- Tighten the radiator hose clamps with pliers
-
step 6 :Reconnecting the Air Intake Hose
- Put the air intake hose into place
- Tighten the intake hose clamps with a flat blade screwdriver
- Put the engine cover into place
- Insert the two 10mm bolts into the engine cover
- Connect the air sensor wiring harness to air intake hose
- Connect any hoses that have been disconnected
-
step 7 :Refilling the Radiator
- Tighten the radiator drain plug
- Connect the lower radiator hoses
- Tighten the radiator hose clamps with pliers
- Put the skid plate into place
- Insert the eight 10mm bolts into the skid plate
- Add coolant to the radiator
- Twist on the radiator cap
- Reconnect the negative battery cable with a 10mm wrench
- Run the engine
- Drive the vehicle briefly
- Check for coolant leaks
- Add coolant as necessary
Tools needed
-
12mm Socket
Funnel
Socket Extensions
Flat Blade Screwdriver
Phillips Head Screwdriver
10mm Wrench
Drain Pan
10mm Socket
Slip-Joint Pliers
Ratchet
Brought to you by 1AAuto.com, your source for quality replacement parts and the best service on the Internet.
Hi, I'm Mike Green. I'm one of the owners of 1A Auto. I want to help you save time and money repairing or maintaining your vehicle. I'm going to use my 20-plus years experience restoring and repairing cars and trucks like this to show you the correct way to install parts from 1AAuto.com. The right parts installed correctly: that's going to save you time and money. Thank you and enjoy the video.
In this video, we're going to show you the radiator, how to remove and reinstall on this 2002 Toyota Tundra with a V8, same as any 2000 and 2005, also similar for the V6 trucks. Tools you'll need are a catch pan; pliers; 10 and 12mm sockets with a ratchet and extensions; and a Phillips screwdriver.
Using a 10mm wrench, disconnect your negative battery cable.
In this next shot, the truck is up on a lift. It's not necessary though. You can easily reach this stuff with it on the ground. It just makes it easier to film. I'm going to start by removing a series of 12mm bolts and taking off this skid plate. We'll fast forward and you'll see me use fast forward a lot just through the monotonous parts. Once you have that out of the way, your radiator drain is right here, it should just come loose with your fingertips. If not, use a pair of pliers and drain your radiator.
While the radiator drains, you can start removing some of the top plates. Two 10mm nuts hold the little nameplate on top and then a 10mm bolt holds that hose clamp. Use a Phillips screwdriver to loosen the clamp from the intake tube to the air filter box as well as an electrical connection on top of the air filter box that you need to disconnect. Then use your screwdriver to loosen the clamp for the throttle body side and then pull that tube up in and out of the way. Use a pair of pliers, and you pinch the clamps and slide them back off the end of the hose and then the clamps can just stay right on the hose like that. Now, twist and pull to remove the hoses from the radiator and the inlet tube. It's the same procedure for the upper on the passenger side hose. To reach the lower, it's much easier from the bottom side of the truck. Disconnect this lower front tube. It's going to swivel with your hand.
We're going to remove four bolts that hold the shroud to the radiator: down here, and over on this side. These are 10mm. We'll speed through that. Just as a reminder, as you're taking these parts apart, lay them out neatly and put the hardware with them so it makes it easier to reinstall in the end. Now, we're going to remove four 12mm bolts: one there, down there, and there, and one down there.To get the lower ones, it's best if you have a two inch extension. We'll fast forward here. The radiator is still held in by a couple of slots and tabs so you don't have to worry about it falling out when you remove these bolts. Now, there's a couple of cooler lines we're going to disconnect: one there and one there. Also, take the lower radiator hose off. We do have a drain pan ready case we get some transmission fluid dripping out of those lines. Fast forwards here, as you remove those lines just like the upper radiator hoses, pinch the clips, pull them back, pull them off, as well as the lower radiator hose. As you can see, some coolant does drip out. So, have your catch pan ready. Now, push your fan shroud out and remove the radiator right up, tilt it back.
We shot this footage as a part of another project so this vehicle didn't actually need a new radiator so when you see me putting the radiator back in, you will notice that I'm putting the old one back in and that is why. It goes down there, you can see it has some slots right here. Get it in past the shroud. Past a couple of wires and hoses, these slots go down. These little tabs hang up right there. Fast forward here as we start the mounting bolts both the ones for the radiator and we reach inside and start the mounting bolts that mount the fan shroud to the radiator as well. Keep the speed going as I tighten up the four 12mm bolts that hold the radiator as well as the four 10mm bolts that hold the fan shroud on the inside of the engine bay.
Now, with the lower radiator hose, let's put it down there, put on the top here. Put the upper radiator hose on there, on the radiator. Use a pair of pliers to tighten those clamps as well as the one on the other radiator hose and reconnect the overflow tube. We're going to make sure we hook our sensor back up. There's a hose that may have come off on the valve cover there. Then, down lower, make sure those hoses are back in the clamp and it's securely fastened.Make sure the petcock is tight, connect the lower radiator hose and the transmission cooler hoses and make sure all the clamps are in place.
Now, you can rehang your skid plate and there are eight bolts that hold it in place. I'll throw those in here and then tighten those up. Again, tighten then up firm, not extremely tight though.
Now, refill your radiator directly with either Toyota or universal coolant. Generally, it's probably going to take two and a half to three gallons. Put the radiator cap on. We add a little bit of antifreeze to the reservoir. Reconnect the battery. We're running the truck, making sure it's up to operating temperature here. Run it a little bit. Check the engine and obviously what we're checking for is any signs of leaking fluid, but what you want to do is let the engine a little bit, make sure it's up to operating temperature, talk it for a drive for a while. Then, again, check underneath, make sure there's no dripping fluid anywhere. Let it cool down, remove the radiator cap, check the level of fluid and fill it appropriately.
We hope this video helps you out. Brought to you by www.1AAuto.com, your source for quality replacement parts and the best service on the Internet. Please feel free to call us toll-free, 888-844-3393. We're the company that's here for you on the Internet and in person.
Shop Products
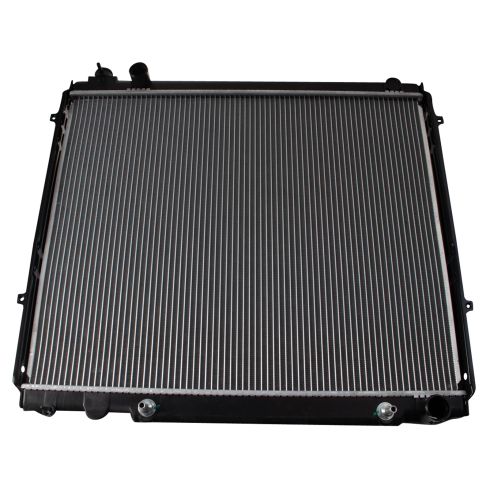
Toyota Tundra Radiator TRQ RDA80098
Part Details:
- Aluminum
- Plastic
- 1
- 22.56 in
- 1.5 in
- 27.31 in
- 1.25 in
- 1.5 in
How to Replace Radiator 2011-14 Chrysler 200
Overheating is a sure sign there’s something wrong with your cooling system. A leak, rust, or obstructions are all cases that may require a radiator replacement. Install a new TRQ radiator that’s engineered to fit your vehicle. How to install one in your 2011-14 Chrysler 200.
