How to Replace Power Window Regulator 2005-10 Pontiac G6
Created on: 2013-07-21
Watch this how-to video and learn from out experts how to replace the power window regulator yourself on the 05-10 Pontiac G6
-
step 1 :Removing the Door Panel
- Pry off the trim piece inside the door handle with a flat blade screwdriver
- Remove the T30 Torx screw inside the door handle
- Pull out the door handle
- Disconnect the latch cables from the door handle
- Disconnect the lock wiring harness with a flat blade screwdriver
- Push in the center of the rivet on the side of the door panel and pry out the side of the rivet with a flat blade screwdriver
- Pry off the trim piece inside the door pull with a flat blade screwdriver
- Remove the two T30 Torx screws inside the door pull
- Pry up the window switch panel by hand
- Disconnect the wiring harnesses
- Pry out the door panel with a door panel clip tool or putty knife
- Lift the door panel up and off
- Carefully peel off the water shield
-
step 2 :Removing the Window Regulator
- Loosen the two 10mm bolts that hold the window to the regulator
- Raise the window by hand
- Hold the window in place with painter's tape
- Peel back the adhesive squares near the top of the door
- Disconnect the window motor lead
- Remove the five 10mm bolts from the regulator
- Pull the window regulator out through the door
-
step 3 :Installing the New Regulator
- Insert one of the bolts into the window regulator
- Push the regulator into the door
- Insert and tighten the five 10mm bolts into the regulator
-
step 4 :Testing the Regulator
- Connect the window motor lead
- Connect the window switch wiring harness
- Turn the vehicle on
- Run the motor up for 4 seconds
- Disconnect the window motor lead
-
step 5 :Installing the New Regulator
- Remove the painter's tape from the window
- Lower the window onto the regulator
- Insert the two 10mm bolts that hold the window to the regulator
- Replace the adhesive squares
-
step 6 :Reinstalling the Door Panel
- Put the water shield into place
- Lift the door panel into place
- Push in the door panel clips
- Connect the wiring harnesses to the switch panel
- Push the switch panel into place
- Tighten the two T30 Torx screws inside the door pull
- Push in the trim piece inside the door pull
- Push in the rivet on the edge of the door panel
- Connect the door lock wiring harness to the door handle
- Connect the latch cables to the door handle
- Push in the door handle
- Tighten the T30 Torx screw inside the door handle
- Push in the trim piece inside the door handle
Tools needed
-
Flat Blade Screwdriver
Putty Knife
T30 Driver
10mm Socket
Ratchet
Brought to you by 1AAuto.com, your source for quality replacement parts and the best service on the Internet.
Hi, I'm Don from 1A Auto. I hope this how-to video helps you out, and the next time you need a part for your vehicle, think of 1AAuto.com. Thanks.
In this video, we're going to show you how to replace the driver's front window regulator in a 2007 Pontiac G6. It'll be pretty much the same for model years 2005 through 2010. It'll also follow most of the same steps for the passenger front window regulator. We'll show you some of the subtle differences and things that you'll need to do. You'll need a 10mm socket and socket wrench with an extension, a flat blade screwdriver, and a T30 Torx socket.
Pull aside the little cover that covers the screw behind it. Use a T30 Torx bit on a socket driver to remove that bolt. Fast-forwarding through the removal. Take the assembly out, locate the tab that holds the cable in place, and pry it with a small screwdriver. With a pocket screwdriver, release the clip that holds the harness to the unlock and lock button. We have the window down for this.
On the edge of the door panel, there is a little plastic rivet. You want to push in the center and then pry out the side with a little flat blade pocket screwdriver. Pry up on the little matting that's on the inside of the door hand pull. Locate the two T30 Torx screws. Using a T30 Torx bit on a socket wrench, I'm going to remove those two screws. I'm going to fast-forward through the removal of those. Go ahead and pull your handle and switch pack assembly out of the way. You're going to see three connectors, go ahead and press the tabs in on the gray one, same as the black, and then for the white one, you're going to use a pocket screwdriver and pry it out. Pry the little tongue out of the housing.
Now get your fingers in between the door panel and the door itself and pop it free of the plastic clips that hold it in place. Don't forget about the clip up on the top by the mirror the little triangle piece there. Pop that out, and then once you've got it out, lift it up off the jam, off the sill, and pull it out of the way. If you're looking to do the passenger's side, it's fundamentally the same as the driver's side. The only difference is the trim piece that you're going to need to remove, as you can see here, is different than the driver's side. Behind it there are the two T30 Torx screws that you need to remove. Then there's also that T30 Torx that's in the handle assembly where the door unlocks or where you open the door, and you open the little cover, remove the screw, and then use your fingers to pry the door panel off.
A close up of those two T30 Torx screws. Peel back on the door seal there and be careful not to rip it it's got some adhesive that goes around the entire way. I'm going to fast-forward as I pull off the door seal.
There are two 10mm screws that hold the glass to the window regulator. We're going to want to just loosen those up so that we can pull the glass out of them. These are cable actuator regulators, and usually what happens is the cable breaks, and in that case you can grab either the window by hand and move it up and down into the correct position. I'm fast-forwarding through the loosening of those two 10mm screws. The glass is now free, and I'm just going to pull it up to the very top, make sure it's still in the window channel, and then I'm going to use some painter's tape and put it on so that I can work without it falling down on me.
By the upper door seal you'll notice that there are two black adhesive squares that cover some bolts, and you're going to need to take those squares and peel them back. Remove the connector that goes to the window motor by placing a screwdriver on the little tab and then pushing back out. Five 10mm screws hold the regulator in place. I'm going to fast-forward as I remove those five screws that hold the regulator in.
There's a little plastic clip that's holding the wiring harness in place there, push it out if you have to, and then you're going to rotate the regulator kind of to the outside to the edge of the door and then snake it through the hole that's closest to that speaker that you see there. You can see it wants to come out together, and you can do that because it's not rigid. The guides are rigid, but the cables will allow you to have some flexibility.
With the old part and the new part from 1A Auto, which is a direct replacement fit.
Putting the regulator in, I'm going to kind of do the opposite of how I took it out. I'm going to bunch them together, one on top of another with the left side going in first and just trying to snake it in there. Then once I get it in, make sure that I haven't pinched any of the harnesses and that I've got it situated correctly. Get your regulator so that the holes line up, and then go ahead and reinstall the five screws. I'm fast-forwarding through tightening up on those five screws.
Plug your window motor back in and then clip in any of the harnesses that you might have unclipped to give yourself a little bit more room, and then get the wiring harnesses ready for the panel to go back on. Temporarily reinstall your master switch pack to line up your bolt holes to put your glass fit to your regulator. You can take the tape off now, and you can let the window come down. You're going to want to guide the window down and make sure that it's still in the window seals on its sides, and then just place it on top of where it's going to be held in by the regulator. Once it's on the top there, you can start to loosen up the 10mm bolts, and then eventually the glass will seat itself down into those clamps.
I'm going to fast-forward as I loosen up those two 10mm screws that hold the clamps on the top of regulator where the glass is going to sit. Once I've loosened them and the glass is fallen in, I'll tighten those back up. Here, I'm doing just a quick test before I put the door panel back on to make sure that the window regulator is working correctly.
Reinstall that white door vapor guard and then put your harnesses through the door panel and reconnect the one that stays inside the door panel. Then go ahead and put the door lock knob through the hole, position the door panel on the sill correctly, push in the cover that goes by the mirror, and just make sure everything set to be tightened back up. Couple of taps on the edges to seat those plastic clips.
I'm reinstalling the T30 Torx screws. The two of them that go in the door handle switch pack assembly. I'm going to fast-forward through reinstalling those two screws. Install the little pad that goes over those two screws. Reinstall the plastic rivet that goes in the edge of the door panel. Reinstall the door handle, and make sure you pull in your unlock and lock button, and then put the ball end of your cable into the socket there, and press down with the cable into the housing. Then press it back in. Reinstall the T30 Torx screw, tighten it up, and then close the cover.
We hope this video helps you out. Brought to you by www.1AAuto.com, your source for quality replacement parts and the best service on the Internet. Please feel free to call us toll-free, 888-844-3393. We're the company that's here for you on the Internet and in person.
Shop Products


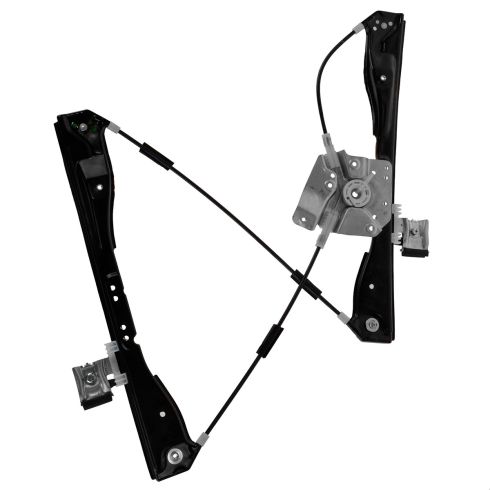
2005-10 Pontiac G6 4 Door Sedan Front Passenger Side Power Window Regulator DIY Solutions WIN01544
Part Details:
- Power
- without Motor
- Features and Benefits
How To Replace Manual Window Regulator 1980-96 Ford F-150 F-250 F-350
Check out this video from 1A Auto to learn how you can replace the window regulator on your 80-96 Ford F-series truck.
