How To Replace Power Window Motor 2001-06 Dodge Stratus
Created on: 2011-11-05
Learn how to replace the power window motor on your 01-06 Dodge Stratus. 1A Auto will show you how to do it yourself in this video.
-
step 1 :Removing the Door Panel
- Use a flat blade screwdriver to pry off the bezel inside the door pull
- Use a flat blade screwdriver to pry off the bezel inside the door handle
- Remove the Phillips head screw inside the door handle
- Remove the Phillips head screw inside the door pull
- Remove the three Phillips head screws alongside the bottom of the door panel
- Remove the Phillips head screw at the back of the door panel
- Pull off the mirror base trim
- With a putty knife pry off the door panel
- Disconnect the door lock wiring harness
- Disconnect the latch rod from the door handle
- Disconnect the power window switch wiring harness
- If any pins remain in the door, remove them with needle nose pliers
- Reinstall those pins into the door panel
-
step 2 :Removing the Window Regulator
- Carefully pull back the water shield, avoiding tearing it
- Remove the six 10mm nuts that hold the regulator to the door
- Pull the window down partially by hand
- Loosen the two 10mm nuts on the window track
- Remove the window from the window track
- Pull the window up by hand
- Pull the window regulator partially out
- Disconnect the window motor wiring harness
-
step 3 :Detaching the Window Motor from the Window Regulator
- Remove the three T25 Torx screws that hold the motor to the regulator
- Detach the motor from the regulator
-
step 4 :Attaching the New Motor to the Regulator
- Line up the motor and regulator gears
- Push the motor into place
- Start the three screws by hand
- Tighten the three T25 Torx screws
-
step 5 :Reattaching the Window Regulator
- Connect the window motor to its wiring harness
- Connect the window switch to its wiring harness
- Turn the regulator down slightly, using the window switch
- Insert the regulator into the door
- Put the regulator into place
- Start all the nuts and bolts by hand
- Tighten all the nuts and bolts
- Move the regulator into place with the window switch
- Disconnect the wiring harness from the window switch
- Slide the window onto the window track
- Tighten the 10mm nuts on the window track
- Carefully put the water shield back into place
-
step 6 :Reinstalling the Door Panel
- Reconnect the wiring harness to the window switch
- Check that the window regulator and motor function properly
- Reconnect the door lock switch
- Clip the latch rod to the door handle
- Slide the door panel into place
- Push the door panel locating tab into its hole
- Push the pins in
- Insert the Phillips screw into the door pull
- Insert the Phillips screw into the door handle
- Insert the three Phillips screws along the bottom of the door panel
- Insert the Phillips screw at the back of the door panel
- Push the mirror base trim back into place
- Put the bezel back into the door handle
- Put the bezel back into the door pull
Tools needed
-
Socket Extensions
Flat Blade Screwdriver
Phillips Head Screwdriver
Putty Knife
T30 Driver
10mm Socket
Door Panel Removal Tool
Ratchet
Flashlight
Needle nose pliers
Brought to you by 1AAuto.com, your source for quality replacement parts and the best service on the Internet.
Hi, I'm Mike Green. I'm one of the owners of 1A Auto. I want to help you save time and money repairing or maintaining your vehicle. I'm going to use my 20-plus years experience restoring and repairing cars and trucks like this to show you the correct way to install parts from 1AAuto.com. The right parts installed correctly: that's going to save you time and money. Thank you and enjoy the video.
In this video we're going to show you how to remove and reinstall or replace a window motor in this 2004 Dodge Stratus, same as a 2001- 2006. Window motors usually go bad. You'll usually notice that they run slow and sometimes they even run really fast for a minute before they finally die. You won't hear any noise when you use the switch and the window doesn't go up or down.
Tools you'll need are a small flat blade screwdriver, a Phillips screwdriver, a putty knife or door panel clip tool, 10mm socket with ratchet and extension, and a T30 Torx Driver with ratchet handle.
Use a small flat blade screwdriver and down in the pull cup here, pry up a little trap door. There is a Phillips screw in there. In behind your door handle, there's another Phillips screw in there. There are three Phillip screws, one there, there, there, and then one on the back edge here. Okay. I'm just going to fast forward as I use the Phillips screwdriver and remove six screws in all. This triangle up here, you just pull out. What you need is a putty knife and you get down in behind the door panel here. Slide it down, pull it off and start to pull the pins and the door panel comes up.
Right here is your lock harness. The little button, press on that, disconnect. On your latch rod there is a clip. I'm just going to reach in with my finger, and get the clip off and the rod comes up and off. Lastly, down here, is your window harness. There is a button right in the middle. You really have to push that button and then work the harness out, and your door panel is off. Once your door panel is off, you want to check these aqua clip pins here because there could be pins stuck inside them. Use a pair of needle nose pliers to pull the pins out and then reinstall them on the inside of your door panel.
Even though I'm speeding through this as far as the video speed, you want to slowly and carefully take your water shield off. It is a little difficult although once you start getting it off, it comes easily. Avoid tearing it, as it does provide a good measure of sound barrier as well as moisture barrier from your door panel.
As you can see, my window is all the way up. What I'm going to do is loosen a bunch of 10mm nuts, one here, here, and then these four over here, one in there, there, there and there. Even though I said loosen in the last clip, I'm actually going to remove almost all of those nuts and bolts. I'm going to remove them except for the very, basically the very last one so I can easily slide my window regulator around. You can pull the window down. With the window down at that height, you can see right through here, is a 10mm nut to loosen, and then right through here, there is a 10mm nut to loosen. After you loosen those nuts, hold onto your window, slide your track forward, and take it off. Be careful as you're reaching in here. Then pull your window up, slide your track back, pull your window out.
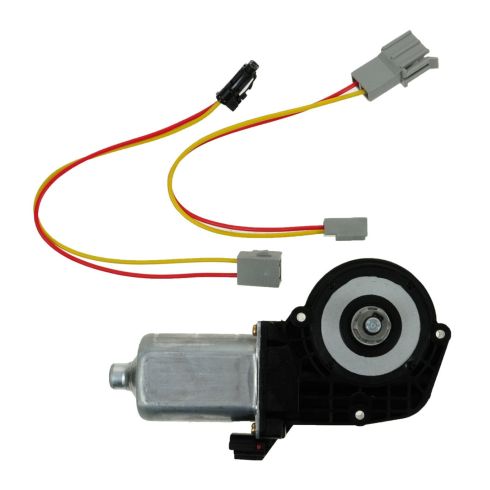
You can see back in here, your window motor is connected. There is a little orange tab. Push that back through, pull it out from the other side. There is a tab. Disconnect that. Pull your regulator out.
If you're just looking to replace your motor, there's three T25 Torx screws. Okay, so I've got a T25 Torx bit and you remove those. Your motor comes off. This motor is in fine shape, so I'll just put it back on. You have to turn it a little bit to get the gears to line up. Start one of the screws.
Just a little tip, as I'm tightening those screws back up, before you reinstall the regulator, you want to reconnect the power window harness to the motor as well as to the switch on the door panel, and run your regulator down just a couple of inches. This will make it a little easier to get things back together. Squeeze it together like that, put it into the door, find the plug. The plug's on there. If you want to put the little red tab back in, you can. Feed the regulator in. Get that bolt hung up right there. Okay, just in the interest of time and not boring you here, what I'm doing here, is I'm going to put the regulator in to place and start all the nuts and bolts that hold it. I'll start all of them first, get them in place, and then go around and tighten them up. When you tighten them, you want to get them nice and firm. They don't have to be incredibly tight or anything.
Here I'm just hooking up the window switch again so I can move the regulator into place. Now, you want to slide your window carefully back down and watch it into place as nuts and studs on the window come into contact with the track. See here, use a little flashlight to see what's going on in there and get the window lined up in the track, and slide the track back onto those nuts and studs.
Here you can see, I've gotten the track on there and now I can tighten up those 10mm nuts. Carefully put that water shield back in place. Here I've put my door panel back on. Turn the key on and just test the window and make sure it's going up and down alright. To get the door panel back on, first reconnect your power window switch. Make sure it clicks. Bring it close. Reconnect your power door lock. Take this rod, put it into the hole and slip the clip right around and clip it on . Make sure your lock goes through.
There is a large locating tab, goes into a big hole. Once you've got that, make sure your pins go in. With the sheet back, make sure all the pins go in correctly. Now its just a matter of replacing all the Phillip screws. Okay, so we'll speed up as we replace all those screws. There's one down in the door cup, behind the door panel, three at the bottom, and then one at the back.
We hope this helps you out. Brought to you by www.1AAuto.com, your source for quality replacement parts and the best service on the Internet. Please feel free to call us toll-free, 888-844-3393. We're the company that's here for you on the Internet and in person.
Shop Products
How to Replace Power Window Motor 1993-2005 Nissan Altima
How to repair, install, fix, change or replace a weak, noisy, damaged or defective power window motor on Nissan Altima, years 98, 99, 00, and 01.
