How to Replace Pitman Arm 2002-06 Chevy Avalanche
Created on: 2017-06-07
Check out this video to learn how o replace the pitman arm on your 02-06 Chevy Avalanche.
-
step 1 :Removing the Pitman Arm
- Loosen the three 21mm bolts holding the steering box to the frame
- Remove the 21mm castle nut on the ball joint end of the pitman arm
- Remove the pitman arm from the steering linkage with a two jaw puller or a pickle fork
- Pull the pitman arm out of the steering linkage
- Hold the steering box in place
- Remove the 34mm nut on the pitman arm
- Insert the two jaw puller to the pitman arm
- Pry the pitman arm off of the steering box
- Remove the pitman arm from the truck
-
step 2 :Installing the Pitman Arm
- Grease the pitman arm with a grease gun
- Insert the pitman arm up into place
- Attach the washer and 34mm bolt
- Tighten the 34mm bolt
- Press the pitman arm into the steering linkage
- Hand-tighten the castle nut
- Hand-tighten the three 21mm bolts into the steering box
- Tighten the steering box bolts
- Tighten the 19mm castle nut
- Insert the cotter pin into the castle nut
- Bend the cotter pin
Tools needed
-
Pickle Fork
Socket Extensions
Pry Bar
Acetylene torch
Ratchet
Grease Gun
2 Jaw Gear Puller
Complete Metric Socket Set
Hi, I'm Mike from 1AAuto. We've been selling auto parts for over 30 years! We're dedicated to delivering quality auto parts, expert customer service, and fast and free shipping, all backed by our 100% satisfaction guarantee. We've created thousands of videos to help you install our parts with confidence. That saves you time and money, so visit us at 1AAuto.com, your trusted source for quality auto parts.
The pitman arm is attached to the steering box itself, and you can find it right up on the driver side of the vehicle. It is right here attached to the steering box, and then attached to part of the steering linkage as well. Typically, these wear out right at the ball joint end of it. It comes as a whole lot of slop in your steering wheel.
To access the large nut on the bottom of the Pitman arm, you have to actually loosen or remove the steering box from the frame of the truck, and we'll start that by removing the three 21 millimeter bolts that are on the driver side of the frame that hold the steering box to the frame itself. We'll start grabbing a 21 millimeter socket and a large ratchet. There's going to be a lot of force on these, so we want to use a long ratchet to do it. Right here on the ball joint end of the Pitman arm, you're going to want to remove this 21 millimeter nut with a socket and an extension. Hopefully it goes on.
With the nut off, now we have to separate the Pitman arm from the steering linkage. There's a couple ways to do this. You could use a pickle fork. I actually prefer using a puller because that is usually the most successful way that I have. You can usually rent these from a hardware store or a local auto parts store, or they're actually not too expensive to just purchase. We'll put a 16 millimeter on the puller and start putting some force on it. You basically swing it up your steering box, pull down on the linkage, and now it is somewhat out of the way.
Now you have access to the 34 millimeter nut on the bottom of the Pitman arm. This 34 millimeter nut is really, really tight, and the steering box is obviously loosened from the frame. So we need to hold the steering box in place somehow while we loosen this nut with a very large ratchet. I think what I'm going to do is I'm going to take a large wrench, put it on this side of the frame, and run one of the steering box bolts through it and back into the steering box. Now I'm going to put a 34 millimeter socket on there with a breaker bar or a half inch drive ratchet that's quite long, and hopefully we can crack this loose.
Now we're going to take our puller and put it on the Pitman arm itself. Going to have to wiggle the steering box around a little bit and kind of get things out of the way to make sure that you have room to actually use the puller. You always want to make sure it's centered on the bolt as well because the puller won't work if it's crooked. We're going to use a ratcheting wrench in this case to tighten up the puller. The Pitman arm is not coming off with the puller, so we're going to throw a little heat on it to try and loosen it up. All right. With the Pitman arm loose, you should be able to pry it right off the steering box and hopefully pull it out of the truck.
As you can see, we got the old Pitman arm and the new Pitman arm. If you're buying a Pitman arm for one of these trucks, you'll need to know if it's a four-spline or a three-spline. What that means is inside here, in this case there's four wider splines so it can only go on one of four directions. You can see there's one here, there's one on here, and if you turn it 90 degrees you can see there's one here and one here. On the three-spline, it's triangular. You can see that they are essentially the same part. The new one comes with the castle nut and the cotter pin so that you can set it up right. It'll look and fit and function just like the original.
I prefer to have it greased before I put it in the truck because it's a little easier to grease now than when it's installed, so I have it clamped in the vice, put the grease can on it, and then just add the grease until it's full. You'll know it's full because it kind of oozes out the bottom seal. You don't want to blow out the seal completely, but as soon as you see it pop up the seal you know it's full. All right, before we put the Pitman arm back in, I'm going to take this bolt out of the steering box that I was using earlier to hold it in place. It'll give me a little freedom to work around it.
Now we can take our new Pitman arm and slide it up into place. The Pitman arm only fits on one of four ways, so there's a very good chance that you're just going to plop it on and get it right the first time. If it was wrong, it would be 90 degrees off in either direction, so I'm very confident that we have it right because it is a four-spline setup and this is really the way it came off. Next we can take the washer and the large 34 millimeter nut and put it onto the steering box.
All right, with the bolt loosely in place we can get the steering box to a place where we can get our 34 millimeter socket onto there. Then we can tighten it up. You're going to want to tighten this basically as tight as you can. If you have some air tools, air tools work really great for this. Now we're going to put this ball joint end of the Pitman arm back into the steering linkage just like that, and we'll hand tighten the castle nut onto the Pitman arm.
Now we can put in the three steering box bolts. We're just going to hand tighten them each for now. Now we're going to take your 21 millimeter socket and ratchet and we can tighten up these steering box bolts. Now we can tighten up this one. The new one actually has a 19 millimeter nut on it, so we'll just tighten that up. You'll want to line it up with the hole in the center of the bolt so that we can put a cotter pin through it to hold it in place.
Thanks for watching. Visit us at 1AAuto.com for quality auto parts, fast and free shipping, and the best customer service in the industry.
Shop Products


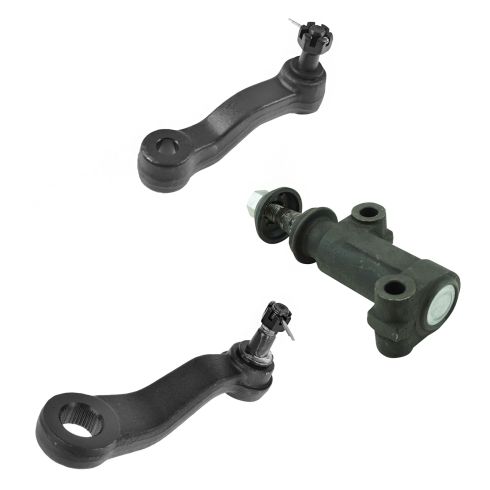
Chevrolet GMC Cadillac Front 3 Piece Steering Kit TRQ PSA56265
Part Details:
- (1) Idler Arm
- (1) Pitman Arm
- 3 Piece
- (1) Idler Arm Bracket
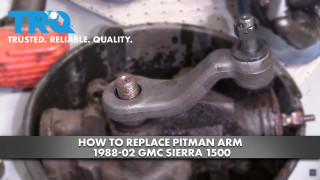
How to Replace Pitman Arm 1988-2002 GMC Sierra 1500
Watch this video to learn how to install a new TRQ pitman arm on your 1988 to 2002 GMC Sierra.
