How to Replace Passenger CV Axle 2010-15 Toyota Prius
Created on: 2018-06-19
How to repair, install, fix, change or replace broken, worn, or vibrating CV axles on 11 Toyota Prius
Tools needed
-
Torque Wrench
Hammer
Rust Penetrant
Pry Bar
Jack Stands
Complete Metric Wrench Set
Trim Tool Set
3/8 Inch Breaker Bar
Flat Blade Screwdriver
Dead Blow Hammer
Center Punch
Bungee Cord
Drain Pan
Transmission Fluid
Floor Jack
30mm 12-Point Socket
Fluid Transfer Pump
Complete Metric Socket Set
Hi, I'm Mike from 1A Auto. We've been selling auto parts for over 30 years.
You use a small pry bar or you can use the large flat bladed screwdriver to pop the wheel cover off. We're going to loosen the axle nut with the wheel on the ground so it doesn't spin on you. First, I need to unstake the axle nut. It's been staked in there so it can't come off. Once we punch that out, you use the socket to remove the axle nut. I'm just going to use a small punch and a hammer. That should do the trick. Just going to spray some rust penetrant on here to help it spin. I'm going to use a 30mm 12 point socket and use a long breaker bar.
The reason why I like to loosen the axle nut or the wheels still on and the vehicle on the ground is that these are on here with a lot of torque, you're not gonna rock the vehicle off the jack stands, and you don't need a second person to step on the brake and to keep that axle from spinning on you while they trying to remove that nut. There it goes. Just get it fairly loose. You don't have to take it all the way off, but you want to make sure it's loose enough so that when your vehicle is in the air you'll be able to get it off without spinning the axle and the breaker bar around. We'll use a 21mm socket, large breaker bar. Loosen the lug nuts with the vehicle on the ground so the wheel doesn't turn.
Raise and support your vehicle with a jack and jack stands, but we're going to use our two post lift. With the vehicle in the air, the lug nuts are loose, I'm gonna use the socket to finish taking the wheel and tire off. To loosen the 12mm bolts that's holding on the ABS wire and the brake hose to the strut body using a 12mm ratcheting wrench. Pull this aside. Unhook it.
Use this clip tool to unhook this from the strut body. This is the ABS wire. Pop it out. Hold that aside. We'll use a 22mm socket, a long breaker bar. I'm going to turn on the nut here for the two strut bolts. Going to loosen both of these up. If the bolt starts to spin, I'll put a 22mm box wrench on either end to kind of hold it. We're going to try to loosen it first, just be careful you don't smash the fender with your breaker bar. I switched to a ratchet to make this go a little quicker. Pull these bolts out. I had to wiggle the knuckle a little bit to make them loose. Pull the knuckle out of the strut. Perfect.
I'm going to tap on the end of the CV axle with a dead blow. I'm trying to make sure it's free from the hub so I can get it out. Spray some rust penetrant in here. I thought I had this accident that loose enough while the vehicles on the ground, but trying to remove it, it still wants to spin, so you can take a breaker bar and brace it against the wheel studs. Continued to spin it off. Hit it with a dead blow. There it goes. Pull the axle out of the hub, push it out, so like that.
On our vehicle, part of this plastic is missing, somebody has cut it away so they can get to the oil filter to get to the oil drain plug to change oil easier, so you may have to take this plastic down, but you can see the CV axle goes into the transmission here. You might want to have a drain pan handy if you leak a little bit of transmission fluid, but there is an opening in the plastic. I'm going to slide the pry bar up in the here and catch the edge of it and then I'm going to tap on it with a hammer to pop the axle out of the transmission. Now we can slide the axle out.
To reinstall the axle, we're reusing the old one. It was is in good shape, we just want to show you how to take it out. Slide it back into place. Be careful not to damage the CV axle boots. Maneuver it into the transmission. Try that to damage the seal, be very careful. You might have to spin it a little bit to find the splines. It won't slide right in because it does have a little lock, a circlip on there, so now I'm gonna have to hit it into place. Take a dead blow on this end. Tap it into place. All right, that's seated in place. Clean up the spill transmission fluid and at the end top off the transmission.
Put the axle back into the knuckle. Maneuver it around here. Flex it over a little bit. Push the knuckle up and grab this into the back and we need to turn it a little bit so it lines up the splines. We'll slide in. Capture the nut on here.
I'll put the hub and knuckle backup into the strut. Get the bolts lined up. Wiggle this stuff around a little bit. Two nuts started for now. These will all get torqued down afterwards.
All right, put the brake line back in place in the bracket. It just slides up behind here. There's a key it sits into, just like that. This bracket goes on top of it. Install the original bolt. Tighten this up until I feel it get tight. I'll stop. Don't forget to clip this back into the strut, your ABS wire, so it's not hanging loosely.
We're going to snug the axle nut down. Torque it with the wheel on the vehicle on the ground, but I want to get it down so it's tight enough to put the wheel back on. I counter hold the bolts and use a torque wrench. Torque the nuts and the strut bolts to 177 foot pounds. Do that for both of them. Once it clicks, you're all set.
Reinstall the wheel. Start the lug nuts by hand. These lug nuts do have a shoulder on them. The opening in the wheel was a little bit bigger, so you might have to line it up and just kind of fiddle with the wheel a little bit while you're tightening these down. I'm just going to use the socket, snug these down. When I'm done, we'll lower the vehicle the ground and torque them to spec.
Torque the lug nuts in a cross pattern to 76 foot-pounds. I'm going to torque the axle nut to 159 foot pounds.
Reinstall the wheel cover. Line up the hole for the valve stem and then snap it in place. Now, remove this under shield that goes underneath the engine and transmission. There is some 10mm bolts here. Then two here. We'll remove those. Use a 10mm socket, a long extension, and my rackets just so I don't have to reach up here, but you can use any length ratchet.
These two bolts were so rusted they broke. There's plenty of plastic clips holding this tray on. I'm not worried about it. These bolts are also very rusty along here. One of them already broke. What I'm going to do is remove all of the clips and then fold the plastic under tray down to get it out of the way. I'm going to leave these bolts in place, not touch them. If your vehicle is not rusty, they'll probably come out with a problem. This car is very rusty. They're going to break on us. I'm not going to bother with it.
I'm just going to use a flat bladed screwdriver or at least these plastic clips. Pop them out. Once you get them started, you can use a trim clip tool. I've just going along and found all the push clips holding this up. Somebody has already cut this to give them better access to the oil pan and the oil filter. Normally, there would probably be a door here you'd flipped down. Ours doesn't have it. I'm not worry about it. There's one more clip here. I'm just going to take a bungee cord, just hook it to this, and you can hook it to the front grill. That will just help hold it out in the way.
This is your drain. There is a 10mm hex key in it and your fill is up here just behind the CV axle. This is also where you'd check the level. You'd open up the fill plug and some transmission fluid should just dribble out. That would be the proper fill level. We did have the axles out of this car, we leaked some transmission fluid out, so we want to top off the level. I'm going to crack this open and I shouldn't have any fluid drip out because it should be low and then we'll fill it until some fluid dribbles out and then tighten it. That's the proper level. If you wanted to drain most of the fluid out, you do it from here, and then you'd refill through here until it dribble out, and then you tighten it up.
I'm going to spray just a little bit of rust penetrant on there. I'm going to use a 10mm hex key, and a ratchet, and a short extension. Get it in place. Break it free. You want to have a drain pan ready to catch any fluid that might leak out. Thread this out of here. There is a gasket on the end there. So I don't have any fluid coming out, so that means it's low.
Use a fluid transfer pump of your choice. I'm gonna use a suction gun type. You can use one that goes in the bottle and then pumps out to fill this up. All right. We can see it dripping out, so that's filled up.
Just reinstall the drain plug. Reinstall a drain plug and just tighten it, not too tight, just until you feel it stop and that should be good. We'll clean it with some brake parts cleaner so we can check for leaks. Reinstall any plastic clips you took down to get the shield off.
Thanks for watching. Visit us 1aauto.com for quality auto parts, fast and free shipping, and the best customer service in the industry.
Shop Products


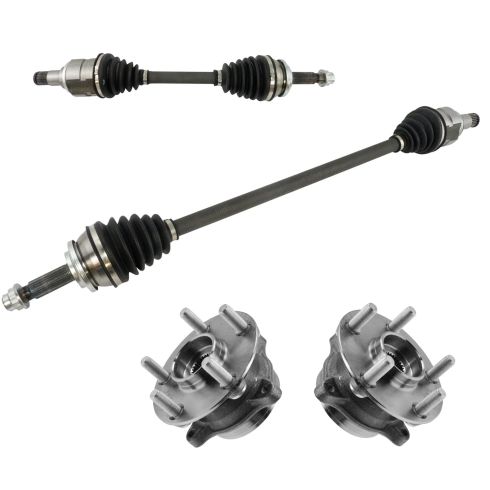
Toyota Lexus Front 4 Piece Drivetrain Kit TRQ CSA70786
Part Details:
- Ball Bearing
- 4 Piece
- (2) Front Wheel Bearing & Hub Assemblies
- (2) Front CV Axle Assemblies
How to Replace Front CV Axle 2007-17 Chevy Silverado
Check out this video to learn how to replace a broken or bent front axle on your 07-17 Chevy Silverado. The part is available here at 1AAuto.com!
