How to Replace Overflow Bottle 2006-10 Chrysler 300
Created on: 2016-12-30
How to repair, install, fix, change or replace a broken, damaged, split or leaking radiator coolant overflow bottle on 05, 06, 07, 08, 09, 10 Chrysler 300
-
step 1 :Draining the Coolant
- Raise and support the vehicle
- Have a drain pan ready
- Open the radiator petcock
- Allow the coolant to drain
- Close the radiator petcock
-
step 2 :Removing the Coolant Reservoir
- Slide the power steering reservoir out of the way
- Loosen the coolant hose clamp by hand
- Pull the upper coolant hose of the reservoir
- Remove the two 10mm bolts that hold the reservoir to the strut tower
- Lift the reservoir up
- Loosen the lower coolant hose clamp with groove lock pliers
- Pull the lower coolant hose off the reservoir
-
step 3 :Installing the Coolant Reservoir
- Connect the lower coolant hose to the reservoir, using the groove lock pliers
- Put the reservoir into place
- Connect the upper coolant hose to the reservoir
- Install the two 10mm bolts that hold the reservoir to the strut tower
-
step 4 :Filling the Coolant
- Twist off the coolant reservoir cap
- Fill the reservoir with coolant
- Start the engine
- Turn the heat to the highest setting
- Turn the fan to the lowest setting
- Add coolant as necessary
- Run the engine until the heat runs steadily
- Turn off the engine
- Twist on the coolant reservoir cap
Tools needed
-
Funnel
Jack Stands
Drain Pan
10mm Socket
Slip-Joint Pliers
Ratchet
Floor Jack
Anti-Freeze
Hi, I'm Mike from 1A Auto. We've been selling auto parts for over 30 years. We're dedicated to delivering quality auto parts, expert customer service, fast and free shipping, all backed by our 100% satisfaction guarantee. Visit us at 1AAuto.com, your trusted source for quality auto parts.
In this video we're going to be working with our 2006 Chrysler 300 3.5 liter V6. We're going to show you how to remove and replace your radiator overflow bottle with the cap. If you like this video, please click subscribe. We have a ton more information on this vehicle as well as many other makes and models, and if you need this part for your car, you can follow the link down in the description over to 1AAuto.com.Here are the items you'll need for this repair.
Raise and support your vehicle. We're using a lift to make it easier to show you what's going on, but this job can easily be done at home on a jack and jack stands. Open the petcock at the bottom passenger side of the radiator. Allow the coolant to drain into a proper receptacle. Once the coolant's finished draining, go ahead and close the petcock. You may still want to keep a drain bucket underneath there just in case there're any little drips.
Move the tab out of the way, and slide your power steering reservoir up. We'll just allow that to hang out of the way for now. You may be able to remove this clamp by hand, and the hose along with it. Remove the two 10 millimeter bolts where the reservoir meets the strut tower. We'll do this using a 10 millimeter socket and ratchet.
Lift up, and bring the reservoir up to make accessing this bottom clamp easier. We'll then loosen and remove the clamp with a pair of grooved jaw pliers. The hose will come off as well. We'll remove the reservoir from our vehicle.
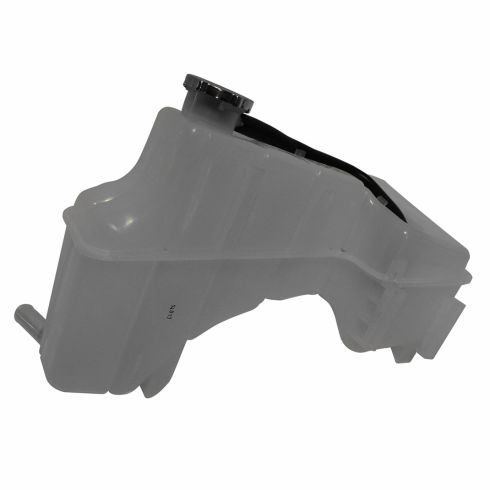
Here we have our old part that we removed from our vehicle, and our new part from 1AAuto.com. As you can see, these parts are exactly the same, with the same lower hose fittings, and the same upper hose fittings. We also have a new cap on the reservoir. This is a reservoir based system meaning that there's no cap on our radiator so there is pressure in our expansion tank here, as well as this being the proper place to fill your cooling system from. We have the same overflow hose at the top, and the same two bolt mounting locations. You could see how discolored our old reservoir is, this is from improperly maintained coolant staining it and you can see that there's a lot of sediment and debris building up inside of the tank. It also makes it very difficult to see our level. The new tank is nice and clear, it's going to make it a lot easier to monitor the level and condition of our coolant as well as keeping all this sediment and debris from recirculating into the system and possibly causing damage. Plastic tanks are also prone to cracking, or if your vehicle overheats, could even melt in certain situations. So if your old reservoir is damaged, discolored or full of debris, this new part from 1A Auto is going to go in direct fit just like your original equipment and fix you up right.
Install the lower hose back on to the reservoir. You'll have to compress the clamp while sliding the hose onto the bottom of the tank. Reinstall the reservoir. Slide the power steering reservoir back into its slots, as well as the top hose back over its fitting. Reinstall your two 10-millimeter bolts with the socket and ratchet.
Open the cap by pushing down and rotating it counterclockwise. Place a funnel in your reservoir, and fill the vehicle with as much 50/50 mix of the appropriate coolant and water as the system will take. Start the vehicle. Set the fan to the lowest setting, and the heat to the highest setting. I like to set it to vent so it's easiest to feel through an open window. Make sure you have some extra coolant ready to go next to the car while it's running. Continue to keep the coolant level up, and monitor the temperature coming out of the vents as well as the one on the gauge. Once the vehicle has a steady flow of heat and has maintained its normal operating temperature, the bubbles have stopped and it has stopped bringing down the coolant level, you can shut the vehicle off. Remove your funnel and reinstall your cap by pushing down, moving it two clicks and you're good to go
Thanks for watching. Visit us at 1AAuto.com for quality auto parts, fast and free shipping, and the best customer service in the industry.
Shop Products
How to Replace Radiator Coolant Overflow Bottle 1996-99 Cadillac Deville
Replace the leaky or broken radiator overflow tank in your 96-99 Cadillac Deville with the help of 1A Auto expert mechanics in this video
