How to Replace Outside Door Handle 2000-04 Ford Focus
Created on: 2018-08-10
How to repair, install, fix, change or replace a broken or snapped off Exterior / Outside door handle on 01 Ford Focus
-
step 1 :Removing the Door Panel
- Pull the mirror trim out toward the window to unclip it
- Disconnect the mirror switch wiring harness
- Pry off the trim door from the inside door handle
- Remove the T20 Torx bolt from the inside door handle
- Pry off the door pull trim with a trim tool
- Remove the two Phillips screws from the door pull
- Pry off the door handle trim with a trim tool
- Disconnect the door lock and window switch wiring harness
- Remove the T20 Torx screws along the perimeter of the door panel
- Pry out the door panel from its clips
- Lift the door panel up and off
-
step 2 :Removing the Outside Door Handle
- Remove the rubber plug from the door
- Remove the T20 Torx bolt from the door handle
- Pry off the outside door lock trim with a trim tool
- Pull the door handle toward the outside of the door to remove it
- Remove the gaskets
- Pop the door handle out of the door
-
step 3 :Installing the Outside Door Handle
- Attach the door handle gaskets
- Insert the door handle into the door and press it toward the inside of the car
- Attach the outside lock trim to the door
- Tighten the T20 Torx bolt to the door handle
- With the door unlocked, click down the door latch with a flat blade screwdriver
- Test the outside door handle
- Secure the rubber plug
-
step 4 :Installing the Door Panel
- Lift the door panel to the door
- Press in the door panel clips
- Tighten the T20 Torx bolts along the perimeter of the door panel
- Connect the door lock and window switch wiring harness to the trim piece
- Press on the interior door handle trim
- Tighten the two Phillips screws to the door pull
- Press the door pull trim on
- Tighten the T20 Torx bolt to the interior door handle
- Press on the interior door handle trim door
- Connect the mirror switch wiring harness
- Press the mirror switch trim into place
Tools needed
-
T20 Driver
Phillips Head Screwdriver
Trim Tool Set
Hi. I'm Mike from 1A Auto. We've been selling auto parts for over 30 years.
All right. On this driver's door panel we're going to start by pulling this piece off. Just grab a trim tool, get underneath here, and pry it out a little bit, and then it comes off towards the back. A couple little clips that got stuck in there. These little clips we're going to transfer them back over to here when we go to reinstall it.
All right. We want to disconnect this mirror switch. The easiest way to do it is to pop this through. Just push it through that way. Pull it through. And then there's a little tab right there on the connector. We'll just use a little screwdriver. Push on that tab. So we can get underneath the tab right there. Disconnect it that way. We can pull this trim off.
Now there's a little cover right here. We'll just take a small screwdriver. Get underneath there. Pop that cover off. There's going to be a T20 screw in there. So we'll use a T20 Torx bit, an extension, and a ratchet. Take this screw out. Pull that screw out. Next we're going to use a trim tool and take off this cover right here over the handle. Get underneath there and pry it up. There's two. This happens to have a couple mismatched screws. It's probably going to be a Torx screw or a Phillips head screw.
We're going to use a Phillips head screwdriver on this one. Take that screw out. All right. This screw has a quarter-inch head. So we're going to use a quarter inch socket, an extension, and a ratchet. It's loose, so I can just do it with extension. Loosen it up. Pull that screw out.
Next we have these Torx screws that go along the outside of the door panel and the bottom. There's six of them. I'll start by taking these off. I'm going to use a T20 Torx bit, an extension, and a ratchet. Take all these out. Take all these bolts out, I mean, screws out. There's two more of those Torx screws over here on the side, so eight in total. Take that one out and then we'll take this one out down here.
Okay. So we're going to pull this trim piece off. Just use a trim tool. Slide it underneath here, pop this off, pop this side off. Just pull it out. We're going to disconnect these electrical connectors. Looks like this one's messed up a little bit so I'll just use a little pick, push down, pull that connector off. And then over here, the connector right here, push that one down. Pull that connector off.
And we'll grab the panel, pull it out. Slide it up. Pull up on this back side, past the handle, pull the door panel up. Right. Now we're going to pull back on this, the weather guard. This has been off before so it was easy to take off. You could take a razor blade and cut it off. There's a little rubber grommet right here. Take that, grab it from the inside and push it out.
Now we'll access this little Torx screw right there. Can you see that? We're going to take a T20, an extension, and a ratchet, and we'll take that out. I'm going to have my other hand holding it on the inside so it doesn't fall. Loosen it up. I can get it by hand. It's an awfully long screw. Right. Pull that screw out.
Now I can take a trim tool, get in between here. Pry this out a little bit. You could use a screwdriver. And it pulls off like that. There's two clips that clip in. This thing slides this way. Once that's out of the way, I can grab the door handle, pull it towards the outside of the door, and pull it off.
To pull the gaskets off just grab it, or you can use a trim tool or screwdriver. Pull it out. There's a little tab there, two little tabs there around this side. Just grab this gasket. There's two little clips there that hold that in, just like that.
Okay, I'm going to install our gaskets. We'll just line this up, just like that. The same with this one. Line that up there and push those in there. Take our handle. I'm just going to slide this in here, get this lined up over here. When it's down then we're going to push it towards the inside of the car. Then we'll take this part, slide that in there, and lock it in place.
All right, now we're going to install this Torx screw. Slide it in with this hand, get it lined up, and then I'll use my T20 and an extension, and twist it in by hand. Once that's down just a little bit snug, and that's it. We're going to reinstall this grommet. Just slide it in right there.
Before we put the door panel back on, we're just going to test it, make sure our door handle works. Click the latch down with a straight head screwdriver. Make sure the door is unlocked, and then from the outside grab the handle and test it. And it's working.
Now we'll take the door panel, slide it on. Start in this corner. Work your way forward. Then angle it out a little bit. Make sure you pull these wiring harnesses through. It goes here, this one goes over here, just like that. Push it in all the way around.
Reinstall this bolt. This one, a quarter inch, with the extension and a ratchet. This one had a Phillips head screw. Yours may have that quarter-inch bolt. Tighten this up snug.
Now we're going to install these T20 Torx bit screws. There's eight of them. Two in here. Just get them started. And there's two on the back here. Taking this one down. Reinstall this handle. Goes this way, slides up there. Lock it in place.
All right. So we're going to slide the wiring harness through here first. I'm going to line this clip up with the door. One clip I left in the plastic trim piece, one clip I left in the door. Slide it on there and then push it that way. We can take this and connect this connector, line the tab up, lock that in. I want this to go in like this. And lock that in.
All right. This wiring harness comes up like this. Connect that to the lock. It's supposed to slide in over here, like this. Now we're going to connect the window switch back here, just like that. Snap that in place. And over here get this lined up. Oops. Click that in. We'll take our Torx screw and get that started, and then we'll snug it up. Take this little cap and push it on. Snap it in place.
Thanks for watching. Visit us at 1aauto.com for quality auto parts, fast and free shipping, and the best customer service in the industry.
Shop Products


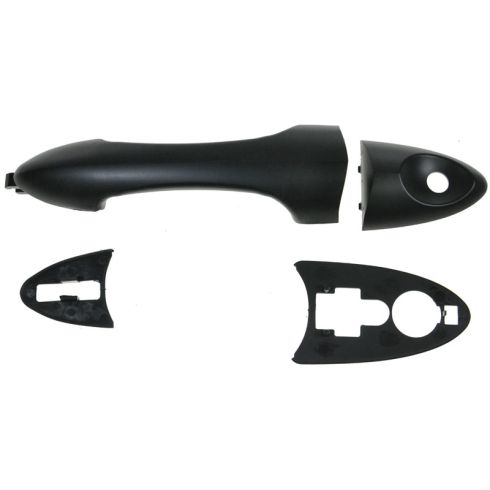
Ford Focus Mazda Tribute Front Exterior Door Handle TRQ DHA48647
Part Details:
- Black
- Plastic
- Yes
- Smooth
- Yes
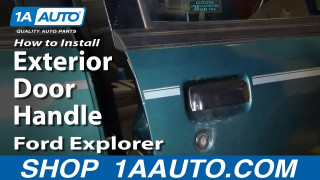
How to Replace Exterior Door Handle 1998-2001 Ford Explorer
Watch this video to learn how to replace an exterior door handle. The experts at 1A Auto show how to replace a broken or snapped outside door handle on your 98-04 Ford Explorer.
