How to Replace Outer Tie Rod End 2007-14 Cadillac Escalade
Created on: 2020-06-03
Watch this video to learn how to install a new outer tie rod on your 2007-14 Cadillac Escalade
Tools needed
-
21mm Socket
Torque Wrench
Hammer
1 Inch Wrench
Pry Bar
Cotter Pin
Pliers
1/2 Inch Impact Gun
22mm Socket
One of the first things you wanna do is safely raise and support your vehicle by the frame so your suspension can hang. Once you've done that, take a small pry bar, and we're gonna take off this center cap. If you were to spin it, you're gonna see a little notch in the cap. Carefully slide this off of here. That exposes our 22-millimeter lug nuts. Remove all six. Remove your wheel.
Now that we have the wheel off, we have a clear view of our tie rod area. One of the first things we're gonna do is break free this jam nut right here. I like to use a nice, long pair of pliers like this. You could also use a wrench. Right on here like that. Once it turns like this, that means it broke free from the outer tie rod end, and now you'll be able to continue. Now let's remove our 21-millimeter nut. Let's just put that nut on, just a couple threads. Now we're gonna take a hammer, and we're gonna hit right here on the knuckle. You wanna be very careful for your brake rotor.
The next thing we're gonna do is remove our outer tie rod end, and as you screw if off, just count those threads. One, two, and so on. All right. Go ahead and write that number down. Now it's time to install the outer tie rod end. Make sure you put it in the same amount of threads that you did to take it off. One, two, three, and so on. Get that nut off of there. Okay. So now with it sitting as it is, you just wanna kind of go to the front of the vehicle and make sure that both wheels are aiming straight ahead at this point. Now that everything looks like it's going in a nice and straight line, go ahead and bring that jam nut so it's hitting up against the outer tie rod end. It's good right there. Let's go ahead and grab some pliers.
The next thing we're gonna do is take a nice wrench, 1-inch will work perfectly, and we're gonna grab right onto this area on the outer tie rod end, and then we'll take our nice, long pliers and go ahead and snug up this jam nut. Okay. That feels good. Go ahead and wiggle that tie rod around a little bit. Make sure it's facing straight up and down. This looks good. Now let's go ahead and snug this up. We're gonna bottom it out. Now you're gonna torque this to 44-foot-pounds. That's torqued. The next thing we're gonna do is look to see if we can find the hole in the stud of the tie rod, and match it with the next corresponding slot on the tie rod stud nut. This doesn't line up, so what I need to do now is I need to continue tightening until it does. I can see right through. I'm gonna grab that locking cotter pin and install it. Slide that right on through. Then just peen it over. There's no way that this nut can come loose.
We'll grab those lug nuts, start them all on there. Let's bottom these out. Now we'll bring it down to the ground, and we'll make it so the wheel is just barely touching enough so the wheel can't spin. Now let's do the lug nuts, 140-foot-pounds. Go crisscross. Torqued.
Now it's gonna be time to get the center cover on. Before you go ahead and pound it on there, just take a look at the back. You're gonna see something that looks a lot like a valve stem. Line it up. It's gonna go pretty much just like this. Light bonk. And then, of course, clean up your wheel, make it look nice and pretty, and take it for a road test.
Shop Products


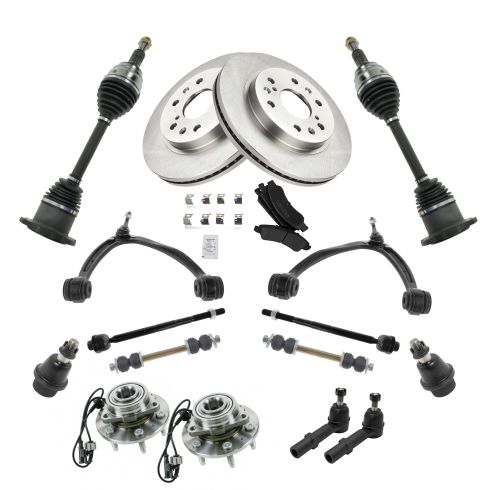
Chevrolet GMC Cadillac Front Steering, Suspension, & Brake Kit TRQ PSA72861
Part Details:
- (2) Front Sway Bar Links
- Vented
- (2) Front Wheel Bearing & Hub Assemblies
- 6 Lug
- (2) Front Brake Rotors
- 12.99 in. (330mm)
- Vented
- 12.99 in. (330mm)
- Premium Posi
- Tapered Roller Bearing
- (2) Front CV Axle Assemblies
- (1) Front Semi-Metallic Brake Pad Set
- (2) Front Lower Ball Joints
- (2) Front Outer Tie Rods
- (2) Front Inner Tie Rods
- (2) Front Upper Greaseable Control Arms with Ball Joints
How to Replace Tie Rod 2000-13 Chevy Impala
Check out this video to learn how to replace the tie rods on your 00-12 Chevy Impala.
