How to Replace Outer Door Handle 2005-14 Ford Mustang
Created on: 2020-04-13
Watch this video to learn how to install a new exterior door handle for your 2005-14 Ford Mustang.
Tools needed
-
Gloves
7mm Socket
10mm Socket
T30 Socket
Needle nose pliers
Trim Tool Set
Safety Glasses
Pocket Screwdriver
Okay, friends. One of the first things we need to do here is get off the door panel and to do that, you're gonna start up here. I'm going to use a nice, plastic trim tool as opposed to metal. get this, disconnect the electrical, a little squeeze tab, pull that off, and set that aside. Next, we're gonna move along to taking this off right here.
You can come under it with your plastic, trim tool, should wanna lift up. Let's take a peek. Ours is a little messed up because the inner door panel's kinda wonky here, but it should wanna come right up. get that out of the way. Here we are. Take off that clip as well, put it in there. Go ahead and grab underneath this little panel here. Draw this plate off. If you were to look, you'd see, it has these little clips on the top and the bottom there. That's kind of, what's holding it in.
Set that aside. If you look inside here, you're gonna see a T-30 bolt. We're gonna remove that. There it is. Use your plastic, trim tool. I'm just gonna pry this out right here, set that aside. And if you look, you're gonna find another mounting bolt hidden right here. There we are. Set that aside. I'm gonna carefully come in between here and grab onto this panel, pull that over off of there. There's another T-30 bolt, let's get that out of there. There it is.
Next, we're gonna move along to doing the sides and the bottom. You're gonna notice that there's 7-millimeter mounting bolts going all the way around. Take those out of there. Now we'll grab that panel carefully, try to lift. Okay. This is looking good. You've got a little hook, two little hooks down along the bottom here. If you look, there's one underneath this black area right there, and then there's one right here. Those just kind of sit down into those door panels.
So you wanna lift up, draw them up and out of there. Now we need to disconnect all the electrical, right there. This is done. We've got the cable right here. We're gonna want to get this out of there as well. Just grab your cable, give it a little twist so you can see both those ears. Go ahead and grab onto those with some needle-nose pliers, and then carefully draw this out. Can sometimes have to twist it. Now we're gonna take off this vapor barrier.
Just be careful not to get it on yourself. It's super sticky, you know, all that goo. There we go. That exposes everything we need to see. All right. So we have a clear view of what's going on in here. We can see these rods that lead up from the latch to the handle. We obviously need to get these disengaged. So for this yellow clip down here, just take your pocket screwdriver. Grab this lip, should wanna pull up and off. There we are. Take this right out of its resting spot.
Next, we're gonna grab this green part right up here, near the handle. You're gonna push on that to push it away from the rod. Pull that off of there. All right, this is looking great. Now, if you move this rod out of the way, right in between these two areas right here, you're gonna find a 10-millimeter bolt. And then over on the other end, you're gonna find another 10-millimeter. We're gonna remove both of those. There's one bolt, do the same to the forward one.
There we are. Let's give this a little wiggle. Now, this part is gonna be a little bit different from the passenger side. You won't necessarily have to do this. The driver's side has the locking mechanism. So we're just gonna go ahead and twist that clockwise, and it'll come right out. At this point, we should be able to wiggle this around a little bit. And there's little ears that kind of hold the handle in, we're just gonna make sure that we kind of push those. And then this should wanna come out.
So now I'm just gonna carefully grab that handle. Should wanna start pulling out. Nice and easy now. We don't wanna damage the paint or anything like that. There it is. Let's get ready to install this handle. Go from the front first, slide it right in. Now and be careful right here. I wanna try to get that in through the door. Just give it a little wiggle. It's gonna be a little tight in some areas. There we are, okay. This is looking good. Let's get the bolts in.
Now we're gonna put in that rearward bolt. It started in there, a couple of good threads. We're gonna leave it loose. We want to be able to move this around. All right. So it's time to get the lock cylinder back in here. And I put it into the grooves. Give it a little twist counter-clockwise. Now we'll get that mounting bolt in. Start that bolt in, nice. Both bolts are started in. At this point, we'll snug them up until they bottom them out, and then just give him a teeny bit more.
Okay. I felt a bottom out right there. Give it that teeny bit more and do the same. Okay, that's bottomed out, teeny bit more. Great. Let's move along to those rods. The first one I'm gonna do is this green one right here. This is just gonna come up, and then it's gonna go right into that hole. I can get my hand. Okay. You can see I've got it in the hole up there. Then you need to take that green tab, swing it down and around, and latch it in on the rod.
That part's very important. If you don't lock it in, you're gonna have big issues. Next, we're gonna move along to this little hooky-do looking rod. Let's see if I can get this lined up. It needs to go in this direction, so the threaded end faces towards the latch of the door. Make sure you latch this in as well. That looks great. So now making sure that at least one of your window's open, I have the passenger side open. I'm gonna close this, and I'm gonna give it a test. You can try locking it. I'm gonna do it again. Okay. The lock works great.
Now I'm just gonna unlock it from the other side, and we know everything works as it should. All right. So now we're at the step where we're gonna be putting this back on here. You just wanna make sure that you get your cable going back through in the area where it's supposed to. You've got your little hole. That's going to go through just like that. Everything else should be fine. Now you're just gonna stick that butyl tape back on. If it's not very sticky, you can go ahead and tape it back on with something else. You definitely wanna have this vapor barrier on here, just around the lock.
So let's get this cable with the door handle on, slide it in, and then back. And then it should come like that. And then you push it through the hole. Doublecheck to make sure it's completely latched in. If that's not latched or the latches broke, you're gonna need to fix that. You don't want this falling off. Grab that electrical connector. Get it ready to go through there. This one's gonna come up here, the smaller one. It connects right in there.
At this point, you're gonna want to pay special attention to your lock, and of course, the hooks that run down along the bottom of the door here that go into the actual door. So let's line everything up to approximately where it needs to go, push that door into the locked position for a second. Let's see. Okay, that's coming through there. I'm gonna push in along the bottom, and then hopefully this shouldn't wanna slide down once I have it all lined up. There it is. Okay. I'm gonna take a peek, it looks like I can see my bolt holes coming through here.
I can see my bolt hole there. I've got my wiring. I've got my other wiring. This looks great. Now we're gonna remount this door panel. Don't forget about this one that's hidden right here.
Let's get this piece back on here. It's gonna come up and through there, just like this, line up those tabs with the holes. yup. That looks pretty great. Got our switch. Give that a nice wiggle. Put this back in here. Awesome. You've got this piece right here. You got your little tabs. Slide it in. There we are. Let's get this piece in. And of course, this piece, attach it in, give it a nice tug, align these up, push it in. Awesome.
Shop Products


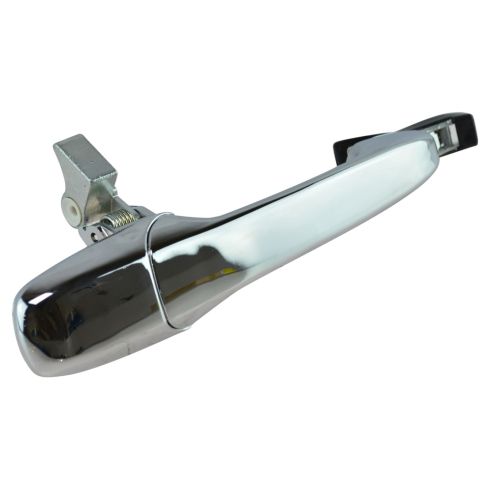
2005-14 Ford Mustang Passenger Side Exterior Door Handle TRQ DHA49192
Part Details:
- Chrome
- Plastic
How To Replace Rear Door Handle 2004-09 Dodge Durango
How to repair, install, fix, change or replace a broken or snapped off exterior door handle on Dodge Durango model years 04, 05, 06, 07, 08, and 09.
