How to Replace Oil Pressure Sensor 2005-13 Chevy Corvette
Created on: 2019-05-06
Watch this 1A Auto expert tutorial on how to replace a broken or failing oil pressure sensor on your 05-13 Chevy Corvette.
-
step 1 :Disconnecting the Fuel Rail
- Disconnect the negative battery terminal
- Remove oil filler cap
- Pull off the engine covers.
- Replace oil filler cap
- Remove the safety clip from the fuel line where it connects to the fuel rail
- Disconnect the fuel line from the fuel rail using the fuel line disconnect tool
- Disconnect the fuel injector harness main electrical connector, which is a large grey connector on the driver side
- Follow along the harness on the driver side to disconnect the following:
- Disconnect the alternator regulator electrical connector
- Disconnect the cylinder head temperature sensor electrical connector
- Disconnect the metal clip supporting the harness leading to the mass air flow sensor
- Disconnect the mass air flow sensor electrical connector
- Follow along the harness on the passenger side to disconnect the following:
- Disconnect the MAP sensor electrical connector
- Pry off the bracket supporting the harness on the evap hose
- Disconnect the fuel injector harness main electrical connector, which is a large grey connector on the passenger side
-
step 2 :Removing the Intake Air Box and Hoses
- Loosen the clamp securing the intake air box to the throttle body using an 8 mm socket
- Disconnect the evap hose that connects to the air box boot in front of the throttle body
- Loosen the air box boot around the throttle body with a pick if it's stuck
- Pull the air box up off of the three rubber mounting tabs
- Pull the air box away from the throttle body
- Remove the rubber grommets from the mounting tabs and replace them in the air box mounting holes
- Disconnect the evap hose that connects directly behind the driver side of the throttle body
- Disconnect the evap hose that connects near the rear of the driver side cylinder head
- Disconnect the evap hose that connects in front of the oil filler
- Disconnect the evap hose that connects between the oil filler and the intake
- Disconnect the vacuum booster hose that connects behind the brake fluid reservoir by pulling it free
- Remove the T25 Torx screw securing the MAP sensor
- Remove the MAP Sensor
-
step 3 :Removing the Fuel Rail
- Remove the wiring harness by pulling off the retention clips from the two locations on the driver side fuel rail
- Remove the four 10 mm bolts, two per side, securing the fuel rail
- Remove the 8 mm bolt and intake retaining bracket that overlaps the fuel rail bracket on the driver side
- Remove the wiring harness retention clip at the rear of the fuel rail on the driver side
- Remove the metal retaining clip from each of the eight fuel injectors
- Remove the fuel rail with some prying force if necessary
- The fuel injectors may come out with the rail, remove them and reseat them in their ports
- Inspect and replace any fuel injector O rings that may come off in the process
-
step 4 :Removing the Intake Plenum
- Disconnect the throttle body electrical connector
- Disconnect the short hose connecting the intake plenum and lower intake at which ever end is easier to reach
- Disconnect the electrical connector to each of the eight fuel injectors
- Remove the ten 8 mm intake plenum mounting bolts
- Remove the hood weather sealing
- Remove the intake plenum insulating cover
- Disconnect the oil pressure sensor electrical connector located behind the rear of the intake plenum
- Feed the vacuum booster hose through to free the intake plenum
- Disconnect the small vacuum line that connects to the rear of the intake plenum at its connector by the firewall
- Remove the intake plenum
-
step 5 :Removing and Installing the Oil Pressure Sensor
- Remove the oil pressure sensor with a 1-1/16 in wrench
- Install the oil pressure sensor, threading it by hand to prevent cross threading
- Tighten the oil pressure sensor with the 1-1/16 in wrench until you can feel the crush washer seat
- Clean the intake area by applying parts cleaner to a rag or paper towel and wiping the area clean
-
step 6 :Installing the Intake Plenum and Fuel Rail
- Replace the intake plenum gaskets if necessary
- Set the intake plenum down nearly in place
- Feed the vacuum hoses at the rear of the plenum behind the oil pressure switch and through towards their connectors
- Set the intake plenum in place
- Reconnect the oil pressure sensor electrical connector
- Apply thread locker to the eight intake plenum mounting bolts
- Replace the eight intake plenum mounting bolts, starting with the rear, and starting them by hand, but leaving them loose
- Replace the intake plenum insulating cover
- Replace the evap hose that connects at the rear of the intake plenum
- Reconnect the eight fuel injector electrical connectors
- Reconnect the main fuel injector harness on each side
- Set the fuel rail down in place
- Reconnect the two wiring harness retaining clips on each side
- Spray the top of each fuel injector with throttle body cleaner
- Seat the fuel rail on the fuel injectors on each side
- Replace the four 10 mm mounting nuts, two per side, securing the fuel rail
- Torque the ten 8 mm intake plenum mounting bolts in the specified sequence to 44 in-lb
- Torque the ten 8 mm intake plenum mounting bolts in the specified sequence to 89 in-lb
- Do a second pass in the same sequence to verify all bolts are torqued properly
- Torque the four 10 mm fuel rail mounting nuts to 89 in-lb
- Replace the fuel injector metal retaining clips using needle nose pliers
-
step 7 :Final Replacing and Reconnecting
- Reconnect the throttle body electrical connector
- Reconnect the short hose that connects the intake plenum and lower intake
- Reconnect the evap line that connects in front of the oil filler
- Replace the MAP sensor
- Secure the MAP sensor with the T25 Torx screw
- Reconnect the MAP sensor electrical connector
- Reconnect the evap tube that connects from in front of the oil filler to front driver side of the intake plenum
- Connect the two vacuum lines that connect at the rear driver side of the engine compartment
- Reconnect the cylinder head temperature sensor electrical connector
- Reconnect the alternator regulator connector
- Reconnect the fuel line to the fuel rail
- Replace the fuel line retainer clip
- Apply throttle body cleaner to a clean rag and wipe the inside of the air box boot
- Seat the air box in place
- Reconnect the air box boot to the throttle body
- Spray the air box mounting tab grommets with throttle body cleaner
- Seat the air box in place on the mounting tabs
- Reconnect the evap hose to the air box
- Tighten the air box boot clamp with an 8 mm socket
- Reconnect the mass air flow sensor electrical connector
- Replace the mass air flow wiring retainer clip
- Reconnect the negative battery terminal
- Turn the vehicle power on for 2-3 seconds to pressurize the fuel system and check for leaks
- Repeat several times
- Start the vehicle
- Conduct visual inspection of the work area with the engine running
- Replace the engine covers
Tools needed
-
Socket Extensions
Flat Blade Screwdriver
Torque Wrench
1-1/16 Inch Wrench
8mm Socket
10mm Socket
Ratchet
Needle nose pliers
T25 Torx Driver
Throttle Body Cleaner
Hey, everyone. Sue here from 1A Auto, and today we have a 2012 Corvette Grand Sport L3 in the shop and we're going to be putting the OP switch in. If you need that part or any other part for your car, click on the link below and head on over to 1AAuto.com.
So when removing the OP switch on the 6.2 liter we have to take the actual covers off and the upper intake out. It is located in the back corner here. On some vehicles like a Suburban, with this engine, 6.2 in it, you can actually reach back there but not on the Corvette. The fiber glass body is right here. That's it. Can't remove it. So we're going to take the upper intake off.
First thing we're going to do whenever we work on an engine is disconnect the negative battery cable. So go ahead and do that and we're going to start taking off these covers.
On this side you have to take the oil filler cap off. I always replace it. You don't want anything falling down there.
So you get your fuel feed line, right here, going into the injector rail. So we're going to have to disconnect that. I take a pocket screwdriver, remove the safety clip and set that aside. Now we have these fuel disconnect and AC disconnect tools. We sell these at 1A Auto and you're going to grab the one that fits the actual rail size. See how it has a split to it? It's going to go on like that and that sleeve goes in there and pushes the butterflies open. So push in on the line. Push the tool in and bring it towards you. You're going to get some fuel residual pressure. That's only because it's stuck inside the fuel rail.
Now that we have our fuel line disconnected we disconnect the main harness for the injectors. That is the gray connector right here on the driver side valve cover. Just going to lift that up. Lift the tab up and pull that aside. We also have to follow the harness along and you're going to have to disconnect the alternator regulator. Then down below that is the cylinder head temp sensor. You can pull that harness right up and bring it right up to the front here. Disconnect the metal clip to the power steering bracket.
And then we have the mass airflow sensor. Tab is down below. Pull out that safety tab and then just feel the clip right there. Disconnect. And now we're going to go follow the harness on the other side and see if there's anything else. MAP sensor.
So on this side we're going to disconnect the MAP sensor which is located right here in the front. You get this big tab. I always bring my trusty screwdriver because it's a little bit easier sometimes. Wiggle that harness off. Going to end up disconnecting the EVAP hoses. There's a bracket right here and I'll take my flat screwdriver, push that tab up, slide that out or just take it off there.
And on this side you're going to disconnect the main harness connector too. It's a gray connector just like the other side. Now we're going to take the throttle body air dam off and out of the way. Eight millimeter socket. I'm going to disconnect the clamp to the actual throttle body and I've got an EVAP hose right here so there's a tab right underneath here. You can see that? Push that tab and lift up on the hose. Take the rubber boot. I'm going to take my little small screwdriver and peel it off of the actual throttle body. Just run it around. Sometimes it gets stuck from temperature engine.
You've got two rubber tabs here. Actually three, one on the air box, and then these. You're going to pull these tabs up. If they come undone, don't worry about it because we're going to disconnect them from that and re-put them in the housing.
I'm going to come to the front of the car here and just give it a good pull. These are the grommets that come undone. We're just going to pull them right up like that and I'm going to put them right back into the air box dam so that way I don't forget. And that way, when we go to install, pop right down in. See how they're set up here? There's a big groove in there. The wider end goes on the bottom. So we're going to pinch them up in. Do that to all three. Then I'll probably spray it with a little silicone grease so that it goes down smoothly when I put it together.
Next step were going to do is disconnect the emission tubes, which are these black plastic tubing that runs along both sides of the intake and goes into the air box dam. So there's a little white clip right here. That's as simple as push down on those and pull. You just gotta keep your fingers pushed down on it the whole time. Releases the seal and comes out. Now we follow it down along the intake and there's one back here. So I'm going to push down on that tab and this is a little difficult because it's connected to another plastic one so there's flex when you go to pull on it.
Follow the top one right over and we go to the solanoid, the purge solanoid. That's the top one. That's connected right down here. Put my finger down there and pull this up.
Now we're going to disconnect the vacuum booster hose. It's main vacuum to the booster. You'll hear it seep out some. Hear that? That's just the air coming out of the booster. Disconnect that. And then we're going to take the actual MAP sensor out. It's a T25 Torx bit. Only one bolt holding it down. Now, there's a rubber seal that holds this inside that plastic intake. It's a plastic screw with a Torx head. It's not a bolt.
Now to grab that MAP sensor. Going to wiggle it back and forth and pull up. First thing you want to do is examine that rubber seal. Make sure it's not ripped. That seal is ripped or damaged, this car is going to run real bad after and that's not what we want.
So now we're going to move on and take the injector rail out, itself. There's an actual wiring harness from the alternator. You see it running over the top here? We're just going to disconnect that from clips. There's a little stud clip here, then there's a middle clip that holds it on right here. Now we can pull this out, away from the upper intake.
We see on this side, there are, holding the rail on ... let's see, one, basically, two bolts. Two nuts and a stud. So we're going to take that off. 10 millimeter socket. Take that stud out and the one down here. There's two on that side. Repeat the process over here.
So on this one, on the driver's side bank, there's a bracket that holds the intake down that also goes over the fuel rail. So we have to take this one intake bolt out, eight millimeter socket, before we can lift the fuel rail up. Make sure that I set that aside and I know that it goes to that bolt hole.
Now I disconnect the electrical connector harness for the injector from the fuel rail. Use a body tool to pull up on that plastic ear. You've got the injector caps on top of each injector. Holds the injector on the rail. We want to take these off with a little screwdriver. Flathead screwdriver. Lift them this way. So there's eight of these on top of each injector. So you're going to take each one off all the way around to both sides. There's also, with this fuel rail, to get to this back injector on this side, I have a steel plate. Unfortunately you're going to, probably, have to take that off just to get to the injector connector. Either that or you can just pop it off and pick it up afterwards after the whole intake is up or get a magnet.
So now that all the injector clips are undone from the fuel rail. The fuel rail is unbolted on both sides, ready to be lifted up. Note, fuel is going to come out! Even if I took pressure and release it earlier, fuel did come out of this line. There's tons of fuel left in this rail so it's going to dump out. So it's going to get stinky. What you can do is just be careful with the eyes. As a matter of fact, I'm going to put safety glasses on.
All right, so now you got your safety glasses on. I take a flathead screwdriver, just so I can really work it slowly and work it up without doing any damage. So the instructions tell you to do the step per step the way I did it and in the back of my head, I said years and years of doing this that these injectors are going to come out with the fuel rail. It just seems to be the nature of the beast and that is exactly what's happening. So I'm just going to see if I can pull it up and have the injectors stay with the rail.
And there's that bracket that I was telling you about. It's stopping it from coming all the way up. So let's take that bracket off. There we go.
I need to disconnect the connector here. Because if i lift this up I want to leave the injectors in the intake. Like that. That's ideally what I want to do.
So I have the last injector down here. Just a little guidance with the screwdriver. Not prying on anything. Can lift the fuel rail up and get it out of there.
So sometimes whenever removing a fuel rail or an injector from an intake and you're not actually working on the injector, the O ring will come off. Always want to examine them. Make sure there's no tears, no dry rot. It looks good. It still has a nice rubber bounce to it. You can reinstall them and use them or for under ten bucks you can probably get all 16 of them, top and bottom, and replace them as you go.
Now the connector that you have to disconnect is the electronic throttle body on the passenger side. So you have that little white clip, that's a safety lock clip. I know this screwdriver is a little overkill, but my other one's on the other side of the car. So you want to push in on the front tab and pull the connector out. While we're here, you'll see there is another little plastic vent from the upper plenum going to the lower intake. It's this hose right here. You're going to want to disconnect that. So whichever connector is easier to get to the one on the actual intake or the plenum, you're going to take that hose. It's the same as the emission hose. Push on that tab and then pull that hose off.
That one's difficult for you to see because the tab is underneath. Technically I can't even see it. You can just feel it with your hand and disconnect that. Get that out of the way. Now we're going to disconnect every connector to the injector. Hold onto the injector and pull up on the tab.
Now I'm going to undo all the upper intake mounting bolts. There's five on this side, five on that side. Eight millimeter socket. That back one I'm going to have to do by hand. I'm going to take each bolt out and it's just a good practice, I'm going to set it up. We know that they're all the same length but where the bracket one are I'm going to take the bolts out and you're going to have to lift it up with the two back bolts in and move it forward because of the actual overhang.
So now I'm going to grab my upper intake firmly and just lift up. See if I can manipulate this bolt out and then try to reach over there at the same time, if not, I might need help. I took the trip, the hood seal, just took it up and out of the way a little bit. There's a cover up here on the upper plenum. Take that out of the way. Just lift it up and manipulate it out and now you have more room on the upper plenum to lift upward.
There is a hose back here, connected. See if I can get this one last bolt up and out of the way. It's because I'm limited on motion because the hose is still connected in the back. But that's what I'm looking to do. Now I've got that out of the way, can set that aside and I can see the actual hose and it is, dun dun dun dun, this hose, which I knew it was. All I've got to do is, the OP switch is right there and that's what were aiming for, here. So now I can just manipulate this up and out of the way a little bit more.
I'm going to disconnect the OP switch right here because you can see it now. Once I get the harness out of the way, I can get the vacuum line over it. Pull up on that safety tab block, squeeze the tab, pull the connector up. Now, where this light was coming on, it's flashing. Oil pressure. No oil pressure and then the gauge was fluctuating everywhere. You always want to check your electrical, make sure you have no frayed wires. It doesn't look like anything got hot and melted. The prongs look okay.
So now we can manipulate this vacuum line up and out.
We have one more vacuum T, you can see it right here. That's a little vacuum line feeding the intake. So just disconnect it. I like to use needle nose pliers, it's usually what I do. Or, a better solution here, squeeze these green tabs and pull the connector off.
So now we have reached where the OP switch is, oil pressure switch, and we're going to take it out of the valley pan. And this is a one and one sixteenth wrench. We'll just put it right on there and break it free. The reason why it's so hard to take it out is because it comes from the factory with the white thread sealer on it. And you can see it coming off right now. Peeling out. See if I can get it by hand. There we go.
Whenever doing anything like this, always do an oil change after. That kind of goes with out saying. Here we have our brand new oil pressure switch from 1A Auto and here's the factory one I just took out. Wow, you can't get any more identical than this. This is, I might have to say, going down the assembly line on the same belt. It's a great price and it's OE, as far as I'm concerned. You can see the way this one went defective. They break, sometimes, internally. You can see the oil inside the connector here and that shorts it out internally inside here. Not that difficult of a job.
If you need this part or any other part for your car. Click on the link below and head on over to 1AAuto.com.
So here we have the sensor from 1A Auto and it comes right from the box with, already, the thread sealer on it. So you don't have to apply any, you don't have to buy some if you don't have any. And that's nice because it's dry on there so it's really going to apply itself when it goes in. Always start it by hand. Confirm that it's going in correctly. Don't just assume and start ranking on it. This is aluminum and aluminum threads. So now with my one sixteenth wrench, I'm going to just tighten it down.
So now I've got it snugged down to the crush washer and I'm going to put my wrench on and I'm going to tighten it down and feel that crush washer seep. You actually feel it pop down and then it locks. Just like that. So now, with a clean rag, I'm just going to take a little parts cleaner, brake clean. Soak it down a little bit. And I'm just going to wipe my surfaces. I'm not going to use any abrasives, any sand paper because this looks in great shape. I just want to get any dirt, sand, anything that could have fallen down. I want to make a nice smooth surface. You can do this to both sides.
So here are the upper plenum gaskets right here. I just installed these particular ones, not even 2000 miles ago, so I'm going to examine and make sure there's no tears and make sure they're still seated properly on both sides. Strongly recommend you get a new set and get the injector O ring set, but I know I just did these not even two, three thousand miles ago so I'm going to leave them in. I'm just going to clean them up and give them a quick visual.
Now, were going to place the upper plenum back in on the heads and the valley pan. I do not want to drag it so I'm going to set it right there so that I can re-angle these hoses. I'm going to bring them down under this harness. Bring them out, over here, on the driver side. Take note that they do go around the back side of this OP switch that we just installed, so not in the front of it. Don't forget, the great old back two bolts back there. They've got to go in before we push this intake all the way in.
So now I'm going to lift it up in the front. Guide it back just a hair. Bring that harness vacuum over the OP switch. See if I can tuck it down in there. There we go. Now, I'm going to get the OP connector and reconnect this. You have some marks to line up on the switch. YOu've got the two ears here and the lock tab. So I'm looking at the angle, how this goes so I can make a clear shot of this. Set it down on top of it. Push down until I hear it click. Make sure that hose, the rubber hose, it's really out of your way.
Now with that, it clipped, and I'm going to reach my hand in to make sure that that safety lock is down all the way, and it is. So I'm going to grab my two bolts, my two ones with the bracket, and guide those in right now.
So this is the intake bolt. So what we're going to do is you want to clean the threads. We're going to take a wire wheel to each threaded bolt. They're all the same. And before we install the upper intake, we're going to apply a small bead of thread lock, about that big, and apply. This is medium strength. I don't need red strength. These are only six millimeter bolts. So just put a little bit of thread lock on that thread like that. Run it around each bolt before you install.
Okay, that one's on. Come on now. There we go. There we go. Seat it. It feels like it's seated.
Now I'm putting all the upper plenum bolts back in. Lining those up. I'm just starting them by hand. Make sure they grab nice and smooth. Then we'll torque those down. I like to take a dry run with the actual fuel rail to confirm that everything is lined up, because, you remember, I can't torque this down because I have to have this bracket loose to get the injector rail out. So I'm definitely going to put them down as far as I feel comfortable with before I put the injector rail on because I also have to put this on after the injector rail is on. This is one intake bolt over here.
So grab a little silicone paste. Sometimes I find carb clean or injector cleaner, should I say. Throttle body cleaner is amazing to put on the O rings and it will slide right in. If you use Vaseline or a silicone paste, it just doesn't work as smooth as you think it would and it really works great if you put some throttle body cleaner on there. It slide right down it.
So now we have to guide the insulation in and it has this back rubber piece. You can try to put this in at the same time with the intake but I don't know. I mean, for me, it's a headache both ways but this way seems to be a little bit more tolerable than trying to work around the thickness of this and get those back bolts in. So I like to squeeze the insulation down on one side, and once I get it there you'll see. I'll grab a screwdriver and go to this side. At this angle, I push it down over and there it is. It falls right in. Except that I put this bracket on first and on the other side. Undo this bolt, take this bracket up out out of the way. There we go.
So before I put the fuel rail down and torque everything down, I'm going to take advantage and put my emission tube right into place. I'm going to connect it in the back here and that's it. I'm not going to connect it over there on the front. And then I'm going to also connect my injectors to the harness. Yeah, that clicked in. Now I can bring my harness over and just push these in.
So technically I don't know why it tells you to disconnect the main harness connector. You really don't have to. That's what the directions said. Because the harness doesn't come out with it. I'm going to do the same thing to the other side. Slide my injector rail on.
So no I'm going to put the injector rail on top of each injector on both sides. Line it up the best I can. Then I'm going to spray throttle body cleaner at the injector on the top and see if I can get it to pop down smoothly. There we go. Watch your harness, make sure those are up and out of the way because those will interfere also. So now I take my throttle body cleaner and I just spray the top where the O rings are real quick and you'll see it pops right down like butter and I'm going to do the same to the other side.
And once you've got all the injector rails popped down on the injectors, you can put the mounting studs in both sides. Now, we're going to torque down our intake bolts and there's a pattern to it. You know, everything has a sequence. So one is here, then two, then three, then four, five, six, seven, eight, nine, ten. Eight millimeter socket and I'm going to tighten mine down first with an electric quarter inch and just snug it. I'm just going right until it stops because the first pass is 44 inch pounds.
The back one here, you're probably going to need a swivel of some sort because of the firewall. I like to switch right back over to the solid socket. And then number 10. All right. So now we can get the torque wrench ready to go.
Okay, my torque wrench is set for 44 inch pounds, that's the first pass. There's one. Two is over here. Obviously, inch pounds is not a lot. So it is important, once you put the bolts in and start them because you have thread lock on them, is to jump right on the torquing and torque it to all steps it requires. You don't want to leave it hanging around because you don't want that thread lock to dry. You want it to dry once it's in place.
This is the first step. The second step is 89 inch pounds. So now we're going to move our torque wrench up to 89. Okay, we're at 89 inch pounds, we're going to start that sequence all over again. Now, that's the final step, but I like to go one step further and I'm going to double check. I'm going to do one more pass at 89.
Now with a 10 millimeter on my quarter inch drive electric, I'm just going to snug the fuel rail down, keeping an eye on where it seats on the injectors. I know it's seated but I just want to watch it to make sure nothing acts too funky. I like to do this in a criss cross pattern, also. Now I'm going to get my torque wrench. It's still set at 89 inch pounds and I'm just going to snug that right down.
Next, we're going to put the injector clips on. See the slotted side? That side sits on the skirt of the fuel rail and this cutout circle is going to go on the top of the injector. So I use a pair of needle nose so I can fish them down in there. See if I can get it lined up properly. Push on with my finger.
See how I worked around? That side locked in over there. So I'm just going to manipulate this up a little bit. There we go. You'll know it's seated because it sits nice and square. I'll move onto the next one.
Okay, that's seated.
Now it's time to reconnect the electronic throttle body connector. Line that up, snap it in, make sure you push down the lock. Then we have that one hose that's inside here. That's going to connect to the upper plenum. Has some flex to it. Just don't force it too too much. Snap it in place. Now we can put the EVAP line back down. Kind of self molded. Does guide itself, basically, down into place. Lock in.
So this is our MAP sensor connector. This is going over to the air intake. And we're going to get the MAP sensor installed up. So here we have the MAP sensor. We're going to install it. I checked the O ring, it's in good shape. I took a little throttle body cleaner on a rag and I wiped it down.
So place it in line, just wiggle it back and forth. And then we have the actual bolt, or screw, I should say. Start it by hand, and that's a T25. Let's connect that. So now we're going to put this emission tube on. There's that purge valve on there and then this goes on the other side. There's a connector. Connect that. These clips break over time so it's not unusual to see those broken just from the heat. If they're still somewhat there, I'm going to definitely bring them so that they stop the hoses from rubbing each other. And that's basically what they're there for anyways.
So now we're over here and we're going to connect our two vacuum lines. That's this feed right here. And then our main vacuum boost. Just wiggle it back and forth. It goes right into that grommet. You know that this is going up here. This goes on the stud that goes to the fuel rail and that connector grabs right around that steel line. Always keep an eye on everything. Watch how it goes down in. You don't want it rubbing, forcing itself to rub. That's going to go on our throttle body when it comes in. That's a mass airflow sensor.
This is the connector for the head temp sensor. It goes down, right behind the little harness right here behind the alternator. It's got a little plastic tab that's going to a little bolt hole that's mounted on the side of the firewall. Sorry, mounted on the side of the block. And you're going to connect your alternator regulator. Now we will get the fuel line. Connect it back to the rail. Those are the tabs inside that act like a butterfly. So you hear it click on. Locked in. Put the safety clip on. That goes in this way and then down on the line and then reconnect my hood seal.
So now I'm going to take a throttle body cleaner, again, and on a rag that's clean I'm going to soak it and I'm going to just run this real quick on the inside right here. Line up my cover of the air filter down there. Make sure I get everything out of the way. This is a hard position if you're small. The rubber piece wants to peel over and that's what you're trying to avoid. Sometimes a nice flat head screwdriver, you can guide it around. Obviously, not with severe force. You just want to make sure that it goes around the outside of the throttle body.
So with a hook, you can also grab it and bring it around underneath, top and bottom, like this. That way it won't peel down into it. There we go, I heard it. A little quick spray on the grommets. Push down on the grommets, get them all lined up. Take your vent hose, bring it down over, click it. That goes like that. There you go. Eight millimeter socket, you want to tighten up that clamp. Then last, we're going to connect the mass airflow sensor connector. Make sure we push that locked down in. Now this has a clip on it and it goes right thee on the metal bracket right here on the power steering pump. Make sure you connect that, you don't want that harness going down, hitting the belt.
So now we're going to connect our negative battery cable back on and once that's tightened I'm going to turn the key in the on position and I'm going to check for pressure. And the fuel will shoot itself on, it will get the voltage and it will turn on for two seconds or so and it builds up pressure. I'm going to turn it off and on, turn it off and on and make sure I have no leaks on my injector O rings, confirm there are no leaks, then I'm going to start her up.
Now, with my car running, I'm going to give it a quick visual. You'll find little things that come loose just from rubbing and moving things. Just reconnect them. Injectors look great. No leaks. Okay, we're ready to put the engine cover on and give her a road test.
Now we know we've given it a visual. We have no leaks, no fuel rail leaks. Ready to put on our covers. So this cover splits with the fuel line, so you're just going to split it down over. Line up the mounting spots, push down on it. This side is the oil cover, so we got to take the oil cover off, let it slide down over, and put our cover back on.
Thanks for watching. Visit 1AAuto.com, your place for DIY auto repairs. For great parts, great service, and more content.
Shop Products
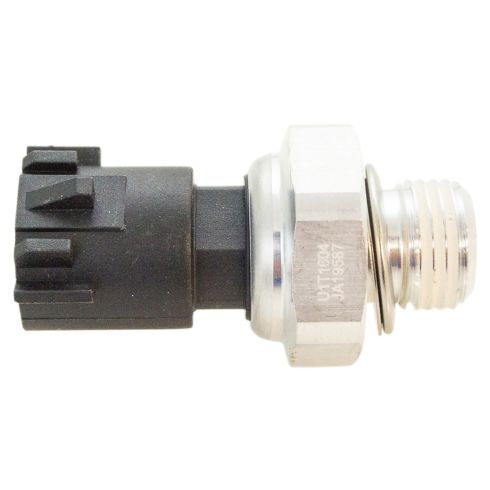
Oil Pressure Sender TRQ SWA41742
Part Details:
- Highest Quality Materials
- Quality Tested - built to a strict level of product standards.
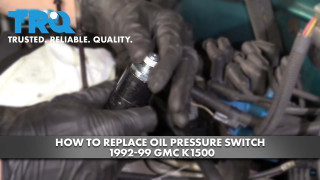
How To Replace Oil Pressure Switch 1992-99 GMC K1500
Watch this video to learn how to install a new oil pressure sensor on your 1988-02 GMC Sierra.
