How to Replace Mirror 1998-2002 Lincoln Town Car
Created on: 2011-04-27
Check out this video teaching you how to replace a cracked or broken side view mirror on your 98-02 Lincoln Town Car.
-
step 1 :Removing the Door Panel
- Unscrew the door lock knob.
- Remove the two Phillips screws under the pull handle.
- Pull the pull handle out.
- Remove the two uncovered Phillips screws.
- Remove the two Phillips screws at the bottom of the door panel.
- Pry out on the edges of the door panel to release the clips.
- Pry up your switch panel and disconnect the harnesses.
- Pull the door panel up and off.
- Disconnect the harnesses on the back of the door panel.
-
step 2 :Removing the Side Mirror
- Remove the two screws that secure the speaker.
- Pull the speaker out and set it down.
- Push the clip that secures the mirror harness out of the door.
- Disconnect the mirror harness.
- Pry off the triangular panel.
- Remove the three 8mm bolts.
- Pull the mirror out and off.
-
step 3 :Replacing the Side Mirror
- Run the harness down through the door.
- Line up the mirror and push it into place.
- Replace the three 8mm bolts.
- Reconnect the mirror harness.
- Re-clip the harness to the door.
- Replace the speaker and the two screws that secure it.
- Replace the triangular panel.
-
step 4 :Replacing the Door Panel
- Reconnect the harnesses to the door panel.
- Line up the panel and put it up over the lock knob and into place.
- Push the clips in around the door panel.
- Reconnect the switch panel and push it down into place.
- Replace the four Phillips screws.
- Push the pull handle back into place.
- Replace the two Phillips screws that secure it.
- Screw the lock knob back into place.
Tools needed
-
Socket Extensions
Phillips Head Screwdriver
8mm Socket
Ratchet
Brought to you by 1AAuto.com, your source for quality replacement parts and the best service on the internet.
Hi. I'm Mike Green. I'm one of the owners of 1A Auto. I want to help you save time and money repairing and maintaining your vehicle. I'm going to use my 20 plus years experience restoring and repairing cars and trucks like this to show you the correct way to install parts from 1AAuto.com. The right parts installed correctly. That's going to save you time and money. Thank you and enjoy the video.
In this video we're going to show you removal and replacement of the side mirror of this 2000 Lincoln Town Car. The tools you will need are a Phillips screwdriver and an 8 mm socket and ratchet with extension. You may also need a couple extra tools if your car has been apart like this one has.
Door panel removal is fairly simple. On this vehicle, this door panel has been taken apart a bunch of times so some of the fasteners may be different for you as well as for example it has a screw here which I believe most cars probably don't. The reason it has a screw here I believe is because so many of the pins in behind that hold it are broken, but we will start by removing the door lock knob just by unscrewing it. In under here should be two, on this vehicle they are Phillips screws. You just kind of put your screwdriver up under there. Now there's another Phillips screw up in here. This pulls out. Then right in here you'll see there's another Phillips screw that goes into the door panel.
As you can tell I've been fast forwarding when I just get to the monotonous stuff so you remove that screw and then there's another screw next to rear side of the pull.
Then at the bottom there's two more Phillips screws. It's kind of a little indent in the carpet. Just put your screwdriver in there, twist it a little bit and you'll get to the screw. This car has a little torque screw here. I'm not sure if this supposed to be there or not. I'll remove it. This may not be on all cars. Then there is another screw here, but this is broken on my car so I know there's no screw in there.
Then what there is is a series of clips so you want to work your hand underneath here. There's one clip right here. Get your hand as close to you can slide your hand underneath and you slide it over and you feel it getting tighter and tighter. Then you give a good pull and get that clip out. Then come up here on top and give it a good pull. There's another clip there. Then on these vehicles there are more clips. There's clips in the middle and more on the edge, but like I said this vehicle's been apart a few times.
Actually before you pull the door panel off you want to pull your window switch up in the front and then pull it out. Then there's a series of harnesses that just have little tabs. You press the tab, pull the harness down. There's a grey one tab, pull it down. Tab here in the black one. Then a tab here for the brown one.
Take the panel away and then there's a few more harness connections back here, a couple of small harnesses with a black and white connector. Press the little button here and pull that apart. There's a blue connector here that has a tab on it that you pull the wire to the blue connector, pull the tab out. It's hard to see. Then there's a grey connector here and again big tab, pull it apart. It looks like this screw is not quite all the way out so. Your door panel is off.
To remove the mirror first you want to remove the speaker because that allows you to disconnect the lead. There's two screws, one here and one underneath here. Then you can remove the speaker. It's magnetic so you just put it down like that. Then this is the lead for your mirror. You pretty much need to push this pin through here so I'm going to pull on the backside and hit it with the bottom of my screwdriver and there's your lead for your mirror. Just pull up on the little tab here and disconnect it. Now there's a panel here. Just pull it off. It just kind of snaps off. Mine's actually kind of glued on there a little bit. Then you've got three 8 mm bolts.
My mirror is out and off. Here's my original mirror, new mirror from 1A Auto. You can see they are all the same. Ours actually has metal inserts in here which makes it a little bit more durable than the original hardware screws right in though. It's heated. The connectors are the same. You can see, different color, but still the same. If you wanted to, this vehicle is a black vehicle so I could probably put this on without any problem, but if you did want to if you have a silver Town Car or a white you could get a, go to an automotive parts store that has a paint department. They can match up your paint with a paint code, put it into an air charged can and you can paint the head of the mirror to match and install it. Obviously on this vehicle my old mirror in fine shape so I'll put that back on. I'm not going to put a new mirror onto a car that doesn't need it.
Install is pretty much just the reverse. Put the lead down through the hole and feed it kind of to the forward part of the door to get it to go down in. Once it goes down in put the mirror on. Start one of our bolts up here just to hold it in place.
So I'm just going to speed it up here. Getting it back together is just the reverse of the procedure. Getting the mirror in, getting it started, reconnect the harness, put your speaker back in and use the two Phillips screws to screw it in. Then finish fastening the mirror with your 8 mm bolts. When you tighten these you want to make them nice and snug, not too tight. Then put your plate back on. We will continue fast forwarding through putting the door panel back on. If you want to see this part in regular speed, please just check out our other videos for the Lincoln Town car door panel.
We hope this helps you out. It was brought to you by www.1AAuto.com your source for quality replacement parts and the best service on the internet. Please feel free to call us toll free 888-844-3393. We are the company with you on the internet and in person.
Shop Products
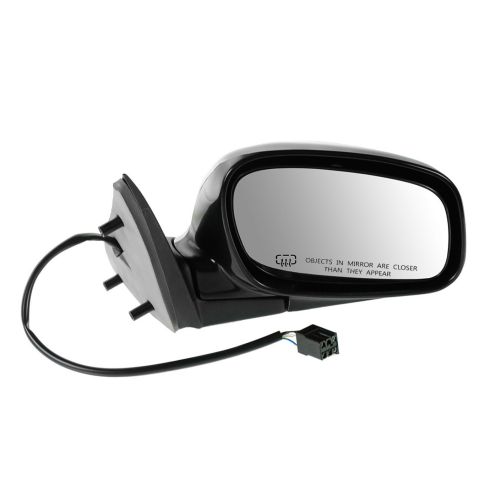
1998-02 Lincoln Town Car Passenger Side Power Heated Paint to Match Mirror TRQ MRA05016
Part Details:
- Paint to Match
- Electric
- Yes
- No
- No
- Clear
- Curved
- Yes
- 3
- Black
- No
- No
- No
- No
- No
- No
- No
- No
- Manual
- No
- No
- No
- Black
- No
- 5
- Plastic
- 29.13 in
- No
- Smooth
- Smooth
- Yes

How to Replace Side Mirrors 2002-07 Subaru Impreza WRX
How to repair, install, fix, change or replace a broken, smashed, cracked, or shattered side view mirror on 02, 03, 04, 05, 06, 07 Subaru Impreza WRX
