How to Replace Mirror 1995-99 Toyota Avalon
Created on: 2012-09-08
Find out how to remove and install the side view mirror yourself on the 95-99 Toyota Avalon with this how-to video
-
step 1 :Removing the Door Panel
- Pry off the triangle panel at the top of the door panel.
- Remove the door handle bezel.
- Remove the switch panel by prying up and pushing in on the clip.
- Disconnect the harnesses on the switch panel.
- Remove the two trim tabs on the inside of the door panel.
- Remove the trim tab on the door pull handle side.
- Remove the clip on the side of the door panel by pushing the center in and pulling the clip out.
- Remove the eight Phillips screws around the door panel.
- Lift the door panel up and off.
- Disconnect the courtesy light.
-
step 2 :Removing the Side Mirror
- Disconnect the mirror harness by pushing on the tab in the middle of the clip.
- Pry the clip holding the wire to the door.
- Remove the three 10mm bolts securing the mirror.
- Pull the mirror out.
-
step 3 :Replacing the Side Mirror
- Put the harness through the door.
- Line up the mirror and push it into place.
- Replace the three 10mm bolts.
- Re-clip the harness to the door.
- Reconnect the mirror harness.
-
step 4 :Replacing the Door Panel
- Reconnect the courtesy light.
- Line up the door panel on the window sill.
- Push the door panel into place.
- Replace the eight Phillips screws into the door panel.
- Replace the trim covers.
- Reconnect the switch panel.
- Push the switch panel in back first.
- Replace the door handle bezel.
- Replace the triangle trim panel.
- Replace the pin on the outside of the door panel.
Tools needed
-
Socket Extensions
Flat Blade Screwdriver
Phillips Head Screwdriver
10mm Socket
Ratchet
Brought to you by 1AAuto.com, your source for quality replacement parts and the best service on the Internet.
Hi. I am Mike from 1A Auto. I hope this how-to video helps you out, and next time you need parts for your vehicle, think of 1AAuto.com. Thanks.
In this video, we are going to show you how to replace a broken, side rear-view mirror on this 1998 Toyota Avalon, pretty much the same as any '98 or '99 Avalon. The tools you will need are a flat-blade screwdriver, Phillips screwdriver, and a 10 mm socket with a ratchet and extension.
We start with the flat-bladed screwdriver, and up here in this corner piece, we pry out lightly and pull firmly. That comes up and off. Your inner door handle bezel, pry down here. Pry out like that. Up at the top, pry out like that. That comes off. This bezel that holds your switches, go right from the center. Slowly work under it and you can see a clip. Push on that clip and pull that up and out. There are two connectors. They both have little buttons. Press the button and pull the connector out. Then there are two little trim tabs here. Pry them off, again, with your screwdriver, Pull off with your fingers. There is another one here. It comes right out.
Then on the end of your door, there is a little clip here. You push the center in, and then that pulls out. Now there are a number of Phillips screws to remove. There are two right there, one in behind where your switches were, and one in that hole there, and then there are a few right underneath the perimeter of your door. Speed up here as I use a Phillips screwdriver to remove those screws. On this vehicle, there were eight in all, four along the bottom, two in the front, one in behind where the switches were, and then the one at the door at the armrest base. Now you can just lift the door panel up and off and you need to reach in behind and disconnect the courtesy light. This has a little tab on it that you press down and pull out.
Our mirror connects down here. There it is down here somewhere using my flat-blade screwdriver to push up right in the middle of the bottom here. There is a little tab right here. Push that and disconnect it. There is also a little clip here I am just going to pry out. There are three 10 mm bolts right in there. One, two sorry. There is one here. One here and one there. Use a 10 mm socket, extension and a ratchet.
Speed up here as I remove those three bolts. You see the old mirror comes off, and as you can see, this one has had a better day. A new mirror from 1A Auto. Fairly obvious that it is in a little better shape than our original. They come molded in black. On this vehicle, they are painted the body color. You could paint yours to match, but what you would need to do is probably take your vehicle to an automotive parts store that has a paint department. They could match your color based on your VIN or your paint code, give you some paint in an air-charged can, and you could refinish the new mirror that way. For a silver or a white car, sometimes just using some paint from a hardware store can work. This vehicle is 14 years old and has 150,000 miles on it. The owner really just wants a functional mirror, so they are fine with just putting a black mirror in place, no reason you cannot do that. That is going to fix the problem, pass inspection. Obviously putting it back in is just a reverse procedure.
Put the mirror in place. Look through and see the holes, and then you start one of the bolts on. Fast forward here again as I start the other two bolts on, use my extension and socket to hand tighten them. Check the mirror before you really tighten up, make sure that it is seated correctly. Then tighten them up nice and firm with your wrench. Take the harness. Put that plate there, and then reconnect your connection. Reinstall the door panel. First, we will reconnect our courtesy light. Now, hang the door panel up on the window sill. Make sure your harnesses come through here.
I am going to fast forward here as I put the screws back in. The two largest screws go in behind the switch plate and under the armrest base. You have the two button-style screws that go in the front, and then the other four screws that go along the bottom. Put this little button back in. Put our switches back in. Put the back down in first and then press that down in. The trim bezel here, put that on, and put these two trim buttons here, put those on. Last but not least, put that on. The last part, take this, reset it by pushing it back up through like that. Put it in place and then push it to lock.
We hope this helps you out. Brought to you by www.1AAuto.com, your source for quality replacement parts and the best service on the Internet. Please feel free to call us toll-free, 888-844-3393. We are the company that is here for you on the Internet and in person.
Shop Products


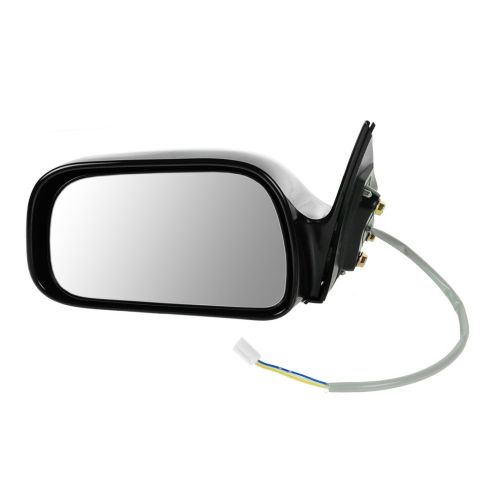
1995-99 Toyota Avalon Driver Side Power Mirror TRQ MRA05246
Part Details:
- 17.05 in
- No
- Black
- No
- No
- No
- No
- Plastic
- Flat
- No
- Black
- No
- No
- No
- Yes
- No
- No
- No
- No
- No
- Clear
- No
- 3
- Electric
- No
- 3
- Smooth
- Smooth
- Yes

How to Replace Side View Mirrors 2012-14 Toyota Camry
How to repair, install, fix, change or replace a broken, smashed, cracked, or shattered side view mirror on 12, 13, 14 Toyota Camry
