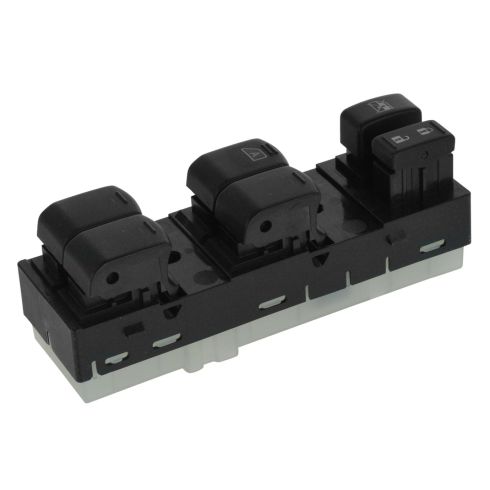
How to Replace Master Switches 2007-10 Nissan Altima
Created on: 2019-05-16
Watch this video and learn how to replace a faulty, shorted, or corroded master power window switch on your own Nissan Altima
-
step 1 :Removing the Door Panel
- Remove the trim door behind the door handle with a pick
- Remove the Phillips head screw from the door handle
- Pry up the arm rest with a trim tool
- Remove the bolts from the door panel with a Phillips head screwdriver or 10mm socket and ratchet
- Pry out the door panel clips from the door panel with a trim tool
- Lift the door panel up and off
- Pry out the courtesy light cover with a pick and disconnect the wiring harness
- Remove the interior door cables from the door handle
- Disconnect the wiring harnesses from the master switch control
-
step 2 :Removing the Master Window Switch
- Flip the door panel over
- Press in the tabs on each side of the switch with a flat blade screwdriver
- Remove the switch
-
step 3 :Installing the Master Window Switch
- Snap in the switch to the door panel
-
step 4 :Reinstalling the Door Panel
- Connect the wiring harnesses to the master switch control panel
- Connect the wiring harness to the courtesy light
- Connect the two interior door cables to the interior door handle
- Lift the door panel into place
- Tighten the two Phillips screws to the door panel
- Press on the arm rest
- Tighten the Phillips screw to the door handle
- Press on the interior door handle trim
Tools needed
-
Phillips Head Screwdriver
10mm Socket
Ratchet
Pick
Hey, friends. It's Len, down at 1A Auto. Today we're going to be working on in 2010 Nissan Altima. And we're going to be replacing a master switch for the window unit block, little mirror button. It's a fairly simple job. And I want to be the guy that shows you how to do it. So if you need any parts you can always come to 1A Auto and check us out. Thanks.
So here we go. We're going to get inside this door panel so we can see what's going on in there. First thing I like to do is I like to get behind here. This is where the handle is. This is a little cover right here. It should just pop right up. So what I'm going to do is I'm going to take a small screwdriver. I'm going to see if I can pry it up, pop it out. Okay. Behind here you'll notice there's a Phillips-head screw, so I'm going to turn that to the left, remove that.
Then I'm going to come over here. I'm going to try to remove this little cover or armrest, I should say. I'm going to use something plastic. Try to Pry. Not trying to use something metal because I don't want to chisel up the rest of our door. So here we go. Phillips-head right here. There we are. That's what it looks like. We can set that aside so we won't lose it. We'll take a look. There's nothing else back there that could hold this door panel on. So we'll move along. We're going to take this off now. I'm going to use something like this. Okay.
I'm going to come right here. I'll see if I can pry it up. Okay. It's pretty tight. I'm going nice and slow because there are clips under here that I don't want to break. If something breaks, well, you break it, you bought it, right? So I'm just going to go along. Once I get all this up I'll show you where all the clips are so you can see why I'm trying to take it slow.
Let's see if I can grab it. There we are. It feels like maybe one more. There we are. Okay. So you can see, we have all these slots right here. We've got all these clips. These clips are what was holding it in. This one was the main one. And that one goes in here. That's why I was trying to start there first, get this undone. That way, there I can lift up, go along the line and un-clip all these. All right.
We'll set this aside. Now we're going to take a look. We want to see what could be holding this plastic door panel onto the inner part of the door. It looks like we might have a screw here, screw there. It looks like a Philips-head or a 10 millimeter, depending on what you have access to. Since we already used a Phillips-head, we're going to go with the assumption you have access to a Phillips-head.
I'm going to turn that to the left. This is a ratcheting screwdriver. It's wonderful. Electric screwdriver would be even nicer. Just going to pull this out. Here we are. Grab that second one. There we are. Same size as the other one. We don't have to worry about mixing those up, but they are quite a bit longer than this one.
Now what I like to try to do, I'm going to see if I can pull up on this. If it doesn't feel like it wants to come up, we could even just try to take the door panel off first and try to take a peek behind there. There is going to be wiring, obviously. These are switches, so they must have electrical current going to them or from them. Okay.
Something to pay attention to as well, is there is a light down here, which also means that it has electrical current getting to it. So there's going to be wiring here, there's going to be wiring here. So when we pull off this door panel, it's going to come off on the bottom this way. And then up along the top there's a little ridge that it sits down onto.
So when you get to the top, we're going to come popping, popping, pulling out. And then it's going to come out and up this way to come off. All right. So I'm going to grab my little tool again. You can use one that's a little thicker, one that's a little thinner, whatever you want to use. But I prefer to use plastic on this, rather than metal, just so I don't mess up my door panel too much.
This one might not be in the best condition, but we'll just try to do it right. I'm going to try to come in. I'm going to try to pry away. Okay. See if I can find approximately ... All I'm trying to do is get in between the door and the panel. Okay. And turn my hat around just, so I can get my head down in here a little bit better. Okay, so I can look down through here.
I can see there's a clip. There we are. There's one removed. I'm going to bring it down along here. There we are. Another one. Another one's right here. There we are. I'm just pretty much following the door panel around the door. This kind of tells me where all the little clips are. Okay. I'm going to come up this side.
Feels like there should be one right about here somewhere. There we are. Bringing it up. Okay. There we go. Pull this away. Now we can see our wiring and our cables. So we want to make sure we disconnect all this stuff. We want to try to avoid any tugs on wiring. If you pull out any wires for many switches or harnesses, well, we're going to have bigger issues.
And I can show you how to fix it all, but let's not do that today. Let's just get the part done that we're trying to do. I'm going to try to take a look under here, see if I can take this off real quick. I'm just using my small screwdriver. Okay. We've got a little electrical connector here. Going to see about pushing that in. Lifting it up and out.
We're going to come in from behind here. Try to take a look at what we're dealing with. All right. We've got two cables. If you wanted to, you could mark them to try to remember which one's which. Or you can just remember the top that comes at the top right here, comes to the top up here. Okay, that's pretty easy to remember. So we'll go, we'll just go with that. You could use something like a crayon.
That just pops right out of there. There's a little lip right here or a little, well, you can call it what you want. Think of what you want to call it, call it that. That's slides into this hole right here. Okay. So if we were installing it, we would slide the little tip into that, hopefully. It's lubricated, so it's hard to hold on to. Basically, it slides right in there and then slides like that and it locks it in. And then if you wanted to lock it back in. Okay.
But we're going to be installing it again later anyway, so here we go. I'm going to pull this one out as well. Trying to be careful not to break the latch. There we are. This one's a little bigger. No real nub. Just a big old circle. Okay. Now we've got the door panel. We're gonna try to keep pulling it away, but not putting too much tug pressure on this. If you need more slack, you can go ahead and pull these little pins out of the door. And try to give yourself more slack.
I'm just going to try to do with the way that it is. This one right here, there's a little push pin, I'm going to try to push that in. Pull this out. Always check your electrical connectors. I'm going to skip saying it on everyone, but I'm going to say it for this one. Check all your electrical connectors as you pull them off. Make sure there's no funny colors, green, blue, red, rust, anything like that.
If there is, you're going to need to do something about it. Okay. Let's see. I'm going to try to find the prong on this one. Feels like it's probably on the backside. Here it is, right there. All I did was come around from the backside with my finger. Squeeze on it. Pull down. Okay. You can't really see that because it's in here, but it's very simple. You just grab it with your index, pop it out. Okay.
This one, going to take a look at it. How does it go in? Don't mind me and my head. I'm just going to try to push. See If I can see it. There we go. Can you see it better now? I can see it better now. Here's our little push. We're gonna try to push that in. And pull out our electrical connector. So you can use our small screwdriver if we want. Pull that out. Take a peak. It looks good.
So now that we've got the door panel off, it makes it much easier just to have it off and out of the vehicle. You can do it with everything hanging on and blah, blah, blah. For me, I just wanted to take it off. I put it on a nice little workbench that way there I can work on it. What am I going to do is I'm going to look at where these clips are. This is where the switch gets held in. All right. The assembly.
I'm going to match it up with the other side, with my imagination. And I'm just going to grab with my fingers. I'm going to try to squish in this tab essentially, but under there. I have a pretty good imagination so I can kind of picture where they're going to be. I'm sure you can get the same. We'll do the same with this side. If you need to, you can use a little pocket screwdriver. Just try to push it. Okay. This one. Yep. This one right here.
We'll get this right out of the way. And here's our switch assembly. So now that we've got our switch out. We want to look at all the little prongs and make sure we don't see any rust or green or blue or any funny colors, aside from metal color. As you can tell, everything on this looks good. What can happen though, is you can get moisture. Maybe you have your window down, it's raining, whatever the cause may be.
A little bit of snow falls in, if you're up in New England like I am. It'll fall in and it'll seep into where you're switch and everything is. And it'll all get corroded inside there. You'll see some funny colors. So if you see anything like that, you're going to want to go ahead and replace this. Judging by the look of this one, it looks like it should be all set to re-install. So I'm just going to go ahead and reinstall it. All right, everybody.
So we've got our door panel right here. You'll notice that we've got all these little holes in it. And that's where all these clips are going to go into. Okay, so all I'm gonna do is I'm going to line it up with where I need it to go. I would like to mention that there's an angle right here. This has to slide in and under first. So you don't want to go back first and then under. You need to go from a front, this angle, slide it under right there, push it forward. Then it's latched in. There we are.
Let's go ahead and install our door panel. These are all where our little prongs went into. If you see anything that looks like this, this should be in in the door, that just pulls right out. We'll check them all. So it looks like we've only got one in here still. We're going to take our door trim tool. Try it from whichever way you want, but essentially, we just want to be able to pull that out.
Let's see if I can get it. There we are. Okay. I'm gonna put this right inside our door panel. We'll find the one that it came out of, bottom corner. It's got a little thick opening here, that goes right there. So I'll just try to slide it in. There we are. Make sure all of these are still in. Okay. Everybody looks good. Perfect. Let's get this up here. We're going to make sure we take this wiring.
We're going to put it down through this hole. That's where the little lights going to be. You don't want to try to forget ... You don't want to forget that because it's going to be hard to get it back out, someday. All right. Now we can start connecting everything else if we want. You could do these up here or these down here. I'll start at the bottom and continue my way up to the top. So we've got the one for our window. There we are.
Center one, that's the power for everything. Got our little lock switch. All right. Actually this one right here looks like it's for the window or the mirrors left and right, blah, blah, blah. So there's that. That's what that one was. Perfect. All right, so we've shaken it around. We're going to look back down here. This came out. We might have to put it back in again. Who knows? Just wants to be out, but we want it to be the way we put it.
So just keep grabbing it. Keep giving it a tug. Get it back out there. Obviously you don't want to yank it right out of the thing. I going to try to hold it up against here. Now I'm going to grab our cables. Hopefully, we remember which way they go. Top is on the top. Bottom's on the bottom. So I got my bottom one. I'm going to go right inside this hole right here. We've got a round with a round hole. I'm gonna put it in. Go over. And I'm just going to push it in. Let's see if it'll go. There it is.
Take our top one. Bring it back around. We've got our little nub. Little nub goes inside that nub hole. See if we can get it. There it is. I'm just going to get that into the slot. I just want to make sure it's in all the way. It's not. If it isn't, then it falls out. You'll have issues. So just take your time, make sure you do it right. I'm gonna try to spin it. Sometimes they can be a little bit of a pain. There it is. Perfect.
So we don't have any more wiring in here. We can look down in. We know we've got everything connected. We still got our little wire hanging out the bottom. We've got a little extra pieces. It's going to go like this. I'm gonna start it. And along the top, there's a little ridge that runs along here, that's going to sit inside this ridge right there. Okay. So once we get it sitting down on there, we can let go of our panel.
Double check for our little wire, still there. It's looking good. Nice. Then we'll just go ahead and we'll take this and we'll bonk it in going all the way around. Double checking, we've got our wire down here. Looks good. I'm going to start at the top. I'm going to just be going across like this. Boom, boom, boom, boom, boom, boom, and I want to go around. All right. I'm making sure that this is pressed down as far as I can go. Give it a little shake. Feels good. Very nice.
We can go ahead and put in our screws. We've got the short one there. We're going to have two long ones, one there and one there. I'm using my Phillips-head, I'm turning these clockwise. If you wanted to, you could use a 10 millimeter. If you notice that you are trying to tighten these down and for some reason the Phillips-head kept sliding off or bouncing off or it seemed like it was stripping, you would want to make sure you used a 10 millimeter.
But to help prevent your Phillips-head from stripping, you can just press it in at the same time. Here we are. I've got my last one, the short one. Remember, it goes in behind here. You can go that way. Just go right up on the top. We'll go this way. There we are. Now before we go too far, we want to make sure we test everything right. We don't want to put everything together and then have to take even more apart. But we do need to have all this stuff in just to make sure that everything's secure enough to use.
So now we're going to try the window. I got the key power on. So we can try going down a little bit. That seems pretty good. Go Up. Very nice. We're down. Stop. Up. Perfect. I like to leave my window down when I'm working just in case I happen to close the door and it might be locked for some reason, not gonna lock myself out. All right, so let's move along. I've got this little cover, might go here. Doesn't go there. Goes over here.
But we'll look at it real quick. We'll see we've got a little tab right here. We've got a little push tab right there. This one right here obviously, isn't a push tab. It needs to go in first and then push the backside in. Okay. So I'll just pull this away. I'm going to put it in that little slot right there. Just try to see if I can push this in. If it doesn't seem like it wants to click in, that's okay. There we are. That seems good. Sits in there nice and flush.
We can move along. We can go ahead and do our armrest. We notice we've got all these holes going along here, right? That's where all these are going to clip into, going along the line. So I'm just going to take it. And we'll line it up. Yeah. I'm going to see if I can get them all popped in. Looks like it needs to go a little bit more on the backside here, see if I can get. Should have started with the back. So I'll just lift it back up, see if I can get it started in.
Something's going on, got this little tab right there. If it doesn't seem like it wants to go in because the tabs bending out. It's very common. It's okay. We'll just use our small screwdriver. Again, it's a very handy tool. We'll push it in. Push it in. Okay. I'm just gonna come down the line. Okay. So we've got our little connector. You can see where the little lock tab is. We've got our connection area over here. The lock tab goes on this side right here where my finger is.
So I'm going to go ahead and line those up, clip it in. All right. We've got a couple little tabs here, and then we've got our under tabs or whatever I guess you'd call them. These ones will slide in, but these need to go in first. So I'm going to go like this. There's a couple little holes under here. I'm going to line up those tabs with my holes. I'm just going to lift it up. Click it in. All right. Door panels on. Len19:04Now we've completed our job. Great job everybody.
Thanks for watching. Visit 1AAuto.com for quality auto parts shipped to your door, the place for DIY auto repair. And if you enjoyed this video, please click the Subscribe button.
Shop Products
How to Replace Power Window Switch 2001-04 Chrysler Sebring
How to repair, install, fix, change or replace a damaged, worn out, faulty or shorted power window switch on 01, 02, 03, 04 Chrysler Sebring.
