How To Replace Master Cylinder 1959-60 Pontiac Bonneville
Created on: 2010-04-30
How to replace a brake master cylinder on a 1960 Pontiac Bonneville. This is the same for 59 and 60 and may be similar for many GM vehicles of that era.
-
step 1 :Removing the Master Cylinder
- Coat the bolts and fitting to the master cylinder with rust penetrant
- Clamp vise grip pliers to the fitting and loosen the bolt with a 7/16 wrench
- Remove the 9/16 bolts
- Remove the master cylinder
-
step 2 :Inserting the Seals
- Pull out the plunger
- Remove the seals with a hook
- Insert the seals to the plunger
-
step 3 :Installing the Master Cylinder
- Carefully insert the master cylinder into place
- Screw the fitting into place by hand
- Insert and tighten two of the 9/16 bolts on either end
- Gently press the brake
- Tighten the other two bolts to the cylinder
- Evenly tighten each bolt by switching back and forth as you tighten them to avoid pinching the seal
Tools needed
-
7/16 Inch Wrench
Socket Extensions
Rust Penetrant
Ratchet
Small Hook
9/16 Inch Socket
Brought to you by 1AAuto.com, your source for quality replacement parts and the best service on the Internet.
Hi, I'm Mike Green. I'm one of the owners of 1A Auto. I want to help you save time and money repairing or maintaining your vehicle. I'm going to use my 20-plus years experience restoring and repairing cars and trucks like this to show you the correct way to install parts from 1AAuto.com. The right parts installed correctly: that's going to save you time and money. Thank you and enjoy the video.
We're going to replace the master cylinder on this 1960 Pontiac Bonneville. Tools you'll need are a 9/16 socket and ratchet and extension, and a 7/16 wrench or possibly a pair of vice grips if your lines are corroded. Also, if your lines are corroded, you may want to have some extra line that you can bend up for the main line, and then also check out our other video that's attached. This is a response to see how you bleed the brakes afterwards.
The first thing we're going to do is coat these bolts with penetrating oil. This fitting here, that's going to be your toughest hurdle right there is getting that apart. Yes, in case you're wondering, that big air cleaner does mean that this is a tri-power.
I let my penetrating oil soak. I'm just going to take a shot because this is a California car, and use the 7/16 wrench, but most likely, whoop and it did, it actually broke free, it broke free. What we generally find is the best method on these is to take a set of vice grips and clamp them on there and that'll ... Now I'm not quite free yet, because if you watch when I turn, oh, now I'm free. You just have to be careful, especially on these older cars, because they don't make the lines for them. You've got to be careful when you take these apart, because the fitting can be seized onto the hose and you end up breaking the hose. This line wouldn't be that bad of job because it's pretty short and you can probably remake it pretty accurately.
I've got the line unhooked, I've got the bolts off, and I'm just going to kind of shake and pull and pull off the old master cylinder. To get those seals off, I'm going to use a little tool, a little hook, and I'm just going to pull out this plunger, stick it right in there underneath, pull them up and out, and then pry them with my fingers. Obviously, in this instance, the right tool makes a lot of difference.
Pull it out and there's the old one. Just use a rag real quick and clean up this a little bit. The new ones, they go on with the solid side facing the cockpit of the car. Put it on and pretty much just do it with your fingers. The second one, you might need to back that off, use the hook here, and get it in. There we go. Our new seals are in.
Here's the rebuilt master cylinder from White Post Restorations: www.whitepost.com. It's not a part that 1A Auto sells, so we'll give credit where credit's due. Basically, it installs like the original, so put it on really carefully, you don't just want to slam it on there and possibly scratch that sleeve or anything.
Let's see here. I can actually feel it, hear it giving pressure as I try to put it together which is good. Actually, I'm pushing down a little bit on it as it goes in. Working it in. What I'm going to do is push it on, put a couple of these bolts on, and then I'm going to gently press the brake pedal and get the cylinder seated. Now I'm just going to get in the car, and I'm going to gently press the brakes and seat the cylinder. When you're in the car, you want to press the brake pedal very gently, and just make sure there's no hesitation. Nothing impeding the travel at all. There's a seal on the master cylinder.
At this point, I'm just going to put the rest of the bolts on here, and then I'm going to evenly tighten them up. I'm not just going to tighten one up at a time. I'm going to go about two or three turns on each one so everything comes together nice and evenly here. We're just going to speed the tape up here because all I'm doing is, like I said, evenly tightening. I'm just switching back and forth between each nut just so the master cylinder presses into the brake booster nice and evenly because there is a seal. We don't want to just tighten one up and pinch the seal or something like that. I'm just alternating and tightening so I don't mar the nice finish.
Tighten my line in. Then we'll have to fill it with fluid, and then we'll need to bleed the brakes. We should have some good brakes now. We know it was the master cylinder because the reason the brakes stopped working we had done all the wheel cylinders and the brakes over so the master cylinder went about four or five months after that. That should put us back on the road.
We hope this video helps you out. Brought to you by www.1AAuto.com, your source for quality replacement parts and the best service on the Internet. Please feel free to call us toll-free, 888-844-3393. We're the company that's here for you on the Internet and in person.
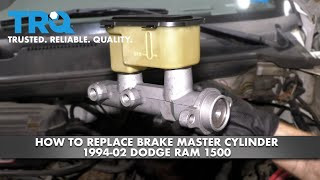
How to Replace Brake Master Cylinder 1994-2002 Dodge RAM 1500
This video shows you how to install a new master brake cylinder in your 1994-2002 Dodge Ram 1500.
