How to Replace Lower Control Arm 2007-14 Toyota FJ Cruiser
Created on: 2019-08-07
Watch this video to learn how to replace the lower control arm on your 07-14 Toyota FJ Cruiser! 1A Auto shows you how to DIY!
-
step 1 :Removing the Wheel
- Raise the vehicle with minimal weight on the wheel
- Loosen the six 21 mm lug nuts
- Raise and support the vehicle
- Remove the six lug nuts
- Remove the wheel
-
step 2 :Removing the Lower Control Arm
- Remove the four 12 mm bolts to remove the front skidplate
- Remove the tie rod end cotter pin
- Remove the 19 mm tie rod end castle nut
- Hammer the knuckle to loosen the tie rod end, then remove the tie rod end
- Remove the two 19 mm lower ball joint bracket nuts
- Remove the lower ball joint cotter pin
- Loosen the 24 mm lower ball joint castle nut
- Turn the knuckle away and secure it so prevent the CV joints from separating
- Separate the lower ball joint bracket from the ball joint using a pickle fork and hammer
- Remove the nut and lower ball joint bracket
- Loosen the 19 mm nut and 19 mm bolt at the strut bottom
- Remove the 19 mm nut from the 19 mm forward camber bolt, then remove the washers and bolt
- Remove the 19 mm nut from the 19 mm rearward camber bolt, then remove the washers and bolt
- Remove the 19 mm lower strut bolt
- Remove the lower control arm
-
step 3 :Installing the Lower Control Arm
- Insert the lower control arm into the mounting brackets
- Install the forward 19 mm camber bolt with washer
- Install the rearward 19 mm camber bolt with washer
- Install the 19 mm nut with washer on each camber bolt
- Insert the lower strut mount into the control arm
- Install the 19 mm lower strut bolt and 19 mm nut
- Torque all three nuts to 100 ft-lb
- Untie the knuckle
- Install the lower ball joint bracket onto the lower ball joint
- Install the 24 mm lower ball joint castle nut by hand
- Align the lower ball joint bracket with the knuckle
- Install the two 19 mm lower ball joint bracket bolts
- Install the tie rod end into the knuckle
- Install the 21 mm tie rod end castle nut
- Torque the 19 mm ball joint bracket bolts to 118 ft-lb
- Torque the 24 mm ball joint castle nut to 118 ft-lb, then continue tightening to align the castle nut with the cotter pin hole, if necessary.
- Install the ball joint cotter pin and peen it over
- Install the 21 mm tie rod end castle nut, and torque it to 67 ft-lb, then continue tightening to align the castle nut with the cotter pin hole, if necessary
- Install the tie rod end cotter pin and peen it over
- Install the forward skidplate, starting with the mounting hooks, and secure it with the four 12 mm bolts
-
step 4 :Installing the Wheel
- Install the wheel onto the wheel studs
- Install the 21 mm lug nuts and tighten them by hand in a crossing pattern
- Lower the vehicle with minimal weight on the wheel
- Torque the 21 mm lug nuts to 85 ft-lb in a crossing pattern
- Lower the vehicle completely
Tools needed
-
24mm Socket
Torque Wrench
Hammer
Rust Penetrant
Jack Stands
19mm Wrench
19mm Socket
Pliers
21mm Socket
Pickle Fork
Side Cutters
Blowtorch
Ratchet
Floor Jack
1/2 Inch Breaker Bar
Hey friends, it's Lenny here at 1A Auto. Today we're working on a 2007 Toyota FJ Cruiser and I'm going to be replacing the left front lower control arm. It's going to be very simple. Meh, I can do it, you can do it, too. If you need this or any other part, you can always check us out at 1AAuto.com. Thanks.
So here we go, friends. I've got the vehicle supported off the ground, the wheels just barely touching so the majority of the weight is off the wheel. I'm going to use my 21 millimeter socket and a long breaker bar. I'm just going to break all six of these lug nuts free. I don't want to loosen them up too much. I don't want to damage my studs by the wheel cocking off to the side or anything. Here we are. All six. Now we can raise the vehicle. We'll make sure it's safely supported. We'll take off all the lug nuts and remove the wheel. One lug nut left. We're going to hold the wheel so it can't move around. Come on, baby. There it is. Set these aside. Remove our wheel. Set it aside so it's safe.
So here's our lower control arm that we're going to be replacing. All right. There's a couple of things that it's connected to. It's connected to right here, so we're going to have to take this nut off, okay? We'll take this off of here. We're going to take these two bolts out and we're going to separate this piece from the lower control arm. We're going to take off this outer tie rod and nut or the cotter pin and the nut. We're going to bonk this so the outer tire rod end falls down. Once this comes down, we'll be able to pull this out and away and it'll give us clear view to be able to separate this. We'll remove this bolt and nut right here and then we'll be working our way inside here. We have our alignment adjustment bolts here, our camber adjustment bolts. It comes through from the front of the back this way. Same thing up in the front here, in front of the back this way. So we'll take down this skid plate that'll make it so we can get that bolt out.
A lot of times what happens is there's a rubber bushing inside here. The bolt goes through the metal part of the bushing and then the rubber bushing's right there as well. And it gets all frozen inside there. Not frozen, but corroded, rusted, whatever you want to say, stuck inside there and you can't get these bolts out. So we'll have to see. If it doesn't come out, well, it could be a fun experience for all of us to see how to get that bolt out. So we'll give it a shot and see what we can do.
So your forward skid plate should have a bolt here, should have a bolt there. These are imaginary in this vehicle, but they should have them there. There is also hooks that are right directly above where those bolts should go and the hooks go into the forward area of your frame. So that's why this isn't falling down. All right. There's also two more bolts. There's one up inside this hole and there's one up inside this hole. Once you remove the two of those, this is going to want to swing down. Okay? And so you want to make sure that you have control over it so it doesn't bump you on the face. I don't want anybody getting hurt. Safety is the number one concern here at 1A Auto.
So if you had all four, start with the front ones and then work your way to the rear. I'm going to pretend my imaginary ones are already out. I'm going to hold up my plate. Here we are, that bolt down there, and I'll let this swing down. Here we are. Going to lay down my tools so I have my hands, grab my skid plate. With it down like this, I'm going to pull it straight up and away from the vehicle. There's our forward skid plate. We'll set this aside and we'll continue.
We're going to use a little bit of penetrant. I'm going to spray up along here. All right, right inside along there, right inside along here, and then of course where the nut is that goes onto the bolt. I'm going to do the same thing on the rear word one. Here we are. Come up ahead here. I'm just going to do this, outer tie rod end nut, and then right down here. Just spray this stuff, not like it really makes too much of a difference on those particular ones, but can't hurt. It doesn't cost me too much money to do it. Perfect. And of course we're going to be getting alignment after this. So this is going to help the alignment person along. A little bit of penetrant there cause they're going to have to break free of this jam nut.
So I'm going to get this cotter pin out of here. Excuse my cutters. If you have a new cotter pin, you don't have to worry about this one. If you don't, well, just try to save it. I do have access to new ones, but that's pretty much what a cotter pin looks like after it's all mangled. We'll set that aside.
All right, we're going to remove this nut, 19 millimeter safety glasses of course, and hand protection. That's what our nut looks like. It's a castle nut. Just going to start it back on here a few threads. Now I'm going to give this knuckle a couple bonks. Bonk, bonk. Try to break the tie rod free. The reason for that being on there is so that the tie rod can't come swinging down and potentially hurt anybody. So here we go. I'm going to try not to hit up here, down here or the boot. I'm just going to try to hit the knuckle itself. There we are. Perfect. We've got that out of the way now. This can pivot. Very cool.
Let's move ahead to the next step. We're going to take off these two bolts. 19 millimeter. That's what one looks like. That's what the second looks like. They're both the same. We'll set those aside. We're going to take out this cotter pin. Cotter pin, set it aside. We're going to remove this nut, 24 millimeter. That's what our nut looks like. Castle nut. These slots are going to line up with that hole. We're going to put this on a few threads.
Okay. Now I'm going to use something as simple as a ratchet strap. I'm going to go right inside this. Okay, and then I'm going to take the other end and go right inside the frame slot there. We'll pull this tight and then right under here, you're going to see, the knuckle is going to pull apart right here where we took those two bolts apart. Ready? Just get that pulled up and away. That looks pretty great. Now we've got plenty of room to do what we need to do, which would be separate this. We need to get this piece off of the lower ball joint. You want to pay special attention to the way that it is. Okay? It's got this end right here, nice flat end. It hits up against here. It's a stopper so when you turn your wheel, you're going to the right. Bonk, bonk. It can't go any further, okay? If you put it on backwards, well, it's really not going to work out that well and it's pretty much impossible.
So anyway, I'm going to grab a pickle fork and my hammer and we're going to get that separated. Pickle fork, little hammer. Let's give it a couple of bonks and see what happens. This piece right here, we want to separate and have it come down. That's what this nut's for. It's going to keep it from flying off, potentially hurting anybody. Here we are. The nut saved us. Put away tools here. There's our little bracket. What I was saying before about putting it on backwards, the bumper there isn't going to work out very well, okay? It's pretty easy to remember. The flat area goes towards the front and it hits up against here.
Now, what we're going to do is we're going to loosen up this nut from this bolt. The bolt comes through from the rear to the front. We use a 19 millimeter on the bolt head and another 19 millimeter on my air gun on the forward end. Here we are. I'm going to leave this so it's still in here, okay? The reason why I'm leaving it so it's still in is just so when we go to remove these bolts right here and they're finally loose, this control arm can't come swinging down while I'm under there and potentially hit me in the face or hurt me in any way. So we'll leave that just like that.
So now we're going to try to remove this bolt from the front portion of the lower control arm, okay? All I'm going to do is I'm going to hold this part with my 19 millimeter and come right in here with a swivel 19. You want to be careful for your axle boot, okay? If you're using a long, regular 19 you're probably going to be hitting right up against it and potentially damage it. All right, so that's very tight. So using the air gun with the swivel, the swivel really took away a lot of my torque. So I'm just going to try to use this and give the old college try here, see if I can get it to want to break free.
So we have our acetylene torch here and what I want to do is I want to try to heat up this nutted area right here. This is the part that's threaded on to the actual bolt, all right? Something that I want to be super careful for, rubber boot for the axle. Okay? I don't want to melt this rubber boot in any way. So I need to make sure that my heat's being concentrated towards here and not going this way and potentially melting our boot. So if you melt this boot, you're going to need to replace your whole axle, all right? So just be very careful when you're applying heat. Just apply heat to where we need it and hopefully we should be able to move along all right.
Flame on. Nice little heat source here. Once again, I'm being very careful not to have too much heat going near my boot. The flame might not look like it's going there, which is great, but you do still have a lot of heat going over that way. I'm going to try to keep my heat down along the bottom here. I'm trying not to heat up the bolts so much as the nut. Here we are. Felt like I felt it move a scoatch, and then that was it. I'm going to continue heating this nut until it's pretty hot. All right. Let's try it again. Switch my safety glasses. So we got ourselves a little bit more leverage here. We're going to want to be very careful at this point. Okay. It's a solid no.
All right, so heating up the nut, trying to use the bars and everything like that with our 19 millimeters, it just wasn't working. All right, so we have other options. Got ourselves a nice little Sawzall here with a metal blade. Safety glasses, hand protection. What I'm going to do is I'm going to try to go right along the inside of this right here. Okay? This is where the control arm mounts into. I'm going to go right along the inside and try to cut along there and then I'll cut all along here. After that, we should be able to bonk this outta here and that one out of there. That's my plan. Let's give it a try.
Oh, that's on like speed 1000. Let's try turning it down a little bit. I'm trying to cut through the bolt right here, and as I cut this way for a little while, I spin this way, because when I cut a line going this way and I come this way, it grabs on a corner and then I'll cut that, then I come up here and grabs on the next corner. So I'm creating corners and cutting corners. I'm going to keep going. Okay. So we used our Sawzall. We came through quite a bit. It's hard to tell just how far we made it. So what I want to do now is I want to just give this a couple bonks and see if I can get that to pop right off. Okay. Here we are. It's warm. The other side, cut the bolt. Very nice. I'll set that stuff aside. We'll move along.
So we've got it so the control arm can move, so the forward end is ready to come apart. It's on there pretty good. Yeah, that's on there. Pretty good. We'll leave that alone for a minute. Cool. Okay, I'll grab that. I'll show you what's going on. This piece right here has this shank that goes all the way through to this side. Okay? And that's what's inside the bushing inside the control arm here. So when we're cutting, we cut through this part and then cut through the bolt that goes from this side all the way to that side, and then had to continue going all the way through the other side of this to get this piece off. Now, we still have this part. This goes all the way through this and then through this side. So what we're going to have to do is probably cut this side right here as well. We're going to do the same thing to this side. Okay. Looks like that's ready to come off, hopefully, if I can get my hammer in there.
Okay, so the forward end is ready to come out. Now we're going to work on the rear word end. Let's get a little heat going here. I'm going to heat up this nut back here. I'm going to try to grab on the forward end of that bolt, see if I can get it to turn out here. Turns out that the nut and the cam adjuster on the backside of these is one piece. Normally it's two separate pieces, so I'm interested to see if this will make it so it comes right out, or at least the bolt. It may work. It may not. Just going to get this nice and hot. It's getting nice and hot now. Give this a try. I don't know. It feels like it might be moving a little bit, but it's not very much if it is.
Just going to get my jump on here, see if I can get that to hold it. I hate how it doesn't give you enough. Oh, this is ridiculous. Oh, this one, looks like it is two separate pieces. It seems like the nut's coming off of the adjuster piece, which is odd considering the other side looked like it was all one piece. Holy moly. Okay. All right. So we'll just get this nut off of here. Carefully removing this nut here. Super hot, obviously. There it is. Get that out of the way. All right.
Okay, so what I'm going to do now is I'm going to try to use my air chisel on this piece right here and try to drive it off of there. I've got my long extension. I want to keep in mind that that's super hot. I'm wearing my safety glasses, my ear protection and my hand protection. Okay. Seems like we've got a good thing going. All right. That's out of the way. I'm going to make sure I go get that just in case it melts or anything. So now I'm going to use my hammer and I'm going to try to bonk this bolt out. I've got my little hammer. Looks like it's starting to come out and then it kind of stopped. So let's go with a little bit of penetrant. Here we are. Let's try some more. All right, so we're going to try the air chisel some more. Okay. It's moving. Come on, baby. It's pretty close. Okay.
Now, when we get this completely out, the control arm can come down, right? The only thing really this holding it in is the strut, the bolt that we left in up there. If you did not leave that bolt in, you need to make sure that it's in right now. Once this comes out, there really isn't going to be anything else holding this in. So to continue, make sure my face is out from underneath there. There we are. All right. This is almost ready to come out. Let's finish it up.
Okay, let's get this nut off of here, this washer, try to give our control arm a little wiggle. The bolt's in there nice and tight right now. So I'm just going to give it a couple loving bonks, try to get it out of there. At this point, this is the only thing holding this control up from falling and hitting the ground. Okay? So keep that in mind. If you've got your head under here, be super careful. I'm just going to see if I can get it out. Of course, it does not want to come out. Okay. Let's get this thing. It's kind of twisted right here, so the bushing's... There we are. Here's our left front lower control arm. Easy peasy.
Okay friends, a quick product comparison for you. Over here we have our original left front lower control arm out of our 2007 Toyota FJ Cruiser. We just removed it. It was super fun. And over here we have our brand new quality 1A Auto part. Both these pieces are the exact same. You can set them right on top of each other. If you don't believe me, they match up completely the same. You got the spot for your strat right here, your two mounting holes. Go to your frame. Turn it over. We've got our brand new ball joint nut on here. Nice protective thing for the boot new boot. Looks great. Even comes with a brand new cotter pin for you to go ahead and mount this in when you get your nut on there. All right. So with all that said, I don't see any reason why this wouldn't be a quality part to install another vehicle. So I'm going to go ahead and do it. If you need this or any other part, you can always check us out at 1AAuto.com. Thanks.
Okay, so I just want to show you real quick. We got a set of cam adjustments. These are really great because obviously we had to cut out the original ones, so you're going to need new ones. So you definitely want to be able to get some of these on hand. And if you can get some that are like these, you're going to be living the dream, because you know why? We've got a little spot right here. That's where this grease fitting's going to go. You're going to pump this up with grease. Grease is going to come out of this little hole right here. Fill up this, and it's going to make it so it doesn't freeze inside here. So someday, I don't know, a hundred thousand miles down the line when you want to replace this thing again, well, it's going to come out nice and easy. So if you can get something like this, you're doing all right. All right, let's get this stuff in the vehicle.
Okay, so we have two different bolts here. We have one that's much thicker, one that's thinner. They're both approximately the same length. The thinner one's a little bit longer. That doesn't really matter so much as just knowing that you have a thick one and a skinny one. The thick one is the forward one. That's the one that's going to have this sleeve. When we go to install all this, that's where the grease fitting's going to go. This is where the grease is going to come out of, so it'll press it in there, come through here, come out of there. We're going to have this on here just like this, and we're going to this sleeve. So you grease it. The grease comes out, fills all inside this sleeve right here, comes out even more, goes all around the outside here, which goes inside where that metal bushing is that we are having an issue getting this out originally on the original part. Okay? So this is a very nice set.
And then of course, once we get it all through and it's coming through the other side of the frame, we're going to put this on and then the nut. Okay? And it's pretty much the same deal for the rear would one, an exception of it doesn't have the sleeve that goes over it. So you would just take one of these, slide it on there, slide it through the frame and through the control arm and put this on, and then this right here. Okay? When you grease it, it's going to come up and it's going to fill all up inside here and make it so no rust can go in between here and the bushing inside the lower control arm.
Okay, so now it's time to get ready to start installing this lower control arm. We're just going to have the bolts ready to go, okay? Just put it on whichever plate fits onto your bolt right. The one with the bigger hole obviously fits on the bigger bolt and vice versa. Smaller hole, smaller bolt. Okay? Grab whichever one you want to hold on to get our control arm up in here. And we're going to put these through front to back. Okay? Just like that. When you end, these are going to be facing upward, not down. Okay? What I mean by that is it doesn't sit like this. It goes right up just like that. Okay. I'm going to grab my rear bolt now, and the same thing, from front to back. I've got my little circle facing up. There we are.
Okay, so we've got our little bushing that's going to go straight through here. It goes right into the controller arm bushing just like that. All right. Cool. If you want to use a little thread locker on this, you can. We'll say it's your prerogative. It is a locking nut, so theoretically you shouldn't have to. Do the same for the smaller side. This side did not have a bushing that goes through the center of the control arm, so we do not have to worry about that. Let's get this started. Here we are. All right. Let's move on to the next step.
So we're going to grab our bolt that connects the lower strut to the lower control arm. Bring this up, try to get it semi-lined up. Now I'm going to try to put my bolt through, which would be much easier if I can come through from front to back, but that's not the way that they go. They go from rear to front. Here we are. Wiggle that around. Washer, thread locker if you'd like thread locker, and then your nut. There we are. Okay. Let's get some torque specifications. We'll get these torque down and we'll continue putting this together.
Okay. It's time to snug these up and then we'll torque them down. All right? So we're going to make sure that our adjusters, like I said before, are going to be facing straight up and down. The alignment person's going to like it better if you start them right there in the center and then they can make their adjustments from there. Okay? So I'm holding the front side with my wrench and I'm turning in the nut side. For this particular application, it's a 22 millimeter wrench on the bolt side and a 21 on the nut side. All right, so that's snug for now.
Now we're going to come up here. These are 24 and 24. They're facing where they need to face, just right there. Like I said, we're just snugging these up and then we're going to torque them down to the proper specification. Here we are. So those are both snug. We're using a 19 and a 19 on these. Once again, just bottoming them out. Okay? All right, let's get the torque specifications and we'll move along.
We're going to torque these down to 100 foot pounds using my 24s for the front bolts here. Tight. Let's move ahead to the rear. Torquing this down to 100 foot pounds as well. Tight. We're going to go 100 with our 19 millimeter for the lower strut to lower control arm bolt. All right, so we'll get this out of here. Just double check our backing plate. Generally speaking, it'll get kind of crushed up against your rotor when you're doing stuff like that. It sounds good. That's just the sound of the pads against the rotor. Very cool. Turn this. We have our bracket. We remember which way it goes, right? This flat part right here goes towards the front of the vehicle and it's going to bump up against right here when you go to a full turn. Okay? Take our slot and nut off. Get this up on there. I'm just going to put the nut on and that's going to hold this from falling down so I can go get my bolts.
All right, so we've got our two bolts. This part right here is going to try your patience, getting it lined up. It has to be just right and it just seems like it never happens. So I'm going to loosen that up as far as it'll go without coming completely off. Let's see if that helps me. Okay, let's get our tie rod in here. Get that started on there. Okay. We're going to just bottom everything out now real quick. So we'll zap these in real quick, 19s. We'll put this on and then the tire rod. We'll snug them all up and then we'll torque them down.
All right, let's torque these two bolts down. 118 foot pounds. All right. We'll do the lower ball joint nut. 118 foot pounds, as well. Here we are. We just want to check it. It looks like our slot lines up with the hole. That's wonderful. Now we'll just go ahead and torque this top one. Grab the torque spec for you. 67 foot pounds. Here we are. We'll just check to see if it's lined up. Looks like it's probably pretty close. We'll grab some cotter pins. We'll put our cotter pin through. I'm going to just bend it over. Tried to bend it with my fingers and it didn't like it very much. I'm just going ping it over with my pliers and come up here. I'm going to do the same to this one. Grab it with my cutters. Just pull it up. Here we are. I want to try to bend that down so there is no possible way that either of these cotter pins can come out of this slot and make these nuts able to loosen up on their own. There's no way they can loosen up. That's tight, tight. Everything's torqued.
All right, let's move on to the next step. So we've got our brand new grease fittings. Just going to put that right in here. Same to the other one. These are seven millimeter. Your kit that you have may or may not come with a fitting. I don't really know. I got lucky with this set. It does. I'm just going to go ahead and snug these up. Here we are. Okay. Let's load them up with grease and move on to the next step. All right. I'm just pumping this full of grease. Get that off of there, this one. This is going to be so great, not that I'm really going to notice the difference right now, but like I said, who knows, 100,000 miles from now or 200,000 miles, it's going to come out nice and easy.
Okay, so now it's time to get our skid plate back up. Remember, we got these little nubs here? Those are going to go up into the frame slots, okay? So just kind of set it up so you know approximately where they're going to go. You can even get behind it a little bit. Might help you see. Here we are. Bring it around. Here we go. Okay. A little bonk. Try and get our bolts up in here. A few good threads. There we are. Same for over here. All right, grab the air gun. Nice and tight. Let's move along.
So now it's time to get the wheel up on here. Oh, by the way, if you see anything nice and new on here that you think that you want to replace on your FJ, go ahead and check out our playlist. I did it all. So we'll get the wheel up on here. Lift it right up. Get our lug nuts started. Okay, 21 millimeter. We're just going to bottom these out and then we're going to torque them down to 85 foot pounds. You'll notice I went in a star pattern or I guess a snowflake in this instance. You never want to go around in a circle because if you start tightening it on, just going in a circle, it might kick the wheel. You might think you haven't tight until you drive down the road, hit a little bump. Bonk. Next thing you know, your wheel's shaking around, lug nuts are falling off and God forbid something happens with your wheel too. We'll get this torqued on. We'll move along. 85 foot pounds in a star pattern, snowflake pattern, whatever you want to call it, crisscross. All right. If you want to go around and do it again, do it again. It doesn't cost anything. There we go. Easy peasy.
All right friends, so now that we've got all that done, you definitely want to make sure you get it to a reputable shop and get yourself in alignment. Okay? You want to make sure your wheels are going nice and straight through to the road so you're not going to wear out your tires. What we did upfront could cause things to be a little bit out of whack, so we want to make sure we're good to go. Like I said before, always feel free to check out our playlist on this. We replaced lots of parts and it was a great time. Thanks a lot.
Thanks for watching. Visit 1AAuto.com for quality auto parts shipped to your door, the place for DIY auto repair. And if you enjoyed this video, please click the subscribe button.
Shop Products


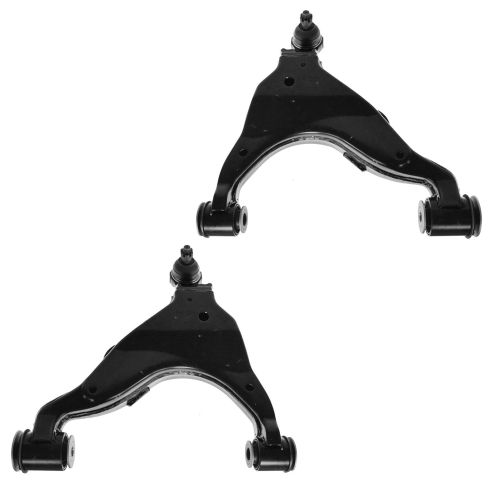
Toyota Lexus Front Driver & Passenger Side 2 Piece Control Arm with Ball Joint Set TRQ PSA62475
Part Details:
- 2 Piece
- (1) Front Driver Side Lower Control Arm with Ball Joint
- (1) Front Passenger Side Lower Control Arm with Ball Joint
How to Replace Front Lower Control Arm 2011-15 Chevy Cruze
Control arms are a crucial part of the suspension system of your vehicle. They carry the load of the vehicle to the wheel and maintain its alignment. Control arms are large and strong. They contain rubber bushings for smoother rides at the cost of eventual wear. How to install a new quality TRQ lower control arm in your 2011-15 Chevy Cruze.
