How to Replace Intercooler Tube 2010-14 Volkswagen GTI
Created on: 2018-05-08
How to replace a cracked or leaking intercooler tube on 10, 11, 12, 13, 14 Volkswagen GTI.
-
step 1 :Removing the Wheel
- Loosen the lug nut covers with the hook found in the kit in the trunk
- Loosen the 17mm lug nuts with the vehicle on the ground
- Raise the vehicle with a floor jack
- Secure the vehicle on jack stands
- Remove the lug nuts
- Pull off the wheel
-
step 2 :Removing the Intercooler Line
- Remove the T25 Torx fasteners from the fender liner/splash shield
- Loosen the two captioned T30 Torx from the intercooler line
- Pry out the lock rings from the intercooler line
- Remove the intercooler line
-
step 3 :Reinstalling the Intercooler Line
- Insert the intercooler line into place
- Clasp the lock rings
- Tighten the two captioned T30 Torx bolts
- Tighten the T25 Torx bolts to the fender liner
-
step 4 :Reattaching the Wheel
- Slide the wheel into place
- Start the lug nuts by hand
- Tighten the lug nuts preliminarily
- Lower the vehicle to the ground
- Tighten the lug nuts to 120 Newton meters in a crossing or star pattern
- Tighten the lug nut covers
Tools needed
-
Flat Blade Screwdriver
Torque Wrench
T30 Driver
17mm Socket
Ratchet
1/2 Inch Breaker Bar
T25 Torx Driver
Hi, I’m Mike from 1A Auto. We’ve been selling auto parts for over 30 years!
In this video, we're going to replace a crank pulley in a 2010 Volkswagen GTI. It is recommended that you replace the crank pulley bolt when doing this job. If you need any auto parts for your vehicle, visit 1AAuto.com. We're going to pull the wheel off. These normally have caps over, so on your vehicle you may have those. You're going to use a tool from the kit in the trunk. It's got a hook on it. You put it in the center of the cap and pull straight off.
This vehicle does not have that, so we're just going to take them off. 17mm socket and a breaker bar. Just going to break them free. This is the passenger side of the vehicle. We're using a two-post lift to raise and lower the vehicle. At your house, you can use a jack and jack stand. We're going to take these lug studs out. Volkswagen uses lug studs or lug bolts, not lug nuts. For this one, when you get to the last one, you're going to want to make sure you put pressure on the wheel. Because of the lug studs, the wheel will fall. Grab the wheel.
To access the front of the motor, we're going to take this panel out. We're going to start by taking these T25s out one at a time. There's one fastener here. There's one here, one here. There's two right here. Underneath, there's one right here, one here, one here, one here. There's two right here, and this one's missing one, but there's normally one right there. Next we're going to take this intercooler pipe out. This comes off the turbo and goes to the intercooler.
I'm going to take these two torques out. It's a T30 and ratchet. These bolts are captured, so they won't pull out. They'll just stay there. I'm going to pull this intercooler pipe out. There's a little lock ring here. I'm going to pull it straight out, hold it. Should be able to wiggle it right out. Then we're going to do the same up here. There's another little lock right there. Pull it out. This comes out of the way.
Now we're going to reinstall our intercooler pipe. Make sure that these clips are pushed down. On this one, you can see it's out. All you've got to do is push it in. Then you have to push this in. Just give it a little force until it clicks. Install these two T30s. We're going to use a T30 socket and a ratchet. Snap these down. Next we're going to install this side panel shield. Install all your T25 bolts.
Now we're going to install the tire. Line it up with the holes and hold it. Then we'll use our 17mm socket to put our lug studs on, or lug bolts, whatever you want to call it. Now we're going to torque the lug studs to 120 Newton meters in a star pattern. When you do it in a star pattern, it makes the wheel go flush to the brake rotor properly.
Thanks for watching. Visit us at 1AAuto.com for quality auto parts, fast and free shipping, and the best customer service in the industry.
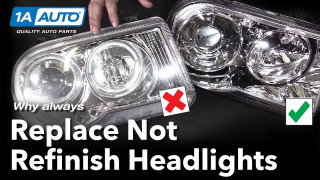
Why you Should Replace Not Restore Headlights
See why replacing your cloudy headlights with new ones is always better than refinishing them Why should you replace your headlights and not clean or refinish them? Three reasons: It's a simple fix, it increases visibility, and it enhances the overall look of your vehicle. Headlights are made from a polycarbonate plastic that can be damaged by UV rays from the sun or suffer pitting caused by road debris light salt and rocks. If you look closely at an old set of headlights, you'll see that the lens is full of micro-cracks. This is called crazing. This crazing, along with pinning, will turn your headlights from crystal clear to hazy yellow and it cuts the output in half, making it very difficult to see at night. It also makes your car look old and dated. With parts from 1AAuto.com and our how-to videos, you can make your vehicle look new and stay safe on the road. To get new headlights for your vehicle, visit 1AAuto.com and visit our YouTube page for do-it-yourself and how-to videos.
