How to Replace Intake VVT Solenoid 2009-16 Toyota RAV4
Created on: 2019-09-19
This video shows you how to replace the VVT solenoid on your 09-16 Toyota RAV4. 1A Auto helps you DIY, and save some money!
-
step 1 :Removing the Intake Variable Valve Timing Solenoid
- Pull the engine cover up to remove it
- Locate the intake VVT solenoid on the rear passenger side of the valve cover
- Disconnect the solenoid electrical connector
- Remove the 10 mm bolt
- Remove the VVT solenoid
-
step 2 :Installing the Intake Variable Valve Timing Solenoid
- Lubricate the solenoid gasket with oil or automatic transmission fluid
- Insert the solenoid into position
- Install the 10 mm bolt
- Connect the electrical connector
- Push the engine cover down onto the mounting pins
Tools needed
-
Socket Extensions
Flat Blade Screwdriver
10mm Socket
Ratchet
What's up, guys? I'm Andy from 1A Auto. In this video, I'm going to show you how to replace the intake VVT solenoid on this 2010 Toyota RAV4. If you need this part or other parts for your vehicle, click the link in the description and head over to 1aauto.com.
Just want to pull this cover off. Just grab underneath the cover, slide up, and up there and there is these retainers that hold it in and just push on little grommets right on those locations. Your intake VVT solenoid is on the back side here. It's similar to the exhaust solenoid. Just disconnect the connector right here. Push down on that and release that connector. Then, there's a bolt right here. We're going to take that bolt out first. I'm going to use a 10mm socket and an electric ratchet. You can use a regular ratchet if you don't have an electric one. Take that out. We can grab the solenoid, try to wiggle it back and forth a little bit. There's an O-ring that if there's any dirt or corrosion above the O-ring, it's a little bit tricky to remove the solenoid. Actually, so I can see it more, not that you have to do this, I am going to take these two nuts off right here just so I can move that wiring harness out of the way. Use the same 10mm socket and ratchet.
Slide this up. I'll just move that out of the way a little bit just so I can see, but you don't have to do this. This is just for the video. I am going to use a little water displacement oil. Just spray that down, let it soak a little bit, or some kind of lubricant. I'm going to take a straight blade screwdriver and just try to get in here a little bit. Just be careful, you don't want to mess up any of the machine surfaces. Be careful prying right here. You don't want to bend it if you're going to reuse it. Just work it back and forth. Just be careful doing this. Slide it up and there you go.
Now, take the VVT solenoid. I'm just going to take a little bit of transmission fluid, you can use engine oil or some other type of lubricant and just lubricate this before you slide it in and it'll just make easier installation. It's also a good idea if you're having problems with this and the solenoid had failed that after you do this job, you actually change the oil because the oil could be the cause of the solenoid failure. Just slide this in here. Just line it up. Don't force it. You want to get everything lined up because you don't want to mess up any of the machine surfaces. I'm going to slide that in just like that. I'll take the bolt, get the bolt lined up. Now, I'll just take a 10mm socket and ratchet and just snug this bolt down. Not too tight. Take the connector and line it up, lock it in place, and you didn't have to take this wiring harness off, but if you did, then install the wiring harness and then these two nuts, install those and tighten them down.
Slide it down. Take this cover and we want to line these little tabs up with these little pins right there. There's three of them. Just push it down and then you're good to go.
Thanks for watching. Visit 1aauto.com for quality auto parts shipped to your door. The place for DIY auto repair, and if you enjoyed this video, please click the subscribe button.
Shop Products
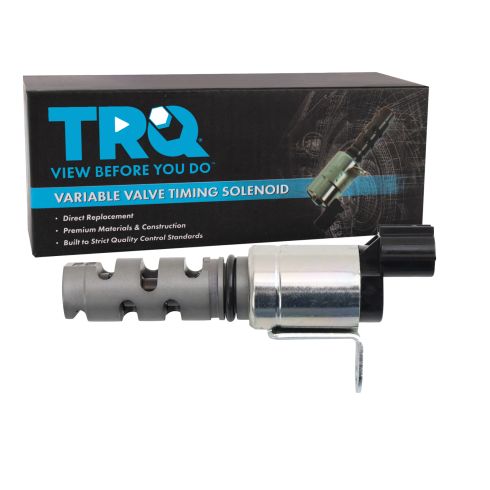
Toyota Lexus Pontiac Scion Intake Variable Valve Timing Solenoid TRQ VTA93431
Part Details:
- No
- 1
- Female
- 2
- Blade
How to Replace VVT Solenoids 2007-12 BMW X3
This video shows you how to install new VVT solenoids in your 2007-10 BMW X3.
