How to Replace Intake Manifold 1996-2005 Buick LeSabre
Created on: 2013-06-29
Watch this video to learn how to replace the intake manifold on your 96-05 Buick LeSabre. The process may be similar for other GM vehicles, as well.
-
step 1 :Removing the Air Intake
- Vacuum any dirt surrounding the manifold to prevent debris from entering the engine
- Disconnect the air intake sensor harness
- Remove the two screws on the air box with a flat blade screwdriver
- Remove the air intake hose and air box cover
-
step 2 :Removing the Mass Air Flow Sensor and Throttle Body
- Remove the 8mm bolt from the bracket below the throttle body
- Adjust the bracket out of your way
- Remove the three 10mm bolts from the mass air flow sensor
- Disconnect the mass air flow sensor harness
- Disconnect the idler control valve wiring harness
- Disconnect the two vacuum hoses
- Remove the mass air flow and throttle body
-
step 3 :Removing the Fuel Lines
- Disconnect the vacuum hose
- Disconnect the pressure sensor harness
- Remove the spark plug wires from the clip on the manifold
- Remove the harness attached to the manifold
- Disconnect the six fuel injectors
- Remove the four 10mm nuts holding the fuel rail
- Pry up under the injector rail with a flat blade screwdriver
- Cut the zip ties with wire cutters
- Pull the injector rail up
-
step 4 :Removing the Upper Intake Manifold
- Remove the nine 8mm screws along the manifold
- Remove the 10mm at the end of the manifold
- Remove the wiring harness clip
- Bend the bracket out of the way with a flat blade screwdriver
- Remove the 10mm from the EGR bracket
- Press the tabs and pull out the pipe
- Remove the intake manifold
- Vacuum any debris in the area
- Clean the lower intake manifold with a rag and mineral spirits or gasoline
-
Torque the 8mm nuts to 2 foot-pounds in this order: rear middle bolt closer to the passenger side, middle bolt directly across, front bolt closer to the driver side, front bolt directly across, rear bolt passenger side, rear bolt directly across, front bolts closest to the driver side, front bolt across, rear bolt closest to the passenger side, rear bolt across
step 5 :Installing the Intake Manifold
- Make sure the sleeve in the lower manifold is snug
- Place a piece of wood over the pole and tap it with a hammer to ensure it's fit
- Insert the upper intake manifold into place
- Insert all of the 8mm bolts and the 10mm and lightly tighten them
- Torque the 8mm nuts to 2 foot-pounds or 24 inch-pounds
- Repeat the order with 4 foot-pounds or 48 inch-pounds
- Repeat the order with 8 foot-pounds or 90 inch-pounds
- Push in the tabs on the pressure sensor and remove it
- Insert the pressure sensor to the new manifold
- Remove the two vacuum lines from the PCV fitting
- Remove the PCV fitting from the hose
- Install the new PCV fitting to the hose
- Connect the vacuum lines
- Insert the PCV fitting to the intake manifold
-
step 6 :Reinstalling the Fuel Lines
- Insert the fuel rail in place
- Seat all of the fuel injectors into place
- Insert the four 10mm nuts to the fuel lines
- Torque the bolts from 10 to 12 foot-pounds
- Connect the fuel injector harnesses
-
step 7 :Reinstalling the Mass Air Flow Sensor and Throttle Body
- Insert the mass air flow sensor and throttle bottle in place
- Insert the three 10mm bolts to the manifold
- Push the bracket in place and secure it with the 8mm bolt
- Connect the mass air flow sensor harness
- Connect the idler control valve wiring harness
- Connect the three vacuum hoses
- Push the spark plugs wire into their clip
-
step 8 :Reinstalling the Air Intake
- Insert the EGR bracket in place and tighten it with a 10mm nut
- Insert the air intake hose and box in place
- Tighten the screws to the air box
- Plug in the air intake sensor
- Wire-tie the harness
- Connect the pressure sensor harness
Tools needed
-
Socket Extensions
Torque Wrench
Hammer
Block of Wood
Vacuum
Flat Blade Screwdriver
8mm Socket
Mineral Spirits
Wire Ties
10mm Socket
Ratchet
Cloth Rags
Wire Cutters
Brought to you by 1AAuto.com, your source for quality replacement parts and the best service on the Internet.
Hi, I'm Don from 1A Auto. I hope this how-to video helps you out, and the next time you need a part for your vehicle, think of 1AAuto.com. Thanks.
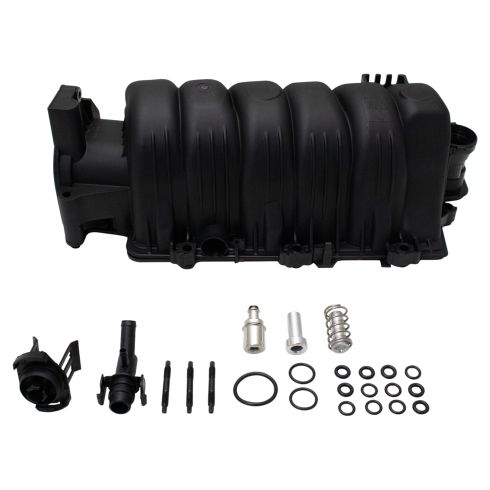
In this video, we're going to show you how to replace the upper intake manifold on this '97 Buick LaSabre. This vehicle has the 3800. This is a common repair needed for a lot of these GM 3800 engines. The exhaust gases can actually get hot and warp the manifold, and it starts to let coolant leak into the engine a little bit. You'll start losing coolant, but you're not sure where it's going because it's not leaking. It's not actually that hard of a repair. You'll need a new intake manifold from 1AAuto.com, flat blade screwdriver, a couple of different sizes will help: 8mm and 10mm sockets with a ratchet and extensions, some pliers, a torque wrench that can register 8 foot-pounds or 96 inch-pounds, and also a vacuum to help you clean some stuff up.
We're going to be taking out the manifold and the injectors. In order to do that, we're going to make sure that there's no dirt or anything like that that can get into the engine. We're just going to vacuum that out first. Just vacuum and clean on both sides of the intake manifold as best you can to prevent dirt from getting down into the engine. Move the harness here for the air intake sensor, and we're going to remove the air box to give us more room.
Remove the two screws on top, then pull it back and pull the rubber bellows off of the throttle body. All right, looking at the new manifold you'll see that the mass airflow sensor is held in by three bolts, it's one up here and then two on the bottom. That's the one up here and then the two down here, you can feel around, and you'll feel them with your fingers. On the underside of the mass airflow sensor, there's a clip, bend that down and pull out the harness. Same goes for the idle air control valve. Now, you see that bracket, we're going to need to bend it out of the way a little bit to access the 10mm bolts on the bottom of the mass airflow sensor.
We're going to speed up here as we use a 10mm socket with a ratchet and extension to remove those three nuts, just be careful, try not to drop them as you pull them off the manifold. If you do drop them, you'll want to have a small pen magnet available just to pull them out of there. Pull off your vacuum lines, there's two of them. Continue twisting that bracket, if you need to get more room until you're clear to get your mass airflow out of the way. Pull off your vacuum line and disconnect your pressure sensor.
Pull out your spark plug wires, and we can go ahead and take the clip off over here. Using a pocket screwdriver, put it in, pull it out, disconnect this as well, or you can just pull it out of the bracket. Disconnect your six injectors by pushing in the metal clip and pulling out. Then the same thing in behind, the harnesses in the back are just a little more difficult to get to. Four 10mm nuts that hold the fuel rail in place: one here, one here, back there, and another one right there. We'll speed it up here again as we just remove those four nuts. You can play with your injectors here a little bit, spin them around, make sure that they are free and that they're going to pull out when you can take the fuel rail out because the injectors are coming with the fuel rail. These are all free.
I'm going to use a long screwdriver and pry up on the injector rail. Wiggle them back and forth so this comes out all right. There are two zip ties that hold the harness on two little brackets, you can either pull the harness from the bracket or cut the zip ties. Cut these zip ties if they're still there. It's just a matter of carefully pulling up and out and making sure everything, all the harnesses and stuff, don't get caught on the fuel rail. There are ten 8mm screws: one here, one over here, here, here, here, there, and three in the front. Just speed up here as we remove them, and we're actually going to remove nine of the ten fasteners: one of the them is a 10mm, one of them is a nut on top of a stud, and then you have to pull a bracket up and off. We'll show you that in a minute. This is a 10mm, this one over here is actually a nut as well. Remove the clip here on the wiring harness, get that out of the way. I bend this bracket out of the way, and below it you'll see another 10mm, take that off. You'll see the two ears here, the tabs, press those in and pull out your pipe. Pull up. Here, again, we just get out the vacuum while he gets some of debris out of there, make sure nothing's gone down in the ports or anything like that.
Carefully clean the lower intake manifold, you just want to make sure nothing gets between the lower intake manifold and the upper intake manifold. Nothing except the gasket, obviously, and you can use mineral spirits or you could just even use some gasoline.
The old part, new part from 1A Auto. New gasket; the only thing, I think, we're going to be swapping over is this pressure sensor here. We need to make sure that this sleeve here goes up into the upper manifold, and it's the lower manifold that remains there. If it doesn't then the exhaust gases coming from the EGR valve will melt the inside of your plastic housing here on the upper manifold. Make sure that that's in there and it's snug. I'm just going to place a piece of wood over it and give it a tap to make sure it stays in place. Now, going in, go in the mass airflow side first. The gasket seated to the intake, line up the guide pins and press down.
Now we're going to fast-forward as we just put all the bolts in. You want to torque this manifold down very specifically, so at this step all we're doing is we're putting all the bolts in and then we're using a ratchet just to get them seated down and snug. We're going to tighten them with a torque wrench to a specific setting. We're going to have the torque wrench set up for two foot-pounds. We'll start at the top one here. I'm just going to fast-forward here. You start at two foot-pounds or 24 inch-pounds, and you tighten them specifically.
The middle two first, you start with the rear one, the rear middle, front middle, then you go to the rear just one right of that, front right of it. Then you go over to the left of the middle, to the backside, and the front side, and then you do the two furthest to the driver's side and then the two furthest to the passenger's side. You just tighten them, again, to two foot-pounds or 24 inch-pounds. The second pass we're going to go about four, four and a half, five pounds. Follow the same order.
Again, we'll fast-forward here as we tighten them, it's supposed to go to 48 inch-pounds which is roughly four foot-pounds. If you go a little bit beyond that and go to five-pounds, no big deal. Again, same order, start in the middle and front to back, work your way out to the sides. Final pass, same sequence, eight pounds. This is a plastic manifold, and it can be warped quite easily. That's way you want to torque this: slowly, carefully, and in this specific order. Just to summarize, 24 inch pounds and then 48 inch pounds and then 96 inch pounds, which pretty much works out to be about two, four, and eight foot-pounds. In this specific order, start in the middle first, middle back, middle front, then one to the right, the back, the front, then go over to the left and back to front. Then the furthest right, back to front. Furthest left, back to front. We're going to swap over the pressure sensor, it's got two tabs on both sides, push them in. Pull the sensor out.
The sensor only goes in one way. Clip that in and put it on your manifold. In this next clip, we're going to be changing the PCV fitting which is the lower tube that hooks into the manifold on the backside. Remove the two vacuum lines and install your new plug. Plug it into the manifold. You, basically, just want to push it in until it snaps or clicks into place. Now we're just going to put the fuel rail back in, be very careful, make sure you don't get any wires pinched in, make sure that the injectors go down and in, and you also want to make sure that they are clean and that they don't have any debris on them before you put them down in.
Just move stuff out of the way, and make sure it's a nice clear shot in and get it fully seated. Just check all six of the injectors, and make sure they're seated down all the way before you bolt it in. We'll just speed it up here as we put the four nuts that hold the rail in place. You put them on by hand first, and then just tighten them up nice and firm. If you're going to torque them, torque them to 10 to 12 foot-pounds. Plug your injectors back in. Again, fast-forward, the front ones are pretty straightforward. The rear ones are straightforward, just probably the number two cylinder which is the one furthest to the or closest to the passenger is a little difficult just to get into and get it snapped on there.
Now we're going to put the mass airflow sensor housing back up in place, and as you're pushing it on, there was the bracket that's attached to the side that's in front of the engine. Kind of push that bracket back into place some so it goes on the other side of the sensor that's in the front of the housing. Then start your bolts on, and you can tighten them up. Push the bracket back into place and secure it with the 8mm bolt and tighten that up. Just speed it up a little bit here as we just button everything else up.
There are three connectors on the mass airflow sensor, a couple of vacuum houses to check on the manifold itself. Snap your plug wires back in place as well as the two larger vacuum lines that go onto the mass airflow sensor. Put the EGR valve bracket back in place, and then tighten it down with the 10mm nut. Make sure your harness is out of the way, put your air box lid back in, make sure that the seal onto the throttle body is sealed and tighten up the screws for the air box as well as plug in the sensor. Then we just used a couple of new wire ties and resecured the harness onto that clip. Then just plug in that last pressure sensor.
We hope this video helps you out. Brought to you by www.1AAuto.com, your source for quality replacement parts and the best service on the Internet. Please feel free to call us toll-free, 888-844-3393. We're the company that's here for you on the Internet and in person.
Shop Products

Chevy GMC Cadillac Truck Intake Manifold From 1A Auto Doesnt Match
This video shows you new features and installation procedure of the updated Chevy/GMC/Cadillac V8 intake manifold.
