How to Replace Input Speed Sensor 2001-07 Hyundai Elantra
Created on: 2019-06-21
Watch this video to learn how you can replace the input speed sensor on your 07-10 Hyundai Elantra. 1A Auto shows you how with step by step details!
-
step 1 :Removing the Input Speed Sensor
- Remove the four 10 mm bolts securing the engine cover, and remove the engine cover
- Remove the two 10 mm bolts securing the air collector, and remove the air collector
- Disconnect the MAF electrical connector
- Loosen the worm clamp securing the air intake to the throttle body
- Remove the air hose from the intake tube
- Disconnect the four air box cover clamps
- Lift the air box cover and remove the tube from the throttle body
- Remove the air filter
- Remove the two 10 mm bolts securing the air filter box
- Move the air filter box aside
- Remove the 10 mm bolt securing the input speed sensor
- Remove the input speed sensor
- Disconnect the input speed sensor electrical connector
-
step 2 :Installing the Input Speed Sensor
- Insert the Input Speed Sensor into position
- Secure the sensor with the 10 mm bolt
- Reconnect the electrical connector to the sensor
- Reposition the Air filter box
- Secure the air filter box with the two 10 mm bolts
- Replace the air filter
- Attach the air filter cover tube onto the throttle body
- Close the air filter cover and secure it with the clamps
- Tighten the worm clamp securing the air tube onto the throttle body
- Reconnect the air hose to the air tube and secure it with the clamp
- Reconnect the MAF electrical connector
- Insert the air collector tubes into the fittings
- Secure the air collector with the two 10 mm bolts
- Reinstall the engine cover and secure it with the four 10 mm bolts
Tools needed
-
Socket Extensions
Flat Blade Screwdriver
10mm Socket
Ratchet
Hey friends, it's Len here at 1A Auto. Today I'm working on a 2007 Hyundai Elantra, and I'm going to show you how to do a transmission input sensor. It's going to be a very easy job, I want to be the guy that shows you how to do it. If you need this or any other part, you can always check us out at 1aauto.com. Thanks.
All right, so now it's time to learn how to remove the engine cover. You're going to take off your four 10 millimeter head bolts, assuming you have all four, unless you're on this vehicle and you've only got two. There's one, set that aside so we can't lose it. One over. Grab the only other one, it feels like it's going to probably break. Maybe, let's see. Okay, got it. Bolt number two, set that aside. There's our engine cover, easy peasy.
So here we go, we're going to take off this 10 millimeter right here. The other one should be right there, it's missing. I'm not too worried about it. We'll set this aside, put our bolts aside. Okay, now we're going to go ahead and get under here. Okay, next we're going to squeeze these two tabs, there's one on my index and one on my thumb, right here, right there, squeeze them, wiggle pull. Easy peasy. Let's get this out of the way. 10 millimeter here, we'll loosen that up. It doesn't have to be all the way loose to the point the clamp comes apart, or anything, you don't have to worry about that. It just needs to be loose enough to come off the intake. I'll squeeze that clamp. Let's try and pull this hose off of here. There it is. Take a peak at it, make sure it's not cracked or broken or anything. It looks pretty great.
Take off our clamps, there should be four of them. There's one there, but it's missing. Let's see if I can pull of this hose, I'll loosen this up a little bit more. There we are. Let's get our air filter out of here, make sure it's clean. This one looks pretty dirty, we should probably replace that at some point. Set that aside. We've got a 10 millimeter here, another 10 millimeter head down there. So I'm just going to use my ratchet with an extension, let's see if I can get it on there. Turn that bolt to the left, I'm going to fully remove it, then I'll remove the other one as well. There's the top one, bottom one. There we are. Wiggle this around, okay. So now it looks like we've got our PCM stuck on here. I'm just going to see if I can wiggle this enough to get it out of the way.
I'm going to look down in here, find my flash light. Okay, right there, is where my sensor is. Right down there. Pretty easy to get to, it's looks like a 10 millimeter head. First I'm going to take off the wiring harness. Actually, I'll probably take off the 10 millimeter and then I'll just bring it up here so I can reach it and get off the wiring harness. Okay.
My pointer, right down here, there's my 10 millimeter, there's my sensor, okay? We're going to take off this 10 millimeter, we'll drag the whole thing up, and we'll disconnect the sensor. Let's see if I can get my arm down in here. 10 millimeter on there. There's my bolt. I'm just going to give it a wiggle, there's my sensor. Easy peasy. And grab it, squeeze, and hopefully pull. There it is. Awesome. So all I do is squeeze on that little button right there. So there we are. Let's go ahead and replace it.
Right here we have our input sensor, it's from the back side of the transmission on our 2007 Hyundai Elantra. And we have our brand new quality 1A Auto part right here. As you can tell, they're both the exact same. Same shape, same connector, same mounting holes. We'll flip them over, same sensor type. I don't see any reason why this wouldn't be a great product to install into our vehicle, so I'm going to go ahead and do it. If you need this or any other quality product, you can always check us out at 1aauto.com. Thanks.
So here we go, it's time to install our brand new quality part. We've got our seal on there right, feels good. When we took it out, the bolt came out of the top, so that's the way it's going to go in, just like this, okay? Here we go. Let's see if I can get my arm down in here, find the hole, wiggle this around a little bit. That feels good, I felt it click in. Now I'm going to grab my 10 millimeter head bolt and I'm going to snug it right up. All right, right now I'm just putting in that 10 millimeter head bolt. That's going in nice and easy by hand. That feels like it's snug by hand. Let me grab my small ratchet here, 10 millimeter. Let's see if I can get it down in here. Once it's bottomed out completely, I'm just going to give it a little tweak and that's it, okay? I'm not going to prying on this too hard, it's sensitive material, all right? There we are.
Okay. We've got our wire harness, it's in good condition, no funny colors. Let's go ahead and put it down in there, listen for a click noise. Perfect. All right, let's get this air filter housing back latched in. So here we go, let's get this situated back in. Whether or not you wanted to do this without removing this box or moving it around, it's up to you. It just kind of gave me a little bit more wiggle room. It's your prerogative, you do your booboo. I'm going to take my two bolts, get it into the hole here, there we are. Grab this one, see if I can find my... there it is. Okay. 10 millimeter. That feels pretty great. Air filter, definitely don't want to leave that out. Okay.
Now we'll grab our cover, and our hose assembly, we'll get that mounted in. I'm going to start by putting it onto the intake. Just wiggle it, make sure it's bottomed out completely. The air filter box on, it should be four clips. There should be one there, it's missing. We're going to tighten up this 10. You want to make sure you don't leave this loose on accident, okay? Super important. We don't want any dirty air getting by that air filter, getting into the engine. It would be bad news for everybody. Give it a wiggle, feels great. Put this back on, it goes underneath this cable. Slide it on. There we are. We put our clamp on, this on here, so we get that. We didn't touch this. We need this. Give it a little tug, that feels good.
We'll go right here, I'm just going to go ahead and put this right here. Set it on here, we've got one broken bolt. If it wasn't broken, you'd just put one in. I'm going to use the one bolt I have, slide it in there. Use my 10 millimeter, and I'm going to tighten it right up. There we are. Just a little rubber fitting there. And there it is, easy peasy. And I've got one right over here, so that's where they're going. If you wanted to get extra bolts, and you wanted to tap out the broken ones, that's completely up to you. For the purpose of this video, I'm not going to worry about it. Let me see if I can get this, slide it in here. Get this one. There it is.
Thanks for watching. Visit 1aauto.com, your place for DIY auto repairs, for great parts, great service and more content.
Shop Products

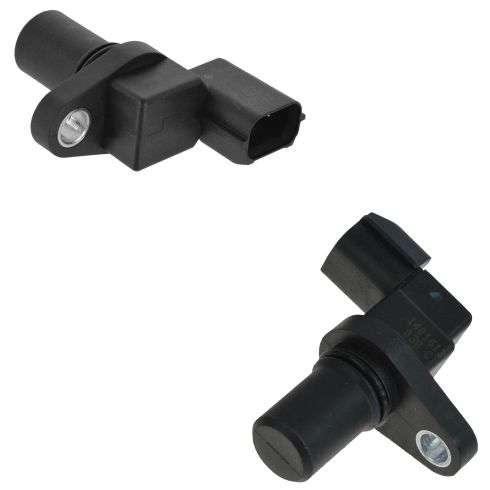
Hyundai Kia Transmission Speed Sensor 2 Piece Set TRQ VSA92592
Part Details:
- 2 Piece Set
- (2) Transmission Speed Sensors
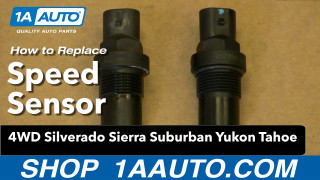
How to Replace Vehicle Speed Sensor 2000-10 Chevy Suburban
Watch this video to learn how to fix a faulty speed sensor. The experts at 1A Auto show you how to replace the vehicle speed sensor on your 00-06 Chevy Silverado, Suburban, or Tahoe; or GMC Sierra or Yukon.
