How to Replace Inner Tie Rods 2007-16 GMC Acadia
Created on: 2020-08-12
This video shows you how to install a new inner tie rod on your 2007-16 GMC Acadia.
Tools needed
-
24mm Socket
Torque Wrench
Rust Penetrant
Pry Bar
Torque Angle Gauge
Liquid Thread Locker
Brake Parts Cleaner
Pick
21mm Socket
Side Cutters
15/16 Inch Wrench
Locking Pliers
Inner Tie Rod Removal Tool
Sledge Hammer
Air Compressor
Hose Clamp Pliers
Wire Ties
Cloth Rags
1/2 Inch Breaker Bar
1/2 Inch Impact Gun
22mm Socket
Now, you can take the lug nuts off. Use a 22-millimeter socket, so you can get the wheel off. Grab the wheel, slide it off. I'm gonna loosen up the jam nut. Just take a 15/16 wrench and loosen it up. That's good. I'm just gonna take a little rust penetrant, just spray down the tie rod stud. That'll make it a little easier to take that nut off. I'm just gonna take a pry bar, and just pry below the strut, and prying down on the tie rod to help the stud from spinning. And then use a 21-millimeter socket to take that nut off. Now, just take a hammer and hit on the bottom of the stud going up. We take this off, you're gonna want to count the threads, so, 1, 2, 3, 17, 17, and just write that number down somewhere. That's gonna make it easier for when you put it back together to get it close. So that when you go to have the alignment done, it's actually a little bit closer than if you didn't count the threads. We're gonna take some locking pliers, and just lock them onto the inner tie rod, and take a 24-millimeter socket, and take this nut off. Now, you can take this clamp off. The boot, use some hose clamp pliers or just some regular pliers, and just slide that off.
On the backside of this boot there is a clamp. If you just take a long pick and find where the clamp is put together or where it's pinched together, you can loosen up that pinched part, just spread it apart a little bit, and you might be able to slide the boot off. And most of the time you have to replace these clamps. But sometimes if you don't damage them too bad, you can reuse them. And there we go, that's slid off. If you're doing the right side, you can turn the steering wheel all the way to the left, that's gonna push this out really far. If you're doing the other side, just do the opposite, and try to get some locking pliers as close to the tie rod as possible. That's good. This is just gonna prevent the shaft from spinning and damaging any internal components in the steering rack itself. Then take a tie rod remover tool, get the correct adapter that fits. Slide this in position. All right, and loosen up the tie rod. Hold the locking pliers, there we go. Take your tool out. I'm just doing this by hand. There you go. Take the new tie rod in, inner tie rod in, and just apply a little bit of thread lock adhesive. And you can clean these threads out on the rack, use a little brake parts cleaner and a rag, just wipe that out, and thread this in. Now, you can put the adapter on and torque this to 74 foot-pounds. Now I'm gonna put the boot on. Now, my clamp is still reusable, so leave that on. If not, you could always use a wire tie if you have to. Now to tighten that clamp, I have these special pliers to tighten that. So just be creative on how to get this around here. You may have to take a heat shield off if you wanna get it from underneath, or you can try to get it in from up here. And if you don't have those pliers and can't access that, sometimes just carefully using some side cutters. You don't want to cut it, but you can pinch it just enough to lock it on there. Just make sure it doesn't twist, and that's good. Take that outer hose clamp or boot clamp, use some hose clamp pliers, and slide it back on. That's good. And put the jam nut back on. Now take the outer tie rod in, and count the threads when you go on, 1, 2, 17. And I'll just move the jam nut little closer, and take the stud, and line it up with the knuckle. Take the nut, the nut on. Now, take a pry bar, go under the strut, slide this down. And then I'm gonna torque this nut to 22 foot-pounds. And if you have an angled meter, you're gonna want to torque this an additional 120 degrees. If you don't, just do the best you can. That's 90, then I'll go another 30 degrees. I'm just estimating. That's about right, and we can tighten up the jam nut. If you have the ability to torque this, you can torque it to 55 foot-pounds. Put the wheel back on. I'm gonna tighten the lug nuts down, torque them to 140 foot-pounds in a cross pattern, so that it tightens the wheel down evenly. Go around again just to double check.
Shop Products


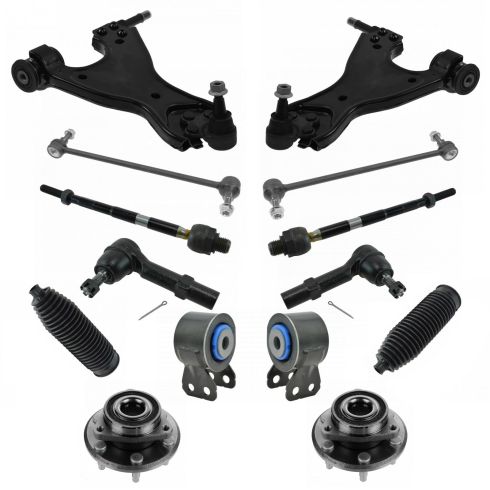
Chevrolet GMC Buick Saturn Front 14 Piece Steering, Suspension, & Drivetrain Kit TRQ PSA66553
Part Details:
- (2) Front Sway Bar Links
- (2) Front Wheel Bearing & Hub Assemblies
- 14 Piece
- (2) Front Lower Control Arms with Ball Joints
- (1) Front Steering Rack & Pinion Bellows Set
- (2) Front Outer Tie Rods
- (2) Front Lower Forward Control Arm Bushings
- (2) Front Inner Tie Rods

How to Replace Tie Rod End 1999-2005 Volkswagen Jetta
Check out this video to learn how to replace the outer tie rod on your 99-06 Volkswagen Golf, Jetta, or Beetle. Save money and DIY it with 1A Auto!
