How to Replace Inner Tie Rod Ends 2003-09 Toyota 4Runner
Created on: 2019-10-30
Check out this 1A Auto video to learn how you can replace the inner tie rods on your 03-09 Toyota 4runner yourself, and save money!
-
step 1 :Removing the Wheel
- Loosen the 21 mm lug nuts
- Raise and support the vehicle
- Remove the lug nuts
- Remove the wheel
-
step 2 :Removing the Outer Tie Rod
- Loosen the tie rod jam nut
- Remove the tie rod end cotter pin
- Loosen the 19 mm tie rod end castle nut
- Hammer on the knuckle to loosen the tie rod end
- Remove the nut and remove the tie rod end from the knucke
- Unscrew the outer tie rod from the inner tie rod, while counting how many turns it takes to remove it
-
step 3 :Removing the Inner Tie Rod
- Remove the 22 mm jam nut
- Remove the outer bellows boot spring clamp
- Cut or break the inner bellows boot clamp to remove it
- Slide off the bellows boot
- Flatten out the inner tie rod lock washer edges
- Remove the inner tie rod with an inner tie rod tool
-
step 4 :Installing the Inner Tie Rod
- Apply grease to the inner tie rod ball joint (included with the 1A Auto part)
- Make sure the new lock washer is installed on the inner tie rod threads
- Install the inner tie rod, making sure the lock washer tabs fit in the steering rack grooves
- Tighten the inner tie rod with the tie rod tool
- Peen over the lock washer edges
- Loosely attach a wire tie round the inner bellows boot
- Install the bellows boot over the inner tie rod
- Tighten and trim the wire tie
- Install the outer bellows boot spring clamp
- Install the jam nut
-
step 5 :Installing the Outer Tie Rod
- Apply anti-seize to the inner tie rod threads
- Install the outer tie rod onto the inner tie rod
- Turn to tighten the new tie rod, using the same number of turns as removal
- Insert the tie rod end into the knuckle
- Install the 21 mm castle nut
- Torque the 21 mm castle nut to 67 ft-lb, then continue tightening, if necessary, to align the cotter pin hole
- Install the cotter pin and peen the ends
- Tighten the jam nut against the outer tie rod
-
step 6 :Installing the Wheel
- Install the wheel onto the wheel studs
- Install the six 21 mm lug nuts and tighten them by hand
- Lower the vehicle with minimal weight on the wheel
- Torque the six 21 mm lug nuts to 83 ft-lb
- Lower the vehicle completely
Tools needed
-
Socket Extensions
Torque Wrench
Hammer
Rust Penetrant
Pry Bar
Jack Stands
19mm Socket
Pliers
21mm Socket
Side Cutters
Inner Tie Rod Removal Tool
Rubber Mallet
Locking Pliers
Wire Ties
Ratchet
Floor Jack
Needle nose pliers
1/2 Inch Breaker Bar
22mm Socket
Hey, friends. It's Lenny here from 1A Auto. Today, we're gonna be working on our 2006 Toyota 4Runner. And I wanna show you how to replace your inner tie rod ends. If you need these or any other parts, check us out, 1aauto.com. Thanks.
Okay, friends. So, it's time to remove our wheel. To do that, you're gonna remove all of your lug nuts. Gonna use a 21 millimeter socket. If you're gonna be using a ratchet, it might be easier to do this while the wheel is still on the ground so it can't spin while you try to loosen up your lug nuts. I'm using an air gun so I've got my eye protection, my hand protection. Here we go. This one I'm gonna leave on a few threads. I have a spare hand. Try and wiggle this around. A lot of times on Toyotas, they don't want to break free right away. That's not really that big of a deal. You could use something as simple as a rubber mallet or if you have a pry bar. Either way, what you want to do is make sure you have a lug nut on at least a couple threads but it's still nice and loose. Come right under here. I'm gonna bonk right on the edge of the rim, okay? If you're using a real hammer that's not a rubber mallet, definitely don't hit your rim. You'll mar it up, cause issues. You could try bonking on the tire. You just have to be careful because when you bonk it's gonna wanna come back. Rubber mallet right on the rim. There we are. That lug nut did its job, made it so the wheel didn't come falling off and hurt anybody. Super important. Safety is number one. Take our wheel off. And we'll roll it out of the way.
Okay. So, right here is you tie rod jam nut. We're gonna use a little bit of penetrant spray. That's gonna do its job, work its way into the threads right here. Nice long set of pliers. Just gonna grab right onto that jam nut. Break it free just like that. I'm gonna remove this cotter pin right here. If you have access to new ones, go ahead and cut it. If you have to reuse it, well, obviously don't cut it. But I do have access to new ones so I'm just gonna cut it right out of there. I'm gonna remove this now. I've got my 19 millimeter socket and an extension. I'm using an air gun but you can of course use a ratchet. You do you, boo boo. Now I'm gonna take a hammer and I'm gonna give the knuckle a couple bonks just right up along here. I'm gonna be careful not to try to damage my nut, the threads of my tie rod will of course break the boot. Maybe it matters, maybe it doesn't to you. That broke free. The reason for putting that on there like that is just so when it did break free, it didn't come falling down, potentially hurt me, break anything. Super important.
Now we're gonna take our tie rod and we're gonna count how many times we come all the way around to the straight up position and you're also gonna take note that when you took the tie rod out, the stud was going up through the knuckle, not down. Ready? One, two, and so on, three. Fifteen. So, it took 15 turns to go from straight up and down all the way around to straight up and down as it came off. Keep that in mind. Write it down if you can't remember. That's fine. So, now we're just gonna put some locking pliers on the inner tie rod end. Get it as tight as you can. The size of this jam nut right here is a 22 millimeter. So, I'm gonna use my socket and of course my air gun. You can use whatever you have to. But this is a 22 millimeter. Got our jam nut. Remove these. Next, what we're gonna do is we're gonna remove this clamp right here. And it's just a little squeezy clamp. It's gonna loosen up as we squeeze. We'll remove it from the bellows boot. That comes right off. Inspect your clamp. Make sure it's still in good condition, still in good working order. If you squeeze it and it doesn't return, replace it. You can use whatever you want for a clamp. If you needed to and in a pinch, you could use something as simple as a wire tie. This one looks reusable so we'll set it aside. We'll grab right onto this upper lip right here with my pry bar and I'm gonna try to give it a couple bonks with a hammer. Okay. Seems like it's starting to wanna break free. Let's see. I don't wanna do anymore bonking than I have to so I'm just gonna keep checking it. It's definitely getting a little looser or a little more loose I should say. But I wanna keep going. Just need this clamp to wanna let go. So, here's our clamp. This went up and around the bellows boot. This was part of this, okay? So, what I did is I just kinda tried to bonk on this ear right here. Bonk, bonk, bonk, bonk, bonk, until it finally just let go. This is a one time use only clamp. At this point, you can grab your bellows boot, you can twist it all around and it's pretty much ready to come off. So, we're gonna be careful because as we try to twist and pull, we could catch our arm up on the skid plate and it might be sharp. So, just be as safe as you can. Give a little pull. Give a little twist. If it doesn't seem like this end wants to come off just give it a little push. Just gonna work it in there. And here my friends is your steering bellows boot.
So, I went ahead and I grabbed our new quality 1A Auto inner tie rod end here. And I just wanted to show you what we're gonna be dealing with. You're gonna have something that looks like this on your old part over there. This is the lock washer. What happens is it has these ears right here peened over into this groove and this groove. And that just kinda locks it in because you also have these that slide into slots on the rack which I'll show you in a second. I just wanted to show you what you're dealing with. This is pretty much what it looks like right here except the ears aren't bent in. So, what we need to do to unlock this inner tie rod end is to drive these back out and away from the tie rod and then at that point we can use a tool and we'll unscrew the inner tie rod end from the rack. So, I'm gonna go right on that ear, just drive it away from the inner tie rod end. Same to the other one. Something that's good to mention also is that we turned the steering wheel all the way to the left and that brought our inner tie rod end out further instead of being tucked in way inside here where we have a hard time getting to it. So, just turn your wheel to the left. That'll bring the inner tie rod end out to where you can deal with it a little bit better.
So, now we're gonna use this clamp looking tool. All right. You'll notice on the tool it has these knurls right along here and then some up all along this. And that's great because what we're gonna do, we're gonna go right over the inner tie rod end until we get up to the big part here. Then what we're gonna do is tighten up these nuts. I'm gonna use my 13 millimeter socket. So, it's pretty darn tight here. Last thing we want is the tool slipping and stripping out our nice knurls. That's definitely tight. Awesome. So, you can see right here you have an area for a three-eights ratchet. I actually prefer to go with something a little bit different. I have myself an adapter and an extension and then I grabbed a nice long half inch ratchet because I need some leverage here. We're gonna turn this to the left. All right. That just broke free, the inner tie rod end. Can almost get it all the way off. It's all right. This has to come off the tie rod anyway. We're not leaving it on there when we recycle the tie rod, so. Just take this back off. So, that's our tool. 1aauto.com. Here's our inner tie rod end.
So, what we're gonna do now is we're gonna take the majority of this nice new grease that 1A Auto provided us. We're just gonna put this right inside with that tie rod end. I'm gonna keep some of this grease because we're gonna use it in a minute and I'll show you when. I'm just gonna use my gloved finger here. Just put it all along here. This is gonna help with lubricating it as it moves around. Obviously an inner tie rod end isn't gonna go, it just kinda does, like, couple, you know, teeny movements at this pivot point right here, okay? But it will work its way in there over time. Now what we're gonna do is we're gonna take our lock in washer, slide it right over this just like this. And what the lock in washer is gonna do is it's gonna make it so we don't have to use any thread locker on this. As long as you have your lock on washer on there, which you should because I'm showing you, use your locking washer, you don't have to use any thread locker.
So, we're just gonna get this jam nut off of here. We don't need that on there right now. We'll set it aside because we will be using it. This right up here. Just gonna see if I can get this started on. All right. So, we've got the inner tie rod end started into the rack. Now we're gonna pay attention to the locking washer. As you press it up against the rack and spin it, you'll notice that it latches in and that's just those two little ears latching into the power steering rack. Now we're gonna snug up this inner tie rod end. Just get it as tight as we can by hand. That's pretty great. Now we're gonna grab our 1A Auto inner tie rod end tool and we'll snug this up the rest of the way. I'm gonna try to start this as far as I can all the way over in this direction because as I tighten it's gonna wanna swing around this way and I don't wanna get it caught on this. Obviously we wanna make sure this is tight just like when we were removing the old one. See about getting this in here. Let's see what we can do. Feels pretty great. It does have that locking washer on there. So, as long as its bottomed out and then a little further, just a teeny bit further, it should be all right because it can't loosen up once you have that locking washer on there. I'm gonna grab my small hammer. We're getting pretty close here. This is right peened right over up against the flat area of the inner tie rod end. And now it's locked in. I'm gonna do the same to the upper portion and we can continue.
Just gonna use these pliers, grab that last ear, crimp that down. Oh, yeah. Perfect. So, now we're just gonna use a little bit more of this grease that we got. It's gonna go right up along here. You can see where the line is right there and that's just kinda telling you where the bellows boot's gonna sit when you're done. So, I like to put some lube right along there and that's just gonna help the alignment specialist later on down the line. So, I'm gonna take a wire tie, just bring it right around like this and just get it so it's kinda sitting there hanging out. It's not tight or anything. It's not crimping down this boot. It's just waiting. So, now when I install it into the vehicle, this is already gonna be on and I don't have to worry about trying to finagle my hands around anything while I'm in there. Just gonna go just like this. Get this started. I'm gonna bring this boot all the way so it lines up right where that edge is, okay? So, now what we're gonna do is we're gonna straighten out the wheel of the vehicle so that it's gonna be ready to go in a straight line. And at that point, this is gonna be pulled all the way in, right? Or I guess half way in because if it went all the way it would be turned to the right. We want it to just be so the steering wheel's straight. So, now we're gonna take the inner portion of this boot, slide it onto the rack. You should feel it click in, give it a nice little tug. That feels good. So, we got the outer portion sitting just past where that little groove was in the inner tie rod end and we have the inner portion where it's all the way up against the rack, all the way into its groove up there. Use some long nosed pliers or needle-nose pliers. Give this a nice little twist around. Regroup. Do it again. Awesome. Cut off the excess if you want or leave it on. It's hidden. But I prefer to just take it off. We'll get our clamp. That's up on there. That looks good. This moves as it should. Awesome.
Just gonna give this a little blast of Never-Seez just like that. Jam nut. That's probably pretty decent. Okay. So, we're gonna get this outer tie rod end on here. We're gonna count it out for our 15, right? So, we find where it starts. Okay. Here it started. One, two, three, and so on. Fifteen. So, that's our 15. Slide this up and into its hole, it's where it's happy. You wanna make sure that this hole is facing front to back. It's gonna make your life easier. If it isn't, just bonk this out, grab down here on the stud, grab some pliers and just twist it. It should turn fairly easily. Brand new slotted/castle nut. So, we're just gonna snug this up using our 21 millimeter socket. Okay. That's fairly snug. Let's find the torque specification. We'll torque it down.
Okay. So, it's time to torque down our outer tire rod end nut. We're gonna torque it to 67 foot-pounds. Just check it one more time. Awesome. So, now what we're gonna do is we're gonna take a look at our tie rod jam nut here and we're gonna see if it lines up with where it's supposed to. If it doesn't line up between the hole and one of the slots, you need to continue on to the next hole by tightening. You never want to loosen it up to the next hole or to the hole previous I guess you would say. You want to continue tightening until you get to the next hole. All right. So, let's get one of these slots lined up with the hole. Got my 21 socket. It's pretty close. Perfect. I'm gonna install the cotter pin straight through just like this. I'm gonna use my cutters. You can use pliers or whatever you want. You could probably even use your fingers for these things. You just kinda bend them so that the ears come up and over the top. Some people like to go from one side to the other side. You can do whatever you want as long as the ears that come out the other end are bent to the point that the cotter pin cannot come out. The cotter pin is what locks this nut in. If the cotter pin for some reason came out, the nut came loose, your tie rod end falls down, your wheel can do whatever it wants to do. So, we'll prevent that. That looks good. We're gonna go ahead and snug up this jam nut real quick. That feels good. Just grab the tie rod, move that around a little bit. Maybe. Okay. I've got it so it's pretty much straight. That looks good. It's gonna move around as we drive anyway. It's gonna do its own thing. But anyway. So, we know that this is tight. We know that this is tight. Let's move along.
Now we're gonna grab our wheel. These wheels can be heavy and I don't want you to hurt yourself. So, instead of grabbing your wheel like this and trying to lift with your back and potentially hurting yourself, I'll show you a little secret. Take your leg, assuming you're not worried about your pants getting a little dirty. Just gonna grab it like this, roll it right up your leg, and now you can use your leg/ab muscles to lift it right up. Use your leg to hold it. Balance it. See? That works pretty good. I'm gonna take my lug nut, my socket, put it right on here. Now that we know we've got one locked in, we can release it. Grab the rest of our lug nuts. We're gonna start all these on. We'll bottom them out and then we'll torque them down. All right. So, let's bottom out these lug nuts. Perfect. We'll get this down on the ground and we'll torque them down to manufacture specifications.
Okay, friends. Let's get our torque down. We've got our 21 millimeter socket. We've got our torque wrench set to 83 foot-pounds. We're gonna go in a crisscross manner. Okay. I'm just gonna go around one more time. It's a small price to pay for safety. Awesome.
Thanks for watching. Visit 1aauto.com for quality auto parts shipped to your door. The place for DIY auto repair. And if you enjoyed this video, please click the subscribe button.
Shop Products


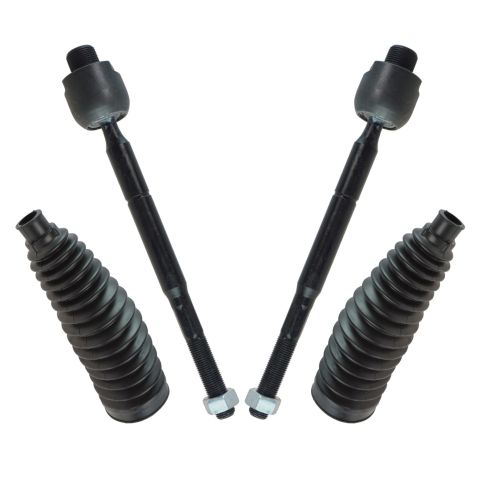
2003-09 Toyota 4Runner Lexus GX470 Front 4 Piece Steering Kit TRQ PSA56821
Part Details:
- 4 Piece
- (2) Front Steering Rack & Pinion Bellows
- (2) Front Inner Tie Rods
How to Replace Front Outer Tie Rod Ends 2002-06 Nissan Altima
How to repair, install, fix, change or replace a broken, busted, bad, loose, or damaged tie rod on 02, 03, 04, 05, 06 Nissan Altima.
