
How to Replace Ignition Starter Switch 2003-07 Chevy Silverado
Created on: 2020-07-30
This video shows you how to install a new ignition starter switch on your 1999-07 Chevy Silverado.
Tools needed
-
Flat Blade Screwdriver
Socket Driver
8mm Wrench
8mm Socket
10mm Socket
Trim Tool Set
Pocket Screwdriver
Marker / Writing Utensil
One of the first things we need to do to start this job is to remove our negative battery terminal from the battery.
Set that aside. Now, coming in from the driver side, we're gonna remove this little panel right here. Set that aside. Right underneath the dash, you're gonna find two bolts, we're gonna remove those so we can get this panel off of here. There's one right here. And one over here. Now that we have those bolts out, we're gonna take our key, put the key in the on position, and then with our foot on the brake, we'll put our gear shift all the way down. At this point, I'm gonna carefully grab on to this. Remove it from the vehicle. Grab on to this little panel. You should be able to slide right off. Now, let's grab on to this, tilt our steering wheel. If you were to look right under here, you're gonna see some holes, there should be some screws located in there. Our vehicle does not have any screws for some reason so I can't show you how to remove them but I'm sure you can figure it out. Next, if you wanted to grab on to this, you'll be able to pull it right out. But before you do that, go ahead and bring this down so it's an almost straight position. Pull this out and set it aside.
Next, we're gonna take off the steering column clamshell here. This is two pieces and it separates right down along this area. In the back, there's gonna be a couple of little hooks. So, we're not gonna start there, that's we're gonna end, up long here's where we're actually going to start. Use a small pocket screwdriver and be careful not to do this, it looks like somebody kinda already made a mess right there and I really don't want to do that as well. You can also use a plastic trim tool if you feel like it's much easier for you, it might be safer as well. I'm gonna try to pry us apart. Do the same on the other side. Okay. And then I should be able to look this up a little bit and separate the two. You're gonna notice that there's a lip, it comes underneath this area of the steering wheel. So you just kind of need to go back a little bit before you lift up. Lift this up and out of here. You can see that there's the little hooky-dos here. I'll get this one off and I'll show you this. And then you've got the hooks there.
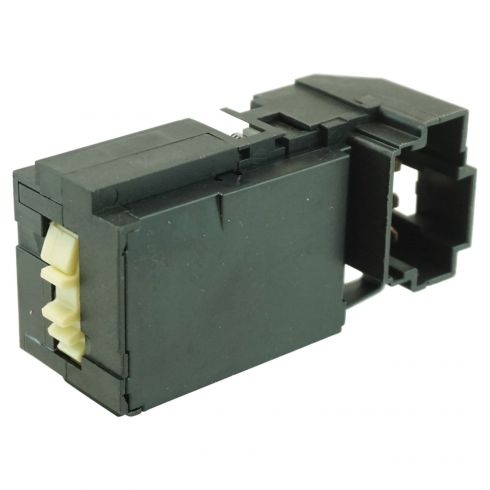
Now that we have everything out of the way, you have a nice clear view of where our part is. This is the ignition switch right here. If you were to follow these wires up, you're gonna feel this little black connector right here. Push on this tab, and then you should be able to pull this out. This is gonna give us a little bit of slack, we need that slack. Now, if you were to come right inside this area, you're gonna see a push tab right there. And then if I move this out of your way, we'll see another one right there. To make this easier, I'll just put it in park and remove the key. Now, we have a nice clear view. Just take your small pocket screwdriver or even a pick, press right on that little white tab right there. That's gonna make it wanna come down a little bit. Then do the same thing to the other side. You should be able to draw this down. There's our unit right there. Now, if were to come around the other side, you can see a little tab. This is going to separate the wiring from it, so we'll just go ahead and push that. Separate that. And there it is, friends.
Now, the next thing we wanna do is just do a quick product comparison of our old compared to the new. If you were to look at it, you can see that you have the same identical area where the wire is supposed to go into, and then, of course, we have our area with the cog. What you're probably gonna notice is the cog doesn't line up the same, it looks very different. The reason for that is because when you go to install the new one, the key should technically be in the rearward position like not the off position like this is now but one click back. Sometimes on these vehicles, it doesn't do the one click back. So what we would actually need to do is take our original, and then we'll just take a sharpie marker and we're just gonna mark right down along this cog right here. Right where it connects to this black part, right where it's right near there. That's gonna be a reference point. So now, if I was to take my fingers after I marked it and turn this, I can see that I'm pretty much right where I need to be with anyone anyway. Turn it around.
So, I can tell that the new one is gonna need to be lined up with this one right here. I'm just gonna mark that new one just so I have a reference point for that as well. Perfect. Now, I'll just turn this. So, it comes around and it's lined right up with that. Let's take this, install it right in here just like this. And now, we're just going to give it a test real quick. We're not gonna try to start the vehicle because it's not gonna start obviously but we just wanna make sure that the key functions properly.
Okay, there's the accessory position, the on position, and then crank. As you can tell, I have plenty of cranking space there. It's not just the teensiest little bit for a crank, if you have that, then your gears aren't lined up. If for some reason you don't even have the extra area for the crank position, obviously you know that you didn't set up those gears right in which case you just pop this out and then reset back up to your reference point. This looks great, so let's continue. Now that we got that working fine, let's just pop this back out of here again real quick so we can get the wiring reconnected. It's easiest this way. Put that over to the side. I'm just gonna connect this right in. Give it a nice click. I'm gonna slide this up in here. Nice click, make sure it's secure. Follow your wiring. Connect this top piece in. Awesome. Okay, before we go too much further, let's reconnect our battery and check to make sure that we start.
All right, so we got all of our lights lighting up like it should. Let's give it a crack. Perfect. Make sure the dash light's all turned off like they should. Now, it's time to get our clamshell back on the steering column there. If you look right here along the backside, you're gonna see there's a couple of little hooks. And if you look at the top, you're gonna see there's a couple of spots where those hose are supposed to go. If you were to put them both together just like this and then swing this down, it should pretty much just lock right in just like that except it's going to be over the steering column. This set in here. This one in here as well. Don't forget that they have to go in and behind the steering wheel. So when you go to put it in, you'll have to push towards the rear of the vehicle, and then just slide it in and under. Okay, this boot right here, you can see has a couple of lips, you wanna make sure that the large area of the lip is on the inside area of the clamshell, and then this little rubbery area is on the outside. I'm just gonna get that down where it needs to go and then we'll proceed. Put this one up there. We're gonna do about the same, but don't forget about those hooks. Those need to make sure they go in there.
Slide up and along right there. Do the same on the other side. Of course, it pops out. It's okay. All right. This is gonna be the hardest part just getting this so it lines up at the same time as we try to put this up. Okay, this side is good. If you have an issue with the rubber boot, just go and use your flat screwdriver and just kinda peel it on over like that. Make sure the other side is latched in, and then we'll move along. Let's get this bottom plate up on here. If you were to look, you can see there's some holes and you're also gonna find some pitons. Just go ahead and line up those holes with pitons. And then, carefully slide this in. Here we are. Both sides. We'll get the screws in down there.
Let's get this on here. Let's get this back in here. It's going to go with the point aiming down. To do the faceplate, we're gonna need to make sure that our gear selector is down. Carefully put this over your steering wheel so you don't damage your steering wheel, and of course, push this down below your dash so you don't damage your dash. There we are. A couple of light bonks. Make sure it's an all the way. Let's reconnect our negative battery terminal and make sure it's nice and tight.
Shop Products


How to Replace Ignition Switch 1995-2004 Ford Ranger
Check out this video for instructions for replacing the ignition switch in a 95-04 Ford Ranger.

