How to Replace Ignition Key Lock Cylinder 1997-98 Chevy Venture
Created on: 2011-02-10
Watch this video to learn how to fix your ignition lock. The experts at 1A Auto show you how to replace the ignition key lock cylinder on your 97-98 Chevy Venture, Oldsmobile Silhouette, or Pontiac Trans Sport.
-
step 1 :Disconnect the Battery
- Disconnect your negative battery cable.
-
step 2 :Remove the Dash Trim
- Disconnect the two pins securing it.
- Unscrew the three 7mm screws.
- Pull the trim out and away.
-
step 3 :Remove the trim panel around the radio
- Pull up and out to remove it.
-
step 4 :Remove the trim around the dash
- Move your steering wheel down and start from the top.
- Pull it up and out and pull it around the headlight switch.
- Put your steering wheel back up.
-
step 5 :Remove the steering column cover.
- Remove the two T25 torx screws.
- Pull the bottom half of the steering column cover.
- It should hinge down.
- Remove the two E5 star pattern screws.
- Put your tilt lever back in and tilt the column down.
- Use a bent tipped awl to depress the button under the steering column cover.
- Turn your key all the way to the start position and the key cylinder should release.
-
step 6 :Replace the lock cylinder
- Line it up and click it into place.
-
step 7 :Reassemble the steering column cover
- Put the two E5 star screws in.
- Hook the lower steering column cover back on.
- Click it up and around the shift boot and click it into place.
- Put the upper dash trim back together.
- Replace the radio trim.
- Put the lower dash trim back together.
- Screw your 7mm screws back in.
- Put the pins back into place.
-
step 8 :Reconnect the Battery
- Connect the negative battery terminal
Tools needed
-
E5 Socket
Bent Tipped Awl
7mm Socket
Ratchet
T25 Torx Driver
Brought to you by 1AAuto.com-- your source for quality replacement parts and the best service on the Internet.
Hi, I'm Mike Green. I'm one of the owners of 1AAuto. I want to help you save time and money repairing and maintaining your vehicle. I'm going to use my 20-plus years experience restoring and repairing cars and trucks like this to show you the correct way to install parts from 1AAuto.com. The right parts installed correctly, that's going to save you time and money. Thank you, and enjoy the video.
In this video, we're going to show you ignition lock cylinder replacement. You might need to do this if your lock cylinders are worn out, or sometimes cars get stolen. We're going to do it on this '99 Venture. This lock cylinder fits a lot of different GM vehicles. The basic procedure is the same, although some of the trim, how to take it apart in your vehicle will be different. Tools you'll need for the Venture are 7mm Socket and Driver, a T25 Torx Bit or a T25 Driver, an E5 Star Socket, and a Bent Tip Awl or similar tool. Most of these tools are not very expensive to acquire.
We're going to take the dash trim apart because it makes taking apart the steering column and trim a whole lot easier to get apart and really, a whole lot easier to get back together. Where you want to start is underneath. There are two trim pins. You can see one right here and one right over here. Reach on each side of those pins, and then pull down firm to release them. With those pins out of the way, there are three 7-mm screws. One there, one there, and then one right over here. For those, I'm going to use the 7-mm socket with the driver. Once again, we'll fast-forward through just taking those three screws out. Once those screws are removed, you just want to grab onto the top of your trim, and pull it out and away.
Now, you're going to want to remove this trim panel around your radio. You kind of pull up on it. You want to lift it up and then out, and then pull it out right there, let it hang like that. Now, you want to move your steering wheel down, and you want to remove the trim around your dash, which you want to grab the side here and pull the top down, and then pull this, the top out first. Now, you want to pull the bottom out, and the left side, the middle, and over here. Something to note ... I forgot to say this ... Obviously, you want to bring your gear shift lever down. Pull your trim out and pull the top up and out. Down here, you've got to pull around the headlight switch, and up, and off. We'll put that to the side as well. You're going to put your steering wheel back up. Up underneath are the two torx screws, one there, and then one there. We'll speed it up, and those are T25 torx screws.
Once you remove those, you want to grab your tilt lever, and just pull it straight out. It just pulls right out. You can grab your trim panel right below your signal here. You can pull it down, and then you can see it hinges back. Same thing on the other side.
From underneath you want to remove two E5star-shaped screws. One right there that's easy to see, and then there's one up in there ... once I slow the camera down ... Where is it? Right there above the wires, where I'm pointing. You want to remove those two screws. What you'll need to remove those screws is a small E5 star-shaped bit or socket. When you remove this one, you want to hold on to this piece of plastic right here, and not let it turn. Now those are off, you can see that your top cover is loose. What you're going to want to do is put your tilt lever back in, tilt your column back down like that.
As you lift the cover up and with a flashlight shining in there, you'll see a small, hit hole right where that arrow is pointing, and you're going to want to use a bent-tip awl or maybe you could even modify a paper clip and put it down in that hole.
I probably should have navigated this videoed this from the other side, but you want to put your awl in, put it in that button, turn your key to the Run position first, then to the Start position, push your key in towards the center of the steering column, push down with that awl, and then pull your awl out, and pull the lock cylinder out. What I'm going to do is remove the plastic cover, and the put the lock cylinder back in so that I can show you without that cover in the way so you can get a little better idea. It' s a little tricky but once you get it, it's easy. You put it back in, and again, turn your key all the way to the Start position as far forward as it goes, then put that all down in there, and pull out. You'll feel it kind of come out a little bit, and then release the awl, and then it will come out all the way.
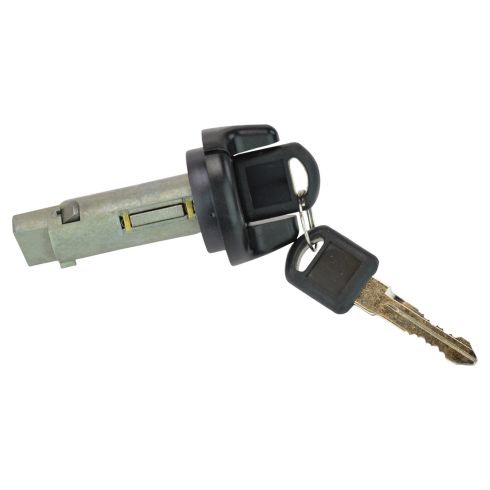
Here's our original lock cylinder, and then on the left is a new lock cylinder from 1AAuto. You can see it's all the same. It comes with keys and everything. It's going to go right in. You just want to make sure you get it all lined up correctly. It's just going to go in just like the original. Now, we can put the rest of everything together. In here, we'll just kind of speed up replacing those E5 star screws for the upper trim panel. Now, we're going to put the trim together. If you don't take your whole dash apart, this is the part that's pretty tough. You can see that hook right there. You want to clip it in to the upper trim of the steering column. On the other side, same thing. We'll get into the upper trim then pull it back. Just make sure you get both sides. I'm kind of shooting this with one hand...
Then on the other side, you need to make sure that -good shot of my chin- that you get it up and around the shift boot right there. Just make sure you feed it up and around that shift boot. As you push it up, make sure the shift boot goes up in there correctly. Once you get it to a certain point, make sure everything's lined up. Put it back together. Make sure that it's all set. Put that back together, then you can put your tilt lever back on. Put our dash piece back on. We're going to feed it down in like this. You need to pull out on the bottom a little bit. Force it in from the top. Force it down in, then I usually get the bottom clip first, then clip the top. It's all set. This piece over here, you want to put in, you want to press it in and down. Lock the top.
Now, you can release your steering wheel back up. I'll fast-forward through putting in those T25screws on the bottom trim panel. Now on this panel, you want to put it back in. There are two locating pins that go in the holes in the dash so you know you're putting it in the right spot. You clip the top in, and then you have your three 7-mm screws at the bottom. We'll put those in and fast-forward through doing that. Once you have those three screws tightened up, you want to just push your push pins back in. You'll reconnect your battery and you should be back on the road and all set.
We hope this helps you out. Brought to you by www.1AAuto.com., your source for quality replacement parts and the best service on the Internet. Please feel free to call us toll-free 888-884-3393. We're the company that's here for you on the Internet and in person.
Shop Products

How to Replace Ignition Lock Cylinder 1998-2004 Dodge Intrepid
Watch this video to learn how to fix your ignition lock. The experts at 1A Auto show you how to replace the ignition key lock cylinder on your 98-04 Dodge Intrepid.
