How to Replace Ignition Coil 2004-08 Ford F-150
Created on: 2020-07-27
This video shows you how to install a new ignition coil on your 2004-08 Ford F-150.
Tools needed
-
Dielectric Grease
Socket Extensions
Socket Driver
10mm Socket
Ratchet
Pocket Screwdriver
Marker / Writing Utensil
Okay, friends. To get started on replacing our ignition coil, one of the first things we want to do of course is to make sure the engine's cool to the touch because you don't want to be working over a hot engine. Secondly, we just want to do a quick eyeball comparison to them to make sure we're dealing with the right piece.
We have six areas where the wires are gonna go to, and then, of course, we have an electrical connector. Towards the front area of the coil, we're gonna have one mounting bolt. And then as you can see on the rearward area, you're gonna have two. This looks perfect so let's get started.
When you're doing these coils, you're gonna notice that sometimes the wires are marked and other times they're not marked. With that said, you want to make sure that you put the wires back to the exact same location that you removed them from.
It's easiest to draw a diagram so I went ahead and did that real quick. Yeah, I'm not the best drawer, but that's okay. You can tell that you have the one mounting bolt there, two in the rear, and then this is the order in which they're gonna go. With that said, I'm just gonna start disconnecting these now. I'm not super worried about it because my wires are numbered.
I'll pull these right out. And I usually like to take a look at them, just make sure that they're all in good condition. If for some reason it looks like they're damaged in any way or maybe corroded or anything like that, it's a great idea to just go ahead and replace them and that's very easy to do as well. We'll set these aside.
Right here's your electrical connector that leads to the coil. We need to get that off of there as well. There should be a little push tab pretty much right where my index finger is. You're gonna push on that and then draw it up.
So I'm gonna use this little pocket screwdriver, and if you come right up, you can feel where there's a tab. Just go ahead and press on that. Give this a little wiggle and it should want to come up. Push this in, lift that up. Always a good idea to take a peek inside here. Look for any funny colors. This looks great. Set it aside.
Now we're just gonna remove all three of our mounting bolts and this will come right out of here. Okay. Get the two rear ones out. Okay. There's our third bolt, and then go ahead and grab our ignition coil.
Looking down at the coil while it's out, I can see all the connection points and they all look great in exception of just the one right here. This one has some corrosion in there which tells me that there could be a problem with moisture getting in.
If you see your coil looking like this, more than likely the end of the wire, that leads to this also is damaged or corroded as well. If that's the case, inspect it. If it can be cleaned, try cleaning it out. If for some reason you can't get it clean enough, of course, you're gonna have to replace your wires as well.
So the wire itself didn't really look too bad. I could see a little bit of corrosion in there, but this actually looks pretty good now. I cleaned it out as well as I could. I would say it's saveable so let's continue.
So we thoroughly compared our new coil to our old coil and we're 100% sure that it's the correct one. With that said, let's go ahead and get ready to install it. I'm gonna put it down in here. I'll start in all three of my bolts before I tighten any of them down completely. That's bottomed out. Just give it a teeny bit more. That's good. Do the same to all.
Now that we have this nice and safely mounted in here, you just want to wiggle it around. Make sure it's completely secured. I like to use a little bit of dielectric grease on all electrical connectors. It's a special kind of grease that allows electrical current to flow through it, but it also prevents moisture from contaminating or corroding any areas.
So I'm just gonna go along all my electrical points. I'm gonna go right down inside there, and then of course, I'll get all the areas where my wires are gonna go. You can do this directly on the wires, or of course, you can do it right on the little studs here themselves as well.
So this looks great. As you can tell, I made a big old mess along the outside of this coil. The reason for that is because it's gonna help make a seal between the rubber boot and the plastic itself, which will of course keep the moisture out.
Now that we have everything nicely looped, let's go ahead and start reconnecting in. I'm gonna go with this electrical connector down here first, push it in, listen for a click, give it a tug. If it pops right back up, it's not locked in.
Now we need to make sure we put the wires back on in the order that we removed them. So let's grab these bottom ones down here. Now remember the lower ones went one, two, three, so find cylinder one wire, put it on the first one closest to you on the lower half there.
Now we're gonna go two, and then three, of course. Now I have my other wires in my hand, and when we do these top ones, the way that we actually want them to be is five and then six, and then in the far top on the rear is number four. So I'll get number four, put that right on there in the back. So we've got number six right here, and then this wire I can see right on it says number five. So that's gonna go right here in the front.
Next, what you want to do is just make sure all your wires are routed properly. You want to make sure that they're not touching up against anything that might rub into them, and you also want to try to avoid wrapping them around any other wires that might have electrical current going through them because that could cause an issue.
Now that we have it nice and installed, it's time to test it. To do that, we're just gonna start up the engine and then we're gonna watch the outside of this engine right here and just make sure it's idling smoothly. If for some reason you see it's acting erratic and it's just jumping around like a maniac, you know that probably something's wrong.
Shop Products


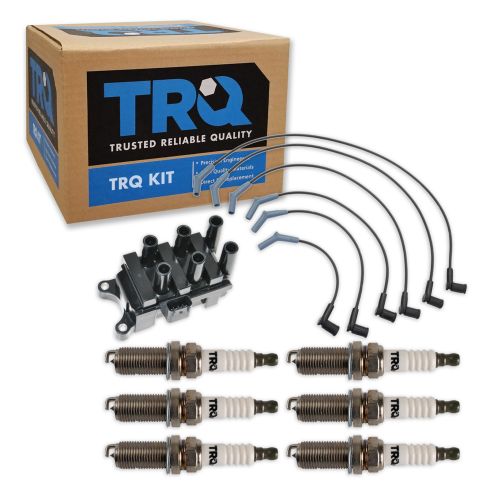
Ford Taurus Mercury Sable 8 Piece Ignition Kit TRQ TKA06188
Part Details:
- (1) Spark Plug Wire Set
- (6) Spark Plugs
- 8 Piece
- (1) Ignition Coil
- Direct Replacement
- Black
- Iridium
How to Replace Ignition Coils 2007-13 Mini Cooper S
IGNITION COIL - How to repair, install, fix, change or replace a bad or broken ignition coil / coil pack on 07 Mini Cooper S
