How to Replace Idler Arm Idler Arm Mounting Bracket 1988-2002 GMC Sierra 1500
Created on: 2020-05-07
Watch this video to learn how to install a new idler arm and bracket in your 1988-02 GMC Sierra K1500
Tools needed
-
Torque Wrench
Socket Extensions
Rust Penetrant
15mm Socket
Jack Stands
18mm Socket
Pickle Fork
24mm Wrench
Socket Driver
Wheel Chocks
Straight Cutters
Ratchet
Floor Jack
22mm Socket
Once you've safely raised and supported your vehicle so you can see underneath, you wanna remove this plate. If you take out these two bolts, this should swing down far enough to see right there. Let's use our 15-millimeter socket to remove this plate as well. That way there we'll have some room to get into the front end with our pickle fork. Remove this.
The next thing we're gonna do is remove this nut right here. Use your 22-millimeter socket. Now that we have the nut off right here, we're gonna come right from this side with our pickle fork and we're gonna try to separate this joint right here. If you wanna spray it with some penetrant, it's probably a great idea. There we go.
Okay, so I've got my ratchet with my extension and my 18-millimeter going through the frame holding that bolt side. The next thing I wanna do is remove the nut on the inside area of the frame. Let's do the same to all three mounting bolts. Now let's just push these bolts in a little bit. Obviously, we don't want them to fall out into the frame. If they do, you just use a magnet, you can grab them out. But by pushing them in at least towards the frame. Oh, it fell into the frame like I said it would. Now we can lift this up and out of here.
Now it's gonna be time to get this together. It comes with a locking nut, so you don't necessarily have to use any thread locker. Put this arm so that the stud is facing down, just like this. Take your nut. If you were to look inside there, you can see that there's an Allen head socket, so we'd use the according Allen head. Can hold the center, and then we're gonna turn the nut using a 24-millimeter wrench until it's nice and tight. Okay, bottomed out right there. Give it a couple extra bonks here. That's nice and tight.
So it's a great idea to use a magnet from the outside of the frame and take out at least two of those bolts that are up there. I like to leave just one. That way there it's a couple less things that I have to worry about pushing through as I get this up and lined up. It's much better to just have one up there. I can have a socket with an extension holding it still, and I'll get that one kind of snugged up a little bit, and then I'll start on the others.
I'm gonna get this shaft right inside this arm. That's gonna be the super important part. Okay, now I'm gonna twist this until all the rest of it lines up, right about like that. Now, I'm gonna use my extension from the other side, I got it through already, see if I can turn this in, get it started. There we go. That one's through. I'm gonna start the nut on there real quick. Should come with a washer. If it came with a washer, the washer goes on the bolt, and then, of course, the nut. It's a great idea to use a little bit of thread locker as well. Goes right up on there. Now there's no chance for this bolt to fall out. Let's continue on by doing the same to the other two. So now it's time to snug these up. I've got my 18-millimeter wrench on the bolt end through the frame there, and I'm gonna go ahead and use my 18-millimeter swivel socket to snug these up. That's nice and tight. Do the same to all three.
Okay, all three are nice and tight. That looks great. Let's move along to torque this to 40 foot-pounds. All right, let's do the same to all the rest. Let's get this on here. We're just gonna snug it up, and then we're gonna torque it to 40 foot-pounds. That's 40. Now you just wanna make sure that the slots on your castle nut are lined up with the hole that goes through here for the cotter pin. Once it's lined up, you put it through and make sure you lock it down. If it isn't lined up, you need to continue tightening until it is. Let's get that locking cotter pin in here. Slides right through. Like I said, make sure you peen it over that way there there's no way this nut can come loose. All right, let's get the plate up here. Let's go ahead and get our shield up here.
Shop Products


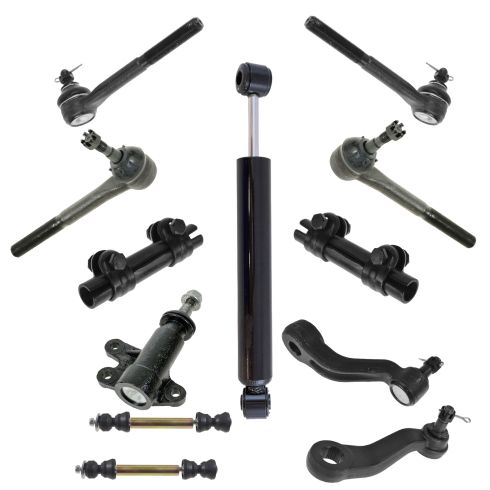
Chevrolet GMC Front 12 Piece Steering & Suspension Kit TRQ PSA63411
Part Details:
- (1) Idler Arm
- (1) Pitman Arm
- 12 Piece
- (1) Steering Stabilizer Damper
- (2) Front Tie Rod Adjusting Sleeves
- (1) Front Heavy Duty Sway Bar Link Set
- (1) Idler Arm Bracket
- (2) Front Outer Tie Rods
- (2) Front Inner Tie Rods

How to Replace Idler Arm 2002-06 Chevy Avalanche 1500
Check out this video to learn how to replace an idler arm on your 02-06 Chevy Avalanche. 1A Auto shows you how!
