How to Replace Hood Latch 1997-2003 Ford F-150
Created on: 2017-06-29
How to replace a broken or stuck hood latch on 97. 98, 99, 00, 01, 02, 03 Ford F150.
-
step 1 :Removing the Hood Cowl
- Unclip the spare tire jack crank from the hood cowl
- Remove the plastic clips from the cowl with a Phillips screwdriver
- Remove the clips with a pick tool if necessary
- Lift the hood cowl up and off
-
step 2 :Removing the Hood Latch
- Mark the hood latch position with a marker
- Remove the two 8mm bolts from the hood latch
- Lift the hood latch off the frame
- Disconnect the latch cable from the latch
-
step 3 :Installing the Hood Latch
- Apply rust penetrant to the latch mounting clips
- Clip the cable to the hood latch
- Start the two 8mm bolts that hold the latch to the frame
- Make sure the latch is lined up with your marks from Step 2
- Tighten the two 8mm bolts
- Push on the latch to test the mechanism
- Release the latch with the handle in the cabin
- Lower the hood slowly to check the alignment
- If necessary, loosen the 8mm bolts, adjust the alignment and retighten the bolts
- Recheck the alignment
-
step 4 :Installing the Hood Cowl
- Put the hood cowl into place
- Press the clips into the cowl
- Clip the spare tire jack crank to the cowl
Tools needed
-
Flat Blade Screwdriver
Phillips Head Screwdriver
Rust Penetrant
8mm Wrench
Marker / Writing Utensil
Pick
Hi, I'm Mike from 1A Auto. We've been selling auto parts for over 30 years. We're dedicated to delivering quality auto parts, expert customer service, fast and free shipping, all backed by our 100% satisfaction guarantee. Visit us at 1AAuto.com, your trusted source for quality auto parts.
Hood latch replacement: you can see this one is pretty sloppy and in danger of breaking. You don't want it to break on you. Then you won't be able to get your hood open.
We're going to remove this whole panel. We're going to start by taking off the spare tire jack crank, take that off. Now there's a series of clips. They have Philips head screws in them. We'll show you how to get them out. There's four across the front, two more, which are missing on this vehicle, and then there are two clips back here, which are a different style, although I'm pretty sure they should be this Philips screw style.
The way these should come out is you turn them counterclockwise and very lightly, almost pull up on the screwdriver while you're doing it so they come out. Once you have that out, the whole clip will come up and out. You may run into them where they don't want to come out that easily. In that case, you'll probably need a little 90 degree pick tool, although sometimes you can be successful getting – oh, my fingernails aren't very big. Sometimes you can get a fingernail under there, but what you'll probably have to do is get a pick tool right in underneath just to pry up a little bit, let you turn in and pull it out. These ones back here are a different style. You pry up, pull the center up and pull it out, although I'm pretty sure these should be the Philips screw style. One you have all the clips off, the panel lifts up and off.
I’m going to use a red marker, and make a good mark where it is, so that when we put it back together you have a good preliminary position. With an eight millimeter wrench, loosen them up, and then it’s always helpful to have a ratcheting wrench remove it the rest of the way. Once the bolt's out, lift it up and out, and then pull on the cable, bring it up and around and off.
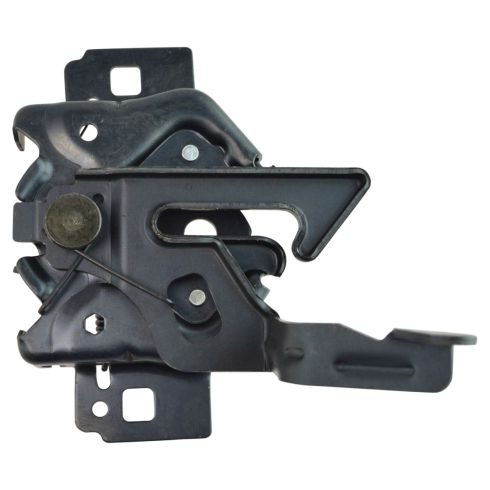
Here’s the original part from our truck, and the new part from 1A Auto. You can see they’re exactly the same. It has the same adjustable mounting points, all the same mechanisms. It's going to go in there and fix up your problem.
I'm just going to spray the clips with some rust penetrant. If your cable looks like this, highly recommend replacing it with one from 1A Auto. We're going to put it together for now, and we'll have another video on that a little bit later.
Put the cable in, pull, and lock it into place, and then put the mechanism down into place and start your bolts in. Once you get it close, just hold it, check the marks that you made, and tighten it up. We're going to test the mechanism by pushing down right here, like our hood was coming down. Just get it to latch and then pull the hood handle to make sure it unlatches. Now, you can line it up by loosening these and making sure everything goes together. We'll put it down slowly. Okay, then it comes down and actually it's pretty good. I'd actually like to adjust it just a little bit that way, but let's latch it in. Unlatch works correctly. I'll bring it up.
Yeah, actually, I'm happy with how it works as far as the level. I'm going to move it that way a little bit. You can see over here there is a hood bumper. That keeps this side of the hood up. It's actually missing on this side so this side is obviously going to go down further than it should. I've loosened up one side, I'll loosen up this side. I'm going to use that little rust mark there. I'm just going to, as I loosen it, move it over, kind of cover up that rust spot, but keep the height level the same. Tighten it back up. Bring it down and it's lined up nicely.
Put the cover back on. It's in place, you can see all the holes. These back clips, just make sure the center's propped up, push them down in, push the center in. Then these ones across the front. Clip in first, then just push the center right in to lock it. Put your jack handle back in, and you're all set.
Thanks for watching. Visit us at 1AAuto.com for quality auto parts, fast and free shipping, and the best customer service in the industry.
Shop Products
How to Replace Hood Latch 2000-06 GMC Yukon
Check out this video to learn how to install a new TRQ hood latch for your 2000-06 GMC Yukon.
