How to Replace Heater Core 1991-98 GMC K1500
Created on: 2017-05-03
Follow the step-by-step instructions in this video to learn how to replace the heater core on your 91-98 GMC K1500.
-
step 1 :Identifying the Heater Hoses
- Run the engine until it reaches its operating temperature
- Turn the heater all the way up
- Locate the heater core hoses, near the firewall
- Feel the heat coming off the hoses
- The hotter hose is the inlet hose
-
step 2 :Disconnecting the Heater Core
- Remove the air intake hose
- Have a drain bucket ready
- Block the heater hoses with block off clamps
- Allow the engine to cool down
- Disconnect the heater hoses
-
step 3 :Removing The Heater Core
- Remove the six 5.5mm screws from the heater core housing
- Pull down the heater core housing
- Remove the 5.5mm bolt from the heater core bracket
- Pull the heater core down and out
-
step 4 :Installing the Heater Core
- Line up the heater core
- Pass the heater core lines through the firewall
- Line up the heater core bracket
- Insert the 5.5mm bolt into the heater core bracket
- Snap the heater core housing into place
- Insert the six 5.5mm bolts into the heater core housing
-
step 5 :Connecting the Heater Core
- Connect the heater core hoses to the heater core
- Remove the block-off clamps from the heater hoses
- Reinstall the air intake hose
- Add coolant to the cooling system as necessary
- Dispose of the coolant properly
Tools needed
-
Socket Extensions
Drain Pan
Ratchet
Needle nose pliers
Hi, I'm Mike from 1A Auto. We've been selling auto parts for over 30 years. We're dedicated to delivering quality auto parts, expert customer service, fast and free shipping, all backed by our 100% satisfaction guarantee. Visit us at 1AAuto.com, your trusted source for quality auto parts.
In this video, we're going to be working with our 1996 GMC Sierra. We're going to show you how to remove and replace your vehicle's heater core. If you like this video, please click subscribe. We have a ton more information on this and many other vehicles. If you need this part for your truck, you can follow the link down in the description over to 1AAuto.com. Here are the items you'll need for this repair.
Locate the heater core hoses on your vehicle. They'll usually run to two ports coming out of the firewall on most trucks and cars. On our truck our two heater core hoses can be located here. What we're checking is by allowing the vehicle to run and warm up, I also have my heat on full blast, we'll either have a decent flow that's still allowing heat to be taken out of the heater core which will bring one hose hot coolant into the heater core and cooler coolant out of the other side or if our heater core is clogged we'll have hot, hot coolant on one side and an ice cold hose on the other. This will tell us which is inlet and which is outlet so we know how to back flush it correctly. This hose is much hotter than the other one so we know we have hot coolant coming in here and cold coolant coming out the other side if at all so this is our inlet, meaning we want to hook up our reverse flush set up to this side, the outlet, to push all that dirt, debris and contaminants out the other way.
After figuring out which heater core hose is which, you'll want to remove any components blocking your access to the lines. In our case this is the intake track on our truck.
Place a drain bucket under the lines to the heater core hoses. Now there are a few options on exactly how you want to go about doing this. It's not a bad idea to drain your entire cooling system and then flush the heater core hoses after all the coolant is out of the system, especially if any of that stuff has freed up and contaminated your system. We just filled our coolant when we did our head gaskets a few weeks back and we don't want to waste it so a set of radiator hose lock off clamps is inexpensive and a great way to keep the mess to a minimum. Simply clamp them on to seal off the hose. Now when I remove this end the only coolant we'll lose is from the heater core.
Allow your cooling system proper time to cool before removing the hoses because even with our block off clamps we are still going to lose a little bit of coolant and you don't want to get burned. We'll slide the clamps off and wiggle our hose off. That little splash there is just from our exhaust manifolds being hot. Our coolant is actually not that bad right now. You can see there where we are losing some coolant, we did lose a considerable amount less than we would have if we drained our entire system.
Remove the six 5.5 millimeter bolts located around the perimeter of the bottom cover. One of them is in a recessed hole closest to the firewall where the actual heater lines go out. Do this using a 5.5 millimeter socket and ratchet as well as various extensions. Once you've removed all six bolts, you can pull down and remove the housing. You actually don't even need to remove this all the way. Slide the housing out from under the heater core.
Loosen up the 5.5 millimeter bolt, securing the clip that holds in the top of the heater core and slide the bracket out of the way. You can then drop it down and pull it though the firewall.
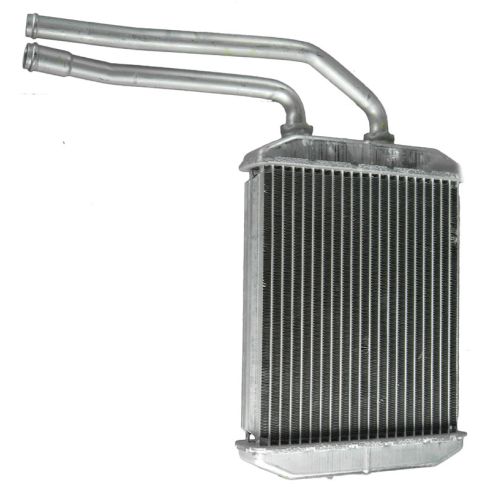
Here we have our old heater core that we removed from our truck and our new part from 1AAuto.com. As you can see, these parts are exactly the same. We have the same heat exchanger here and the same inlet and outlet hoses.
You'll notice that this is very similar to the radiator at the front of your vehicle, only it works in sort of the opposite fashion where instead of blowing heat out and away from the vehicle, it blows the heat into the passenger compartment to keep the inside of your truck warm. These can develop holes and leaks or just get plugged solid, much like a radiator can. If this happens and you can't get away with back-flushing it like we showed you earlier, this new part from 1A Auto is going to go in direct fit, just like your original equipment and fix you up right.
Reinstall the lines through the opening in the firewall. Set the heater core into place, and put the retainer tab back in. We'll then tighten up the 5.5 millimeter bolt to secure the bracket. Reinstall the cover. Basically you just want to get it lined up as best you can and push it back into place. Once you've got it hooked back into its slots, you can reinstall all six of the 5.5 millimeter screws.
Reinstall your heater core hoses. Make sure that both hoses and their clamps are in place before you remove the block off clamps if you used them. Otherwise it'll just leak through one way, fill the heater core and come out the other side. Remove your block off clamps if you used them. Reinstall the truck's intake and top off and bleed your coolant.
Now we have a coolant containment tank on site that we have dumped regularly. You'll want to check your local laws as well as local disposal plants and potentially parts stores on how and where to dispose of coolant safely and legally.
Thanks for watching. Visit us at 1AAuto.com for quality auto parts, fast and free shipping, and the best customer service in the industry.
Shop Products

How to Diagnose Fix a Vehicle That Doesnt Have Heat
How to diagnose a vehicle that does not have heat.
