How to Replace Heater Core 2003-14 Volvo XC90
Created on: 2019-09-12
Heat doesn't blow hot anymore? Heater core might be clogged. Check out this video to learn how to replace the one in your 03-14 Volvo XC90!
-
step 1 :Draining the Radiator
- Open the coolant reservoir cap, after the system has cooled sufficiently
- Raise and support the vehicle
- Remove the three 14 mm bolts on each arm of the skid plate
- Lift the skid plate and slide it forward to remove it
- Open the radiator drain petcock with a 13 mm socket
- Allow the coolant to empty into a drain pan
- Lower the vehicle
-
step 2 :Removing the Heater Core
- Spread a plastic trash bag or similar sheet to prevent spilling coolant on the floor of the vehicle
- Remove the floor vent trim
- Remove the driver side inner foot well trim
- Remove the two T20 screws to remove the kick panel
- Remove the T20 screw securing the heater core
- Pull out the two coolant tube retaining clips
- At this point coolant may leak out into the vehicle
- Remove the two coolant tubes from the heater core
- Remove the heater core
-
step 3 :Installing the Heater Core
- Apply the included foam tape to the new heater core, using the old heater core as a guide
- Remove the rubber gaskets from the coolant tubes
- Install the new gaskets that were included with the heater core onto the coolant tubes
- Carefully slide the heater core into position
- Install the coolant tubes into the heater core
- Secure the coolant tubes with the retaining clips
- Install the T20 screw to secure the heater core
- Install the kick panel and secure it with the two T20 screws
- Install the driver side inner foot well trim
- Install the vent trim
-
step 4 :Installing the Skid Plate
- Raise and support the vehicle
- Apply anti-seize to the skid plate bolt holes
- Lift the skid plate and slide the hooks over the subframe
- Align the bolt holes in the hooks with the subframe
- Line up the skid plate arm bolt holes
- Install the long 14 mm bolts into the front bolt holes
- Install the short 14 mm bolts
- Lower the vehicle
-
step 5 :Refilling the Coolant
- Refill the coolant using a vacuum system if available
- Otherwise, add coolant to the reservoir tank, and allow it to fill into the system
- Continue adding coolant until the reservoir stays full
- Run the engine with the heat on, and continue filling the reservoir as more coolant is drawn into the system
- Continue filling until the reservoir stays full
Tools needed
-
Side Cutters
13mm Socket
Flat Blade Screwdriver
Rubber Mallet
14mm Socket
Pry Bar
Drain Pan
Ratchet
Plastic Sheet
T20 Socket
Pocket Screwdriver
Pliers
Hey friends, it's Len here at 1A Auto. Today we're working on our 2004 Volvo XC90, it's the all wheel drive version, and we're going to be replacing the heater core. It's going to be a fairly simple job. I can do it, you can do it too. If you need this or any other part, you can always check us out at 1aauto.com, thanks.
Okay, so now what we're going to do, now that the hood's up, we're just going to open up this right here. This is your coolant reservoir. You want to make sure that your coolant is not hot. This vehicle has been sitting for a while, so I'm not worried about it. We'll set the cap aside and we can move along.
Okay, so now that we're underneath the vehicle, what we're going to do is we're going to try to get this out of here so we can get to the radiator that's located right here. It's going to be very easy, we're going to you use a 14 millimeter. We're going to take out this bolt, this bolt. There's one hiding up in here, and then the same thing for the other side of the vehicle, all 14's.
I've got my air gun, 14 millimeter, can use a ratchet if you want. Just blast these out of here. Here's what my bolts look like. There's two long ones, and then the other four look the same. The two long ones were of course the two that were hiding, so we'll set this stuff aside. We can move along to the next step.
Okay, so I grabbed a rubber mallet just in case I need it, because what we need to do, these arms right here, they have almost like this that goes right up here, okay? What we need to do is get this to go forward and then come undone and then come out. I'm just going to use my rubber mallet. Just give it a couple of bonks. Try to lift up, just getting it to move is the hard part here, because the way that these hooks are.
There it is, okay, here we are. Almost, come on baby. There we are, we got this out of here. Let's move ahead to the next step. Okay, so we've got our recycling receptacle here. It's ready to catch the coolant that's going to come out. Now what we need to do is drain the coolant. We're going to come right up here. You've got a little petcock area.
We're going to turn this counter-clockwise, that's to the left with our 13 millimeter socket, and we should have coolant get ready to come out of this. Safety glasses, hand protection, here we go. There we are, cool. We'll just let this do its thing and we'll move along.
Okay friends, so now that we're inside the vehicle, the heater core is going to be located right behind here. It'd be super easy to get to, but before we start, where the heater core is located inside and everything, there's going to be some hoses that come.
I like to grab a bag, or you can grab whatever you have that's going to be able to catch any coolant that may come down. I'm just going to put it in here for now just like this, and that's just going to make it so if God forbid any coolant comes out of this, which it's pretty probable that something may, it's going to try to catch it and I'll be able to get it out of here without damaging our carpet.
Now that we have our bag in here, we're just going to go ahead and grab this. This piece right here is just going to pop off like that. It's basically just a vent directional thing. The heater vent comes right down along here, so this just aims it which way it's going to go. We'll set that aside over there.
Now we're just going to grab this trim piece. Come down along, just grab it, pull it off. We'll pull that out. These little metal clips are all that are holding that in. They just go along these tabs, all right? This one's missing one. I've got to put that back on. It's pretty easy, if it comes off, just take it, slide it right on there, there it is.
We'll set this aside for later. Now we have a fairly clear view of our heater core, which is located right here. It's like a small radiator looking thing. What we're going to need to do to get a full view of it though is we need to take off this lower panel right here. It's a T20, essentially it looks like a star.
We'll take that out and I'll show you what it looks like. There's one, it's nothing special. We'll just set it aside. Take out the other one. There's only two, but there is also going to be an electrical connector under here, so you want to make sure that it doesn't drop down too far yet until we know exactly what's going on behind there.
Now that I've got the other screw out, which looks exactly like the first, I'm going to put it with the first one there. I can grab this, this should just pop right out towards me here here. There we are, it's just got those little clippy do's. We'll set this aside. Now we have a clear view of what's going on under here.
I'll move out of the way so you can get a better view of it and then we'll continue on taking it out. There's the heater core and you can see the metal lines up along the top there. Those lines are going to have to be removed and then the mounting screw that holds the heater core in, and then that should be pretty much it.
It should want to slide right out for us. Like I said, there might be coolant that comes out, so make sure you're wearing hand protection and eye protection and let's get the job done. Okay, so now we're underneath the dash here. I just wanted to show you what we're dealing with.
You've got your coolant tubes, you've got your heater core. The coolant tubes are held to your heater core with these little clips. They just slide out to the rear of the vehicle. There'll be very easy to take out with something as simple as a pocket screwdriver. You'll also notice that you have these bars right here.
This is your temperature control, so what you want to make sure is you have your key in the on position, you put your temperature in the hot position, turn off your key, take the key out. These bars should be clear, so you can take out these pipes, all right? Something else to note is there's a Torx bit right here, or a Torx bit screw, Torx drive screw, whatever you want to call it.
We're going to remove that once we get these pipes out of here, and then the heater core should be able to slide right out. We'll just make sure we have our bag ready to collect any coolant that may fall down. We don't want it to get on the carpet and we'll get to work.
Okay, so here we go. We've got our bag/catch area ready. I want to make sure that we don't get any coolant down on the carpet. We're going to remove this clip up here, okay? You can do that with your pocket screwdriver or even a bigger screwdriver, whatever you need to do.
Of course, we've got the coolant drained already, but that doesn't mean that everything's out of this. This thing right here, it should just pop right out. Okay, it looks like it's halfway. I'm just going to continue. All right, so the way that this is going, it's hitting up against here.
What we're going to do, I'm going to loosen this up. I'm going to use my Torx bit, and this is a T20. That's our screw, Torx bit. Get that down here and I can pull this out a little bit. Now that the heater core can move around, hopefully we can get this clip out of here, which is hitting right there.
I'm going to try to grab onto this clip with something a little different. I'm going to use my cutters. I'm not going to try to cut or anything like that. They grip on pretty well a lot of times better than pliers for things like this, so that's why I'm going to go with that. All I want to do is just try to grab onto it and pull this clip out of here.
There we go, it's coming. There we are, so there's our clip right here, and basically the line comes through. Then it has a little ridge, and this holds that ridge into the heater core. We want to remember that this bump right here faces up when we go to re-install. We'll set this aside.
We'll grab that other one. Let's see if I can pull this line out of here. There we are, got a little bit of coolant come out. That's okay, we knew it was going to happen. We're ready for it. I might as well get my parts out of here though, it goes up there.
All right, let's let this finish draining real quick and then we'll continue. As you can tell, it did take out quite a bit of coolant onto where the carpet would have been. The bag's definitely a really important step. It doesn't cost anything really, 10 cents or whatever and it saves your carpet, so definitely go with the bag.
All right, so we'll get this line out of the way a little bit so we can see our clip. The clip's located pretty much in the same area as the other one except on the other ear. I'm just going to try to grab my screw driver, see if I can get it in there.
Okay, that one's not fitting, fucking screwdriver. These clips are going to be the hardest part of this whole job, so that's not bad. I mean, if that's the hardest part, then we're doing it right, right? It should you want to slide right, come on baby. That's what I'm talking about, clip number two looks a little different than the first.
It doesn't have that weird bump, so we'll just remember that I guess what you would say would be the normal looking clip goes up top. I'll set this aside, move on to the next step. We've got one line broken free. I'm just going to grab this one, get that out of there, very nice.
Okay, so both those lines are able to move around. You can push them up, try to get them out of the way. We're going to grab the heater core. Like I said, you've got to get these lines out of the way, so whatever you've got to do to get the lines to move enough, and then just slide your heater core. It's starting to come out. Come on baby, don't play no games.
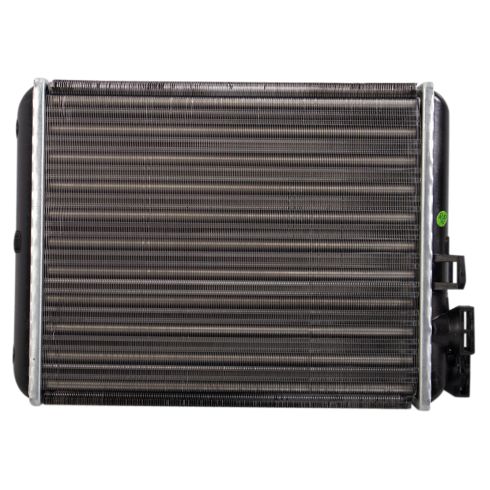
All right, we're going to have to move it a little bit more here. There We go, just push them up, they're just clipped in there. Get this thing, here we are friends. There's our heater core, so here we are friends. A quick product comparison for you. Over here we have our heater core out of our 2004 Volvo XC90 all wheel drive version.
This was very easy to get out. Over here we have our brand new quality 1A Auto part. Both these parts are created equal. You've got your ports for where the lines go into. That's super important. You have the area for where the mount screw goes in. Also important to make sure you have on the new one.
It's got brand new cooling thins. As you could tell, they're in great condition, both sides. This looks great. You're going to have airflow that comes through this. It's going to get warmed up by the coolant that comes in here, and then your blower motor is going to suck the air through or force the air through depending on the application, and it's going to heat up the air and heat up the cabin for you.
We'll put this back down. It also comes with the seals that you're going to need. This right here looks like a mess, but it's really not that big of a deal. This just wraps right along here. You want to basically make it look exactly the way that Volvo made it look originally.
We also have brand new gaskets that come with the 1A Auto kit here. That's for the lines where they go into here, so we're going to make sure we change those out. This literally comes with everything you're going to need to replace this, so I don't see any reason why I wouldn't want to install it into the vehicle.
If you need this or any other part, you can always check us out at 1aauto.Com, thanks. Okay, so on our old heater core, you can see that Volvo put a nice little a seal around here, okay? Just comes all the way around there. You've got another strip that comes this way. The same thing on this side.
These ones are fatter than the one that goes around this. Then on this side you've got this big old thing, which is essentially this, all right? What we're going to do is we're going to prep our brand new quality 1A Auto part. We're going to do the same thing.
They didn't do this part for us, because during shipping you want to make sure that this doesn't all get damaged. Of course peel off whatever it could possibly do, so they left it for us to do and that's okay. We're going to take this one. This just goes right along this edge, just like they have it, okay?
We're going to go right here, bring it all the way around. It should have a little sticky tape here. I'm going to pull some of it, not all of it yet. Start on one edge, there we are, bring it around, hold some more. Now we want to be careful when we're doing this not to grab onto the fins too much. If you start peening these down, it's going to restrict airflow, which will cause issues.
All right, there's the end of that. I'm just going to use a cutting blade, trim that. Just make sure it's on all the way around. Okay, so now we're going to do this gasket right along here. We're going to put it on our brand new quality 1A Auto one. It will be very simple. Just stand this up, I'm going to take the sticky pad off of here.
All Right, now just line it up so it's centered as much as possible just like that. Squeeze along the edges. Very nice. Okay, so we brought it along here. We've got it along the other side. There we are, stand to like that now. We're going to take our thick strip and we're just going to take it from where this one ends to where that one ends.
Nice and sticky. Pretty much anywhere along this is good. All right, trim that, cool. Turn it over, you guessed it, same thing. Just from where this one ends, all the way across to where the other one ends. There we are. I'd say that looks pretty decent. It's got a little extra. It's always nice to have a little extra in case you need it. Maybe you need to do a little patch job on it.
That looks good though. We'll set that aside. Now we're cleared for an install. Okay, so we're back underneath. We have our lines right here. We want to make sure we get these gaskets off. It's fairly simple. Just take your small pocket screwdriver. You could probably even do it by hand. I'm just going to slide it right off.
There's one of our gaskets. We're going to slide on our brand new one. Start from the top, start from the bottom, start wherever you want. Essentially just slide it on there so it's all the way up against this little area right here. That looks pretty good. We're going to do the same thing to the other one.
There we go, okay, those new gaskets are on. Now we're clear to grab our heater core. We'll slide it back into its box area and we'll get the lines in. Okay, so we've got our heater core, we're back inside the vehicle. This is where the lines are going to go in. We want to make sure those are in the upward position.
You don't want your heater core this way, because then of course the lines will not reach, so that's pretty basic. Next I wanted to mention you've got all your fins right here, which is where the air is going to flow through. When we're trying to install, it might be a little bit of a brute and become a pain in the butt and it could be easy to just start jamming things around and moving things, in which case you could bonk up against these fans which are very delicate.
They peen over very easily as you can tell. If a couple of them are bent over, it's really not the end of the world. You don't have to be like, "Now I need another heater core," but just try your hardest not to peen them over, because the more airflow that can come through this, the better.
With all that said, I'm going to go ahead and get under here and I'm going to see about moving those lines out of the way, because they come down right along here, and they're going to be in the way for the heater core trying to slide it in. I'll see if I can lift them up, slide in this heater core, and then we're going to do the lines.
Of course the clips, they come through from this side, and then we've got our one mounting bolt hole there, and we should be good to go. Let's give it a try. Up here, oh yeah, this is going good, nice. Right now what I'm doing is I'm just trying to hold the line straight up, and I'm just trying to guide the heater core in.
We'll just keep guiding this in nice and easy. There we are, so that's bottomed out with the box. We've got our little piton that's coming through there, and then the mounting hole's lined up. It looks to me like we're doing pretty darn good. We're going to grab those lines and see about getting them in now before we start this screw in case we have to move this around at all.
All right, so I'm going to start with the top line. I'm just going to try to line it up with the box. We've got our brand new gasket on there, that's nice. The hardest part is just going to be getting this to pop in there, but once it is popped in, you should be good to go. We're still working at getting the line in.
I'm just going to get it lined up with where it needs to go. Then I'm going to use my pry bar and I'm going to just try to give it a little loving push here and coerce it into where it needs to go. There we are, okay, so there's one. Cool, let's take a look at it here. All right, it looks like we just need our clip and then we can move along.
Okay, so we've got our clip. This was the semi-normal looking one. It's a little bit curved. We want to have this curved, so it curves away from the heater core box, so it's easier to grab when it comes time to install or remove or whatever the case may be. Anyway, this is going to slide in from the rear of the vehicle towards the front.
The same way we pulled it out, we're going to reinstall it. It's happy that way, Volvo made it that way. I'm just going to see if I can get it in here. I'm just going to put the other line out of the way, give myself some room here. I need to go along the box with this into the slots just like that, very nice.
You want to make sure that you have your line pushed in far enough that the clip goes on the outside of the lip on the line. If you don't have your line pushed in far enough and you put your clip on the inner side of the line, it's not going to hold the line in of course. Then as soon as you're building up pressure in your cooling system, it's just going to pop right off of there and create a big old mess for you.
As soon as you start the clip, just take a double check and see if it's on the right side. If it is, you can continue. I'm just going to use my flat head screwdriver and I'm going to use the flat end of it to try and force that clip in. If this doesn't work, I can try to use some pliers, which I may do, but this looks like it's trying to work for me, so I'm just going to give it a try, give it the old college try here.
All right, so we're just going to use some pliers here and I'm going to try to help this a clip along, just try to continue forcing it in and through until it's bottomed out. They don't give you very much room to do this, but overall it is much easier to do than other heater cores that I've done before, so I'm really not going to complain too much about it.
Just wiggle it as we push. This clip should be working its way in. Give it a nice little tug, that feels good. It's going nowhere. We're going to do the same to the other line and then we'll continue with mounting it in. Now that we've got both lines in with both clips, they're nice and locked in, we can go ahead with our little screw.
This is the Torx bit 20 that we removed. We're going to put it right into its hole right there. We're only going to be screwing into plastic here, so you don't need very much torque. Just pretty much screw it in till it feels like it bottomed out just like that. I'm just going to give it the teensiest bit more, not very much at all.
That's nice and secure. We can move ahead to the next step. All right, so we've got the panel that goes underneath your kick panel here. We've got a screw hole there and a screw hole there. Got a little push pin and another push there. This is going to go right here in this corner, and then the other one's going to go right inside its hole right there.
Those latched in. We're going to stick with our T20. I'm not going to tighten that one up yet till I start this one in as well just in case I have to move this panel around at all. All right, both are started in. Let's go ahead and snug them up. There we are, bottomed out. Just give it a teeny bit more and that's it. That one's tight, let's move ahead to the next step.
All right, so we've got our side trim panel and we've got all these little pitons on there, okay? Those are going to press into these holes coming along the side there, very easy. Just bring it over, line it up, bring this down so we get that in. Just bring it up, we'll line up our holes here.
When you get over to this end, the pitons are a little lower. There we are, that looks pretty great. We're just going to grab our vent deflector here. We're going to start with the bottom and then work our way up to the top. Just start like that and then there's that. All right, just putting a little bit of copper never seize on there. It's going to help it come off down the line.
On the skid plate you've got these little pitons that come down into right in between here. This part right here sits up on subframe area right up here. That pitons got to come up and then sit down into its groove right up along the top up there. If you're struggling, you're getting it over, but it's just not doing its thing, it's because that thing needs to slide down in right there.
All right, so let's get this up here. I'm going to go at an angle. I'm going to try to do one side at a time, under there, up over that. Bring this round up this way, give that a little push, bonk. There we are. Those little pitons came right down into the sub frame like what we wanted them to do.
All of our bolt holes are lined up. Let's grab some bolts and get it in. All right, so we've got our bolts, we've got four of these, two of these. These two are the same. They're the same as those two over there. Let's get those started in. I'm just going to start all these in. We're not going to tighten anything down until they're all started.
I'm going to use a 14 with my extension, just so I can get up in here. Now that they're all started, we'll go ahead and tighten them down. All right, all six are tight, easy peasy. Okay, so when we're filling the coolant, generally speaking, you'd want to apply vacuum and then add coolant that way, because that'll make it so it draws coolant into all the areas inside the cooling system.
If you don't have access to a vacuum system to be able to fill the coolant, you're just going to have to slowly top it off. It's going to work its way in. Once it gets up so it looks like it's full, run the vehicle for a little bit. It's going to draw down, just keep adding. Make sure you're wearing safety glasses as you're doing it.
Once it gets hot, anything could happen in there. You're going to want to run it for a little while, because it's going to burp out a lot of air through this system. There's the heater core, you've got all your cooling hoses, you've got the inside of the engine, all sorts of areas where this coolant's going to need to go.
Once you get it so it's running and it's burped out all its air, you just make sure it's at its topped off level. Take your cap, screw it right on there and down the road you go.
Thanks for watching. If you want the parts to do it yourself, check out 1aauto.com, the place for DIY auto repair.
Shop Products

Car or Truck Heater Blowing Cold Air Top 3 Common Causes for Lack of Heat
Len points out some common causes for why your car or truck is still blowing cold!
