How to Replace Heater Blower Motor 2008-13 Nissan Rogue SUV
Created on: 2017-12-18
Watch this video to learn how to replace the blower motor on your 08-13 Nissan Rogue. 1A Auto helps you out with step by step instructions!
-
step 1 :Removing the Lower Dash Trim
- Remove the T20 Torx screw from underneath the hood release latch
- Pry out the lower dash trim from the steering wheel
- Loosen the hood release latch cable from the switch
- Release the latch cable from the bracket
- Press the tabs on the harness
- Release the harness from the dash
- Unclip the harness wiring from the dash with needle nose pliers
-
step 2 :Removing the Steel Support
- Remove the four 10mm bolts from the steel trim underneath the steering wheel
- Remove the 10mm nuts from bracket
- Remove the air duct
- Pull the bracket/steel support down and out
-
step 3 :Removing the Brake Pedal and Gas Pedal Assembly
- Pry off the e-clip from the brake pedal assembly with pliers
- Disconnect the electrical connectors from the brake pedal switches
- Remove the 13mm bolts from the brake pedal assembly
- Unclip the harness from the brake pedal assembly with needle nose pliers
- Unplug the electrical connection to the gas pedal
- Remove the two 13mm nuts on the backside of throttle
- Remove the assembly
- Remove the pin
-
step 4 :Removing the Blower Motor
- Disconnect the connector
- Remove the 8mm bolt
- Turn the blower motor counterclockwise to unlock it
- Lower the blower motor down and out
-
step 5 :Installing the Blower Motor
- Insert the blower motor into place
- Turn the blower motor clockwise to lock it
- Tighten the 8mm bolt to the blower motor
- Connect the connector
-
step 6 :Installing the Brake Pedal and Gas Pedal Assembly
- Insert the assembly into place
- Tighten the 13mm bolts by hand
- Tighten the 13mm bolts
- Insert the pin into place
- Clip in the e-clip to the brake pedal assembly
- Clip in the harnesses
- Connect the gas pedal assembly wiring harness
-
step 7 :Installing the Steel Support
- Insert the steel support into place
- Tighten the 10mm bolt to the bracket
- Clip the air duct into place
- Insert the reinforcement plate
- Tighten the four 10mm bolts to the reinforcement plate
-
step 8 :Installing the Lower Dash Trim
- Connect the hood release cable
- Connect the harness to the dash
- Clip the harness in
- Line the dash up
- Press the dash into place
- Tighten the T-20 Torx screw beneath the hood release
Tools needed
-
13mm Socket
Socket Extensions
T20 Driver
8mm Socket
10mm Socket
Ratchet
Swivel
Needle nose pliers
Hi, I’m Mike from 1A Auto. We’ve been selling auto parts for over 30 years!
To get to the blower motor on this Rogue, it's actually up here in the driver's side foot well area up near the center console. Instead of taking the dash apart, we're going to go in from underneath. But I need to take this lower part of the dash out. There is one screw holding this on and the rest is clips. So, it's actually T20 Torx. We'll remove this T20 Torx screw. Put that aside and actually grab onto this plastic and start to pull it out. It will unclip. You can pull this out if it helps. All it is, this is the door so that you can get to the fuse panel. Pull it out.
Under here there's a clip that goes in this way so you can't pull it off. So you just got to pull this out just enough to slide right out. It's got the hood cable attached to it and the diagnostic cable attachment. I'm actually going to pull the lever and you'll probably hear the hood release when you do it. But you want to pop the cable out, so you got to pull this down and flip that up. You can pop the cable up by pushing it over.
Basically, it's this little lead weight lock piece that sits in here and then locks into this opening here. You kind of just have to pull the cable up so it moves it into this slot so it can, but it popped out. It's just hard to see with all the plastic around it. I'm going to take some needle nose and just turn the cable. I just use the pliers to pry it up and out of where it was locked into the plastic here. I want to remove the diagnostic port, be real careful not to damage this. So it's got two tabs on each side.
I'll actually just use these pliers just to push them in a little bit and then pull on it from the backside. Slide it right out of there and flip this around. The harness has a little push clip in here. Got some little lock tabs I can squeeze with the needle nose. So what I did was I pushed the needle nose in there and just squeezed on these tabs to push them in and then pulled it out. Now that I can just move our plastic trim out of the way.
We remove this knee pad steel thing that's under here. It's got four 10 millimeter bolts that are holding it in. Just going to remove these. Four bolts removed. It's got little tabs here, just lift it off those. Put that aside. Next we remove this steel bracket. There's a 10 millimeter nut holding onto the stud here.
Reach in with a socket extension, loosen it up, reach in and grab it. Pulling the bracket up from the first nut, there's a second nut located up higher. Use a socket extension and a swivel joint, 10 millimeter to get to it. You might not need to remove this bracket, but for our purposes it's going to help make the video clearer to show you what we're doing. Just kind of wiggle it off. I let gravity toss the nut down, it fell into here. Before I can take this metal bracket out, now I can remove this plastic, this is part of the heater system, it blows hot air onto your feet. It just clips into the heater box. Just grab it and pop it off. It pulls right out. It's got a couple tabs on it. It just snaps into place.
Fiddle with this bracket a bit, turn it, and maneuver it out of here.
That's basically just a steel support structure under your dash. Kind of holds that knee plate. When you step on your brake pedal, that pushes this rod under here. So before you can remove this brake pedal assembly, we need to remove this E clip that's holding it on. I'm going to take my needle nose pliers, get a hold of it. Pull it straight out. This is U shaped. This pin has to come out first. It's got two tabs on it, these white locking tabs. I'm going to push it in like that.
Take my needle nose pliers again and push the two locking tabs in like that. So push it right out. Reach behind, pull the pin out. Leave it just like that. Now it's loose. You don't have to pull it all the way out of this piece here. Those plastic locking tabs are going to stop it. So you don't want to break them off. Don't pull it too hard. Now I can unplug the electrical connectors here for the brake pedal switches. Pushing the lock tab. Pull this one off. Do the same for this one.
Rolling. Got a 13 millimeter deep socket for the nuts that are holding on the brake pedal assembly, they go over long studs. Going to start with the top one, remove it. Reach up and grab it. I'm going to remove this one down here. I need to unclip this harness from the brake pedal assembly. It's got push clips in here. You really can't see what I'm doing because it's inside the steel. But I'm just going to push in with my fingers the little release tabs.
One half kind of pulled out. I just pulled it out, once I pushed in one the tabs that I could get to. Put the harness up over here out of the way. Got to unplug the electrical connection to the throttle pedal, or gas pedal. Push the lock in and pull that off. This harness is clipped into the steel as well, the same type of push in clips. So I'm going to reach up with my fingers and push in one of the locks, pull it out. Push that harness out. Also got to slide this up and out of the way. Now I can get to the two 13 millimeter nuts that are on studs just above each other on the back side here. Might be hard to see but there's two of them in here. Loosen that one up. Loosen this one up. This out. There it is. Luckily when stuff falls, it just falls on the driver's side floor here. So I just had to maneuver it off of that pin and it goes through.
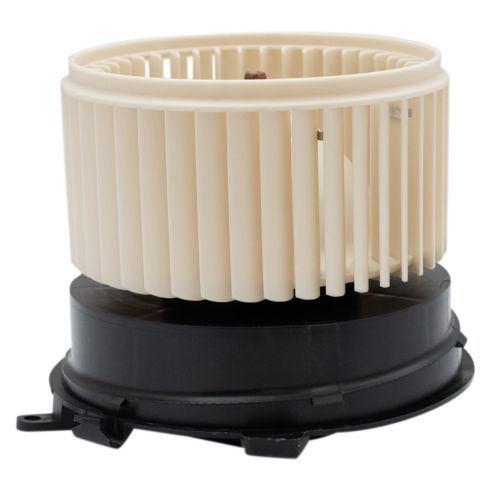
I'm pulling it straight off the studs. Just taking the whole assembly out. This is your whole brake pedal and throttle pedal assembly. As we see there's that pin in here. It's got locking tabs. So now I can push them in. I'm actually going to pull it out, make sure it doesn't get caught on anything while I'm working in here. Put that aside in a safe place, you don't want to lose it. The blower motor is located up inside what would be the center console of the car up towards the firewall. It's that black part that sort of looks like a shell or something, like a seashell.
You're going to have to unplug the connector, remove the screw and unlock it from the heater box. Blower motor is held in with an 8 millimeter bolt. It also has a Phillips head in it. But I'm going to use 8 millimeter socket and ratchet to remove it. Get that loose, reach up and grab it with my fingers. That's the only thing locking in, as far as bolts. It's got plastic tabs that are holding it in. Before I can remove it, I need to unplug the harness.
I'm going to reach up, and push the lock in. I'm going to reach up and turn the blower motor to the left. So counter clockwise to unlock it. Whatever hand is easiest for you. Going to get a pretty good grip on it. It's in there pretty tight. So you got to give it a good twist. It'll snap when it unlocks. Pull it right out. Get the harness out of the way. You bring it out. Caught a couple of the studs here. I just have to play with it a little bit to get it out. Just pull it out. There's our old one.
Here's the original blower motor from the vehicle. This one has failed. This is our brand new one from 1AAuto.com it is an exact match with the mounting tabs. It has the same style locking ramp, the way it turns in to lock. The fan part, which is also called a squirrel cage, is slightly taller, but it should work just fine because it's really only on this lip part that it's a little bit taller. This should fit great and work great in the vehicle.
When I install the blower motor, it needs to sit in this orientation when it's finished, up inside here. It has this ramp that it locks into. So when I go to install it, it's going to be turned to about here. Slide it in, you're going to have to find, super hard to see in there. You're going to have to feel it slide over these openings for the tabs, and then once it's seated we're going to turn it clockwise. It'll lock in place, and then we'll throw in the self-tapping screw to keep it there.
Basically, you just have to maneuver it up into place. It just barely fits up in here. Kind of sneak it by these sensors and this brake pedal thing. Before I took it out and I kind of rolled it. Let's see, go this way. Slide it up into place. I put the brake pedal arm or plunger into the fan part and used that as a way to maneuver it over it. I'm going to get it into place.
Got to pull this down a little bit. Try not to get the wires caught. A lot of this you're just going to have to do by feel. It's very hard to see up in here. Try not to catch the harnesses, move those out of the way. Let's see. I think I got caught on a harness for the blower motor itself. Make sure I can sneak it by the harness and kind of fiddle with it. I felt it, it's inside the heater motor box now. Just using my fingers to feel for the orientation of it. So the blower motor plug where it plugs into is facing the firewall. Got it seated I think.
Going to start to turn it counterclockwise and push it in a little bit and see if it will catch some of those locks and start to pull itself in. No, that's too far. Didn't quite catch. I think that locked into place actually. Yep, it didn't make a loud snap. But it firmly went into place.
I can't pull it out with my hand. It's seated in the heater box. It feels like it lines up with the screw hole for the locking screw. So I'm going to put that in. I'm going to install the little self-locking screw with the 8 millimeter head or the Phillips head, whatever you want to use. Got to reach up in there and put it in with my fingers.
Actually I got it threaded pretty far down with my fingertips. Now I'm just going to snug it with the 8 millimeter socket. It doesn't take much force because it's just going into plastic. It's just to keep the blower motor from spinning. And the rest of the other parts, the plastic tabs keep it locked in place. Push the harness back up where I found it. It was up over here and plug it back in at the top of where it connects into the blower motor. It'll click when it locks into place. So the blower motor is installed.
Need to reinstall the brake pedal and throttle pedal, or gas pedal assembly. So there's two holes here for the studs and two holes here: one here and one up here. And there's corresponding studs on the firewall. You also need to push the brake pedal back into this plunger part, just going to go through here, this U shaped thing. It's very important, you want to make sure that that goes in there and gets locked, because that's what actually presses your, when you step on the brake pedal, that's what pushes in the master cylinder and stops your car.
This pin will go through there and then we'll lock it with the E clip. Slide this up into place. Try not to get the harnesses caught. I'm going to get this first one caught in the bottom, just lightly catch it so the little assembly doesn't pop off on you. Push that one up in. This one caught and I'm going to pull these harnesses up just out of the way here. So I can get to the nuts and studs. So I can catch these two inside ones. I'm after my socket and ratchet. Tighten them down. This pin, can reach up behind the brake pedal and you're going to go through the piston here. You just got to find the hole. You got to push it right in.
With the pin installed, reinstall the clip. Clip these harnesses back in place. This one actually goes—this is the throttle pedal one with the black connector just down there. This one clips in by the opening on the side. Clips in right here. The brown one goes in this one. They're coded. You can only put one in one way. Black one goes here. They'll click when they're into place.
I'm just going to push that wire up like that into the throttle pedal, clip it into the bracket. There's the opening in the bracket. Put the harness into the bracket and install the connector down here. It'll lock into place. Now I have to get this bracket back in place and put these two studs through the openings in the other metal bracket here. Basically just have to maneuver it in place.
Up in here. Lightly catch the bottom one. I'm going to take my socket and swivel extension. Put the nut in there and reach up and grab it, stud out. And now I'll tighten this one. I clipped this little air duct back into place. It's got a push clip on the side that's going to get captured and then these two little push in tabs that are going to get captured. Go for this side first, lines up with this little black tab that's over here. Maneuver this in here.
This is pretty soft, you can squish it a little bit. Prop it up in place. Line up with the ducts. Snap into place and it stays right there. Going to put this metal reinforcement back in. Just hang it right here. Need to put the bolts back into this plate. So it doesn't quite line up with this because I messed with this bracket a little bit. Just lift it up. Line it up. The holes are pretty wide. Switch to my ratchet, tighten all these down. Snug them up. We need to reinstall our lower dash panel.
I'm going to start with the hood cable. That's going to snap into this opening. I'm going to hook it to the handle pat. Just pull it straight in like that, it locks. I need to get this through here and pull the cable out a bit. Have to get this started by putting a little barrel part through here. And you might have to pull up on the cable and lay it into this groove. It helps to get the barrel part first. And then twist it up and just over, just the machine over like that. Now it's hooked up.
I'm going to rotate this over again. It's getting caught on the e-brake. Now that, it's easier now because this harness wasn't connected to do the hood cables. Now I can plug the diagnostic cable harness back in. So that just has these two snap plugs or these two snaps and alignment tabs here it's going to go in just like this. This is going to clip in here.
Now we can push this back up into place. It's got this opening on the outside here. Pull out this trim a little bit so it slides up into place. That one’s caught, now we can push these ones in. They just snap in place real lightly. This one goes like that. It all just snaps back on. Our hood cable works. Push this down a little bit. Reinstall the cover for the fuse panel. Lastly, install the T20 torx screw. And then you're hooked back up. Put our key in, turn the ignition on. Turn the blower on. So it works great.
Thanks for watching. Visit us at 1AAuto.com for quality auto parts, fast and free shipping, and the best customer service in the industry.


How to Replace Blower Motor 2011-17 Toyota Camry
How to repair, install, fix, change or replace a bad or broken blower motor on 11, 12, 13, 14, 15, 16, 17 Toyota Camry
