How to Replace Headlights 2000-06 GMC Yukon
Created on: 2020-03-30
Watch this video to learn how to install new headlights on your 2000-06 GMC Yukon.
Tools needed
-
Socket Extensions
Phillips Head Screwdriver
E8 Inverted Torx Socket
I want to take these two pins out, just slide this pin forward just like that. Slide it out. Do the same on this one. And then just slide the light forward. Now, you can disconnect the connector right there, just like that. Or you could also slide the bulb out, twist it, slide it out. Just don't touch the bulb if you're going to reuse it. It's always a good idea to replace the bulbs at this time. Put the new bulb in here. This one is an HB4, that's for the low beam. And the high beam is an HP3. That's good. Just connect the connectors. And just line this up. When those holes are lined up, take the pins. Before I lock it in place, just get the other pin lined up. Might have to wiggle it back and forth a little. All right. With both of those lined up, lock them in place. To aim the headlights, you can use this right here. You just use an E8 socket and you can twist it left and right. And that's gonna move it side to side. And for the height adjustment, you're going to go down here. The same E8 socket, or you can also use a Phillips head screwdriver.
This is going to be a general tutorial on how to aim your brand new TRQ headlamp assemblies. Okay. So, looking at your brand new TRQ headlamp assembly, you're going to see where your low beam is, and you'll see a little dot right in the center. And that is the axis point, okay? So, what we're going to do is we're going to mark that with an erasable marker, just so it's easier to see. Next, what we need to do is measure from the level ground up to this point and take note of that measurement. Now, we're just going to pull the car up to our wall. On our vehicle, we remember that the measurement was 28 inches for our axis point. Your vehicle may be different, but that's where I'm going to put this tape. Just above that 28 inches. We'll do the same on the other side. Okay. So, let's just back the vehicle up straight back 25 feet from the wall. And now, that we moved our vehicle 25 feet back from the wall, we're going to start with our measurement here. That's where the headlamp center is. We're gonna go down 4 inches on the driver side. On the passenger side, we have our line here. What we need to do is go down 2 inches. To adjust the driver side. We're going to cover our passenger side headlamp. If you look at the backside of your headlamp assembly, you're going to see something that looks like this. This is the adjustment. Some of these headlights assemblies have one, two, or even more of them, but you should at least have one. This is how we're going to adjust the headlight beam. Now, we're gonna lower the top part of the beam down to just below this line. When you turn the adjustment to the right, it brings the beam up. And if you turn it to the left, it'll bring the headlight beam down. And this is this way on most vehicles. Let's continue on to doing the passenger side. All right. We properly aligned our TRQ headlamp assemblies. Okay. And on the quality TRQ headlamps for a pickup truck, the procedure is going to be the same. You're going to find your center dot, mark it, and then you'll measure from the level ground up to your dot.
So, once your headlamps are properly adjusted, it'll be time to adjust your fog lamps. You'll notice on the driver side, the focal point is all the way at the bottom right now. I would like to bring it up so it meets up with approximately the bottom of the focal point of the headlight. Some fog lamps have an adjuster, others don't. The ones that do have an adjuster, you would just turn the adjustment to the left or to the right to adjust the beam up and down to where it needs to be. Now, with your TRQ headlamps and fog lamps properly aligned, you can drive down the road safely.
Shop Products


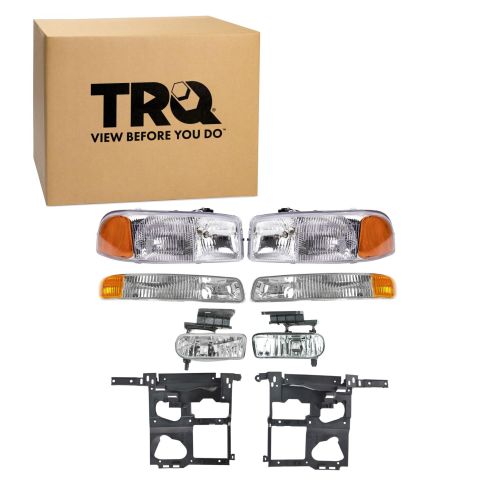
GMC 8 Piece Lighting Kit TRQ LKA76935
Part Details:
- (2) Parking Lights
- (2) Fog Lights
- (2) Headlight Brackets
- 8 Piece
- (1) Headlight Set

How to Replace Headlights 2004-07 Subaru Impreza WRX
How to repair, install, fix, change or replace the broken, damaged, cracked, faded, cloudy, or chipped headlightson 06 Subaru Impreza WRX
