How to Replace Headlights 2010-11 Toyota Prius
Created on: 2018-01-12
How to repair, install, fix, change or replace the broken, damaged, cracked, faded, cloudy, or chipped headlights on 10, 11 Toyota Prius.
-
step 1 :Removing the Bumper Cover
- Pry up the push clips with a flat blade screwdriver
- Remove the five clips from the top of the bumper
- Remove the 10mm bolts from the bumper
- Raise and support the vehicle
- Remove the 10mm bolts from the splash shield
- Remove the three push clips from the splash shield
- Pull the splash shield down to reach the headlight wiring harness
- Disconnect the headlight wiring harness
- Remove the clip from the fender liner on either side with a flat blade screwdriver
- Remove the 10mm bolt from the fender liner
- Pop the bumper cover out of its clips
- Lift the bumper up and off
-
step 2 :Removing the Headlight
- Remove the three 10mm bolts from the headlight
- Release the headlight from the two clips on the top
- Release the headlight from the clip on the bottom
- Pull the headlight out
- Disconnect the wiring harness
- Twist the bulb socket counterclockwise out of the light
-
step 3 :Installing the Headlight
- Remove the shipping stickers
- Twist the bulb clockwise into the light
- Connect the wiring harness
- Insert the headlight into place
- Tighten the three 10mm bolts to the headlight
-
step 4 :Installing the Bumper Cover
- Insert the bumper cover into place
- Snap the clips on the bumper in
- Align the fender liner
- Press in the clip to either side of the fender liner
- Tighten the 10mm bolt to the fender liner
- Tighten the 10mm bolt to the bumper cover
- Press in the push clips to the bumper cover
- Place the guard onto the bumper cover
- Press in the push clips
- Connect the turn signal wiring harness
- Tighten the 10mm bolts to the splash shield
- Press on the three clips to the splash shield
Tools needed
-
Socket Extensions
Flat Blade Screwdriver
Rust Penetrant
10mm Socket
Ratchet
Trim Tool Set
Hi, I’m Mike from 1A Auto. We’ve been selling auto parts for over 30 years!
Pop your hood with this lever here. Find the safety release and pull it up. Prop your hood up just like that. Remove this trim piece. There's three clips: here, here, and here. The trick to these is you just push them in with your finger like that. They'll go in a little bit. Then you can pull this right up. Put that off to the side.
Remove the five clips on the top of the bumper right here, and then two more on this side. You can use a plastic trim tool from 1aauto.com just to pull these up. Get under here, and pull up like that. Take a ratchet and a 10mm socket and remove these two bolts. These feel a little bit rusty, so I'm going to use some rust penetrant. You definitely don't want to break these, so you might want to tighten it a little bit. Let the rust penetrant work itself in the threads, then loosen it back up very carefully. When you feel it get real tight, I'll tighten it back up. Repeat this process until they're removed.
We're going to raise and support our vehicle. We have a two-post lift, but you can do this in the driveway on the ground. There's a series of 10mm bolts along the bottom edge of the bumper. We're going to soak these in rust penetrant because they look pretty rusty. Now you can remove those six 10mm bolts. These also have a spot for a Phillips, but a 10mm is going to be easier. There's three clips just like the ones on the top of the bumper: one here, one in the center here, and one on this end here. You remove those.
Over on the driver side you can pull this little panel down. Before we remove the bumper, we want to disconnect this harness here. You want to push in on this lock here, pull down, and disconnect that harness. In the wheel well there's a 10mm bolt here you'll have to remove and a trim clip here. We'll take a flat blade screwdriver and spin this horizontal, and then use a trim tool to pull that out just like that. Now you can remove the 10mm bolt. Repeat the same steps on the opposite side.
You want to pull the fender liner back a little bit, grab the bumper, and just give it a good tug. If you need to, you can very carefully slide a trim tool in here and just very lightly pop this out just like that. It'd be helpful to have somebody to hold the other side of this while you remove the other side. Now you can remove the bumper.
There's three 10 millimeter bolts holding the headlight on: one here, one here, and then one here. That's the reason we had to remove the bumper. No other way to get to that bolt. This one. This process will be the same for the driver's side. There's a small clip right here at the bottom of the headlight that you might have to push up a little bit, like that, to get that lose. Then on the top of the headlight, you want to pull up on these two clips. The headlight will come straight out.
You need to remove the harness from the headlight. You want to take some needle nose pliers. Squeeze these tabs in. Push that through. Push these tabs in. It'll come through like that. You want to disconnect all the harnesses to the bulbs. Push in on the tab. Pull that one out. This one, you can turn counterclockwise. Pull that out. Push on the tab here. Remove that one. Push down on this tab. Remove that one. Let the wires hang.
Here's your headlight. Here we have our original headlight from our 2011 Prius and our new one from 1AAuto.com. Has all the same mounting locations. We will have to change the bulbs over. You have your adjuster here. If your headlights are foggy, if they're worn out, like this one is, this one will go in just like your original part. It'll be nice and bright for you while you're going down the road. You can switch your bulbs over and take off these little stickers here that just are for shipping. Put those aside.
You want to take these and turn them counterclockwise. Find where the tabs line up. Turn them clockwise to lock them. Same thing with this one, counterclockwise. Pull that one out. If you do need new bulbs, now would be the time to change them out. This one, same thing, counterclockwise. Pulls out. Lock it in by turning it clockwise. This one stays on the wire hardness in the car, We'll put that in when we put the headlight in.
Reinstall all your bulbs and harness connectors. This one, they're all going to be turned clockwise. You can reinstall these connections. This one goes here. That one's going to click. Same with this. It's locked in. This has a little channel here. It only goes on one way, just like that.
Reinstall your headlight. Make sure this piece goes along the top here and also over here. We want this clip to slide in there. Make sure the channel of the headlight fits into the car fender and these lock in on the top, just like that. Reinstall your 10 millimeter bolts. Your bolts for the headlight, these course thread bolts go on the top. This one that looks like this goes in the side here. Feed that in by hand. Make sure you don't cross thread it. Just want to get these snug. Don't want to break any of the plastic. You're good. Repeat these steps on the opposite side.
Reinstall your bumper. Line it up on the top. Hold the front. Line up the edges. Just snap them back into place just like that. Push your fender liner back into place just like that. Make sure this clip goes back in at the same time. Reinstall this piece. Just push it into place. I'll reinstall your 10mm bolt. Repeat these steps on the opposite side.
Reinstall your clips on the top. Just make sure these are pulled out like that. Push the base in and pop the top on. There's one in the center here, and two on each end. Reinstall your two 10mm bolts at the top here. Lay this piece back where it was. It was over this rubber gasket. Line it up. Push your trim clips out. Might help to have something hard to push against. You want them to be like that. Feed those in.
Reinstall the three trim clips on the top. Reinstall your connector for your turn signals. That will click. Feed this back up here like that. Reinstall your bolt here and your trim clip there. Now you can reinstall the rest of the bolts and trim clips on the bottom of the bumper. Close your hood, and you're all set.
This is a basic tutorial on how to aim the headlights on your vehicle. Find the axis of your headlights. This is usually indicated with a small dot or the headlight bulb size on the lens. If not, it's the actual center point of your headlight bulb. Transfer this mark to a vertical wall with a preferably dark color that'll allow you to back up 25 feet. Pull up and find the center line of your vehicle, as well as the center line of your headlight axis. Mark the wall with the height of the headlights in a straight line going across at that access height.
Back your vehicle up 25 feet from the wall to the front edge of your vehicle's headlights. Turn your headlights on and locate the adjusting screw, usually on the back side of your headlights. You'll want to rotate this until the passenger hot spot or focus of the beam is approximately two inches below the line, and the driver's side is four inches below the line. We changed the heights on each side, so you can still get a good beam to the offside of the road on the passenger's side and have the driver's side low enough to not blind oncoming traffic.
Thanks for watching. Visit us at 1AAuto.com for quality auto parts, fast and free shipping, and the best customer service in the industry.
Shop Products

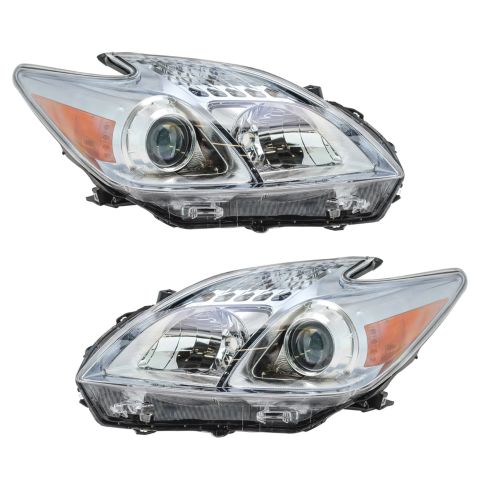
2010-11 Toyota Prius Driver & Passenger Side 2 Piece Headlight Set TRQ HLA74351
Part Details:
- 2 Piece
- Standard Replacement
- PC (Polycarbonate)
- Assembly
- (1) Passenger Side Headlight Assembly
- (1) Driver Side Headlight Assembly
How to Replace Headlight 2002-06 GMC Envoy XL
Learn how to change the headlights or headlight bulbs on your 02-09 GMC Envoy by watching this 1A Auto video
