How to Replace Headlights 2007-09 Toyota Camry
Created on: 2017-10-12
How to repair, install, fix, change or replace broken, damaged, cracked, faded, cloudy, or chipped headlights on 07, 08, 09, Toyota, Camry.
-
step 1 :Removing the Front Bumper
- Place tape along the edge of the bumper to mark its location
- Remove the 10mm bolts from the splash shield
- Remove the splash shields
- Turn the clip in the fender liner on either side
- Pull back the fender liner
- Remove the 10mm bolt from the bumper on either side
- Remove the 10mm bolt from the metal support on top of the bumper
- Pry up the plastic pin from the headlight with a flat blade screwdriver
- Remove the Phillips retainer from the bracket
- Pry up the plastic pin from the headlight with a flat blade screwdriver
- Pull the bumper off of the bracket
-
step 2 :Removing the Headlight
- Remove the 10mm bolts from the headlight bracket
- Pull the headlight out
- Disconnect the headlight wiring harness
-
step 3 :Servicing the Bulbs
- Twist the bulb socket counterclockwise out of the light
- Pull the bulb off of the socket
- Push on the new bulb
- Twist the bulb clockwise into the light
-
step 4 :Installing the New Headlight
- Reconnect the wiring harness to the headlight
- Line up the bolt holes on the headlight bracket to the bolt holes on the vehicle
- Replace the 10mm bolts and grommets into the headlight bracket
-
step 5 :Installing the Front Bumper
- Hang the bumper on the top brackets
- Push the bumper into the bracket on both sides
- Press in the push clips to the headlights
- Tighten the Phillips retainers to the metal bracket
- Press in the clips to the bumper
- Tighten the screw to the bumper behind the fender liner on both sides
- Replace the splash shield
- Tighten the 10mm bolts to the splash shield
Tools needed
-
Phillips Head Screwdriver
Painter's Tape
10mm Socket
Ratchet
Hi, I’m Mike from 1A Auto. We’ve been selling auto parts for over 30 years!
To remove the headlights, you need to remove the bumper. I'm going to put some protective tape on the edges of the bumper and the fender, so that while we're handling the bumper, we're going to avoid scratching up the paint. Just repeat this with the other side. To take the front bumper off.
You don't have to have the car in the air, but it does make it easier for us to show you what we're doing. You're going to remove this 10-millimeter bolt here. There was one here, all of them right across the front: one here, here, another one here, and this one over here. I’m just going to use a 10-millimeter socket. They do have a spot in them for a Phillips head screwdriver, but the socket makes it a little bit easier.
To remove these lower splash shields, I'm going to remove the other 10-millimeter bolts. One over here. I'm going to remove these bolts here, so I'm probably going to replace these with after-market ones. They're most likely going to be 10 millimeters, like the other ones, but on this car, they're 1/4". On each side of the bumper, there's a small plastic clip. We use a flat bladed screwdriver to turn it 90 degrees to unlock it.
Then we use a plastic prying tool, like the ones you can get at 1AAuto.com to pry it out. Put that aside so we don't lose it. That's what's holding in the bumper to this fender liner. Once you remove this pin, you got to move up here, and you can pull down the fender liner. There's a hidden fastener up here. It's 10 millimeter. Also has a Phillips head screw head to it, but I'm going to use a 10-millimeter socket because it's easier. Go ahead and remove it. Repeat this for the other side. This bolt might be a little rusty underneath. I'm going to spray some rust penetrant. Take our 10-millimeter socket and remove it.
This is a one single bolt that is holding on this entire middle support that's on the top of the bumper. On both sides of this bumper, there is a screw with a rubber cap around it and a bunch of these push pins. This larger one here attaches to the headlamp assembly. It's actually broken on our vehicle, so it needs to be pushed out so the bumper can come apart. I'm going to leave this one in here because it's already broken. We're going to remove this, and then the other side I will push this pin out.
Using a Phillips head screwdriver. That feels pretty rusty, I'm going to use some rust penetrant in there. See how the top of this bumper's now loose, so it's come off of this middle bracket. It should be pinned into here on the headlight, but this part of the headlight is actually broken off. You need to push this pin out. It's going to be pretty difficult where it's like a flush mounted pin, so I'm going to take a plastic prying tool that you can get from 1AAuto.com. I'm going to push it in here. I'll try to pry up on that. It'll work, it might not work. I might just take a very small flat-headed screwdriver, and go up in here. That actually did the trick. So that will be loosen from the headlight assembly. I need to remove this screw. With all the fastener removed, the bumper should unclip from the body.
You have to give it a bit of a pull to pull off of this bracket. It snaps down to here. It's going to actually sit on top of those metal brackets on the top of the bumper, so that's okay. I'm going to do the same on this side. Just got to put your hands underneath. Get a firm tug. With it loose, you can lift the whole bumper off.
With the bumper removed, we can get to this bolt here that's holding in the headlamp. It's a 10 millimeter. It's also broken. This driver side headlamp on our car. One of the reasons we are replacing it is because it is broken. Those tabs are broken here that the bolt goes through. So, I'm going to be able to take the headlamp out. There it falls out, yeah. So, I can actually get this bolt out now. It was kind of hung up on that plastic. Remove this upper 10 millimeter bolt. It also has a Phillips head slot in it. It's easier just to use the 10 millimeter ratchet and socket. There's this one down here, which of course again is broken. So, the headlamp's really loose. But we can pull that off anyways. The headlamp is sitting on these white plastic grommets. Just going to push it up, pop it off the grommet, and then pull the headlamp out.
Slide it out of the fender. It's still connected to the lights. Now we can unlock all the headlights. Push the locks in. Wiggle them off. Lock to get to. Actually going to open it up here. You want enough finger strength to push that lock down. Put this back in here for now. This will unclip from here. Leave our harness there. Pull our whole headlight assembly out.
Here's the original headlamp from our vehicle. It's all yellow and pitted. It's also smashed and broken. So, you can get water in here. It can fog up. It's basically no good. It doesn't even mount solid in the car. These are all the extra pieces. It was broken on this side here. It was also broken down here. That's why we're replacing it. So, our brand new one from 1aauto.com. It's an exact match, which ships with protective plastic film on here. Peel that off. It's got all the correct tabs and mounting holes. It's in great shape. The only thing we have to do is swap over our bulbs.
IF you need to adjust the height of the headlamp, the adjustment screw is here. This should work great for you. Really going to make your car look nice. I'm going to pull out the side marker bulb here. It's a 194 bulb. Pull out the turn signal bulb. It's a 3457. This is the low beam bulb and the high beam bulb. Start over here with our side marker bulb. They've got little plastic covers on them to keep debris out when they ship. Take the original bulb and socket. Line it up with the tabs. Turn it clockwise. It'll lock it in. Pull the plastic off of this one.
Install our turn signal bulb. Just going to line up the tabs in the correct spot. This way. Turn it clockwise to lock it. Install our low beam bulb. Line up the tabs. Turn it clockwise. Install our high beam bulb. Clockwise to lock it in. Now we can install the headlamp in the vehicle. Also, available from 1aauto.com are new headlight grommets. These are what your self-tapping screws thread into. There's one on the top. One down here.
For example, if this is broken or missing, you can replace it. There are two tabs on the backside. You kind of push them together. It'll pop out of the sheet metal. So, just kind of pop it out. Just like that. Take the new one. Pop it right in. It's as simple as that. Reconnect our headlight harness. Start over here at the high beam. Next do the low beam. The turn signal. Marker light bulb. This harness clips on this little tab. Headlight slides back into place into the fender. It's going to go over that little grommet. Push down. It sit on that one there. Install the self-tapping screw. Install the 10 millimeter that goes into the fender. Have to move the white housing around to line it up. If I feel it get tight, I'm just going to stop. Tighten the top one. Tighten this one here. New headlamp is installed. Repeat the install for the other side.
If you need to make the adjustment on height. The adjustment is right here.
I'll reinstall the bumper. We'll hang it on the top brackets. This is why we put tape, so as we're moving around we don't scratch anything. This can be pushed back into the bracket now. Same for the other side. Install the push clips into headlamp.
Then these bumpers have bolts in them, Phillips head screw. Install the bolt on top of the bumper. I'm going to reinstall these plastic locks. They went in this way, and then turned. Install the self-tapping screw that's up here behind the fender liner. Reinstall the locking clip. Reinstall the self-tapping screw behind the fender liner. Reinstall the splash shield.
Slide up into the bumper. Reinstall the other half. This piece went up into here. Just reinstall whatever hardware that's original to the vehicle that you took out here. Peel off all the tape that you're using to protect the body work.
This is a basic tutorial on how to aim the headlights on your vehicle. Find the axis of the headlights. This is usually indicated with a small dot or the headlight bulb size on the lens. If not, it's the actual center point of your headlight bulb. Transfer this mark to a vertical wall with a preferably dark color that will allow you to back up 25 feet. Pull up and find the center line of your vehicle as well as the center line of your headlight access. Mark the wall with the height of the headlights and a straight line going across at that access height. Back your vehicle up 25 feet from the wall to the front edge of your vehicle's headlights. Turn your headlights on and locate the adjusting screw usually on the backside of your headlights. You'll want to rotate this until the passenger hot spot or focus of the beam is approximately two inches below the line and the driver's side is four inches below the line. We change the heights on each side, so you can still get at good beam to the offside of the road on the passenger side and have the driver's side low enough to not blind oncoming traffic.
Thanks for watching. Visit us at 1AAuto.com for quality auto parts, fast and free shipping, and the best customer service in the industry.
Shop Products


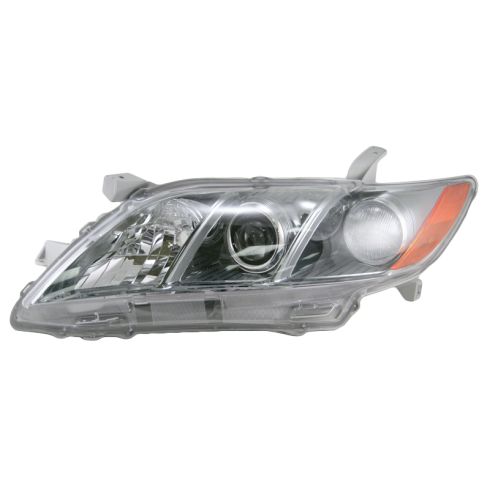
2007-09 Toyota Camry SE US Built Models Driver Side Headlight Assembly TRQ HLA78828
Part Details:
- Features and Benefits
- PC (Polycarbonate)
- Halogen
How to Replace Headlight 2001-05 Chrysler PT Cruiser
Watch this video for help with replacing a headlight and headlight bulb in a 01-05 Chrysler PT Cruiser.
