How to Replace Headlight Dimmer Switch Without Fog Lights 1997-2001 Toyota Camry
Created on: 2016-07-18
This video will show how to replace the headlight dimmer switch on 97-01 Toyota Camrys without fog lights.
-
step 1 :Disconnecting the Battery
- Loosen the negative terminal with a 10mm wrench
- Let the disconnected battery sit for 30 minutes to drain power from the modules
-
step 2 :Removing the Dimmer Switch
- Remove the Phillips head screw from the lower steering wheel column
- Turn your key to accessory mode
- Turn the wheel 90 degrees
- Remove the Phillips head screw from the column
- Turn the wheel 180 degrees
- Remove the Phillips head screw from the column
- Separate the steering column cover with a flat blade screwdriver
- Remove the upper portion
- Remove the panel from the tilt column lever
- Remove the bottom portion
- Disconnect the switch connector
- Remove the two Phillips head screws from the switch
- Remove the switch
-
step 3 :Installing the Dimmer Switch
- Insert the switch into place
- Tighten the two Phillips head screws to the switch
- Connect the switch connector
- Insert the upper steering column cover into place
- Tilt the column up and insert the lower column portion
- Press the tilt trim piece into place
- Tighten the Phillips head screw to the bottom of the column
- Turn the key to run
- Rotate the wheel and tighten the two Phillips screws
- Straighten the wheel
- Remove the key
-
step 4 :Connecting the Battery
- Reconnect the battery with a 10mm wrench
- Turn the key to the on position
- Check the parking, low beam, high beam, and turn signals for operation
Tools needed
-
Flat Blade Screwdriver
Phillips Head Screwdriver
10mm Wrench
Brought to you by 1AAuto.com, your source for quality replacement parts and the best service on the Internet.
Hi, I'm Mike from 1A Auto. I hope this how-to video helps you out, and next time you need parts for your vehicle, think of 1AAuto.com. Thanks.
In this video, we're going to show you how to replace the headlight dimmer switch in a 1998 Toyota Camry. This information should be the same from '97 to '01, as long as your vehicle does not have fog lights.
The items you'll need for this repair are a new headlight dimmer switch from 1AAuto.com, a Phillips head and flat blade screwdriver, as well as a 10 mm wrench.
Using a 10mm wrench, loosen the negative terminal on your battery. Remove and isolate the terminal.
Remove the Phillips head screw from the bottom of the clam shell on the steering column. Turn your ignition key to run. Turn the wheel 90 degrees to the right. Remove this Phillips head screw. Rotate the wheel in the opposite direction and remove this Phillips head screw. Using a small flat blade screwdriver, separate the upper and lower steering column covers. Lift up and remove the upper portion of the clam shell. Pop out the panel around the tilt column lever.
You need to remove the front with a flat blade screwdriver. Tilt the column up. Remove the lower portion of the clam shell. Remove the connector at the bottom of the multi-function switch, and remove these two Phillips head screws. Remove the switch from the column.
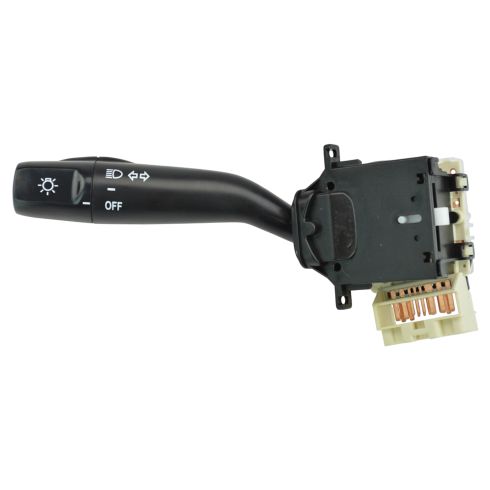
Here, we have our old part that we've removed from the vehicle and our new part from 1AAuto.com. As you can see, the parts are identical in size and shape. We have the same connector on the bottom with the same two bolt mounting locations. We have the same reset tab for our turn signals, as well as the same graphics. Ours are nice and bright on the new part. Some of the things that your headlight dimmer switch controls is the parking lights, headlights, the high beams, as well as the left and right turn signals. If you've traced your lighting problem back to your headlight dimmer switch, this new part from 1A Auto is going to go in direct fit, just like your original equipment, and fix you up right.
Connect the connector to your new headlight dimmer switch. Line it up. Slide it into its place in the side of the steering column. Install and tighten down both Phillips head screws with a Phillips head screwdriver. Place the upper portion of your steering column cover back on. You may have to drop the tilt steering wheel down to make this easier. Tilt the column up and install the lower portion of the cover. Reinstall the cover on the tilt portion. Install the Phillips head screw at the bottom of the column.
Insert your key. Turn it to run, so you can rotate the wheel 90 degrees. Tighten the Phillips head screw with a screwdriver. Rotate the wheel 180 degrees in the opposite direction and install the last screw. Straighten the wheel, turn your key off, reconnect the battery, and check for proper operation of the headlight dimmer switch.
Reconnect the negative battery terminal and tighten it down. Turn your key on. Check that the left and right turn signals are both operational. Make sure your parking lights, low beams, and high beams also work.
Thanks for tuning in. We hope this video helped you out. Next time you need parts for your car, please visit 1AAuto.com. Also check out our other helpful how-to and diagnosis videos.
Shop Products

How to Replace Turn Signal Lever 2007-09 Chevy Equinox
This video will show how to remove the steering column cover to access and replace the combination switch stalk on the 07-09 Chevy Equinox
