How to Replace Headlight 1999-2002 Toyota 4Runner
Created on: 2012-03-07
Watch this video to learn how to replace the bulbs and headlight assembly as well as the parking/corner light on your 99-02 Toyota 4Runner.
-
step 1 :Preliminary Notes
- Note: DO NOT TOUCH the bulbs- the oil from your fingers will burn into the light and foul your bulb.
- Clean with rubbing alcohol and a soft cloth if the bulbs do get touched.
- When adjusting headlights, the concentration of the beam should be an inch below the height of the low beams at a 20ft distance and the high beams should be level with the height of the high beams at a 20ft distance.
-
step 2 :To replace just the headlight bulbs
- Pop the hood and secure it.
- Reach behind the headlight assembly.
- Unplug the harness and pull aside the rubber boot.
-
step 3 :Remove the grille
- Use a flat blade screwdriver to unclip
- Pull off and set aside
-
step 4 :Remove the parking light
- Unscrew the phillip's screw at the top
- Pry out the parking light
- Unplug the wiring assembly and bulbs
-
step 5 :Remove the headlight assembly
- Remove the 10mm bolts securing the assembly.
- Remove the four fasteners.
- Remove the 10 mm nuts using your wrench.
- Pull out the headlight assembly and unplug.
-
step 6 :Install the new headlight
- Plug in the wiring harness and bulbs
- Bolt the headlight assembly in and replace all the clips.
-
step 7 :Install the parking light
- Plug in the bulbs and harness
- Secure the parking light into place with your Phillips screw and driver
- 7:09 Install the grille
- Transfer the grille clips from the old head light assembly to the new one.
- Clip the grille on.
-
step 8 :Aim the headlights
- Use your Phillips screwdriver to adjust the adjustor screws and aim the headlights.
Tools needed
-
Flat Blade Screwdriver
Phillips Head Screwdriver
10mm Socket
Ratchet
Brought to you by 1AAuto.com- Your source for quality replacement parts and the best service on the internet. Hi I'm Mike from 1A Auto. I hope this how to video helps you out and next time you need parts for your vehicle think of 1AAuto.com. Thanks.
In this video we're going to show you how to service the headlights on this '99 Toyota Forerunner. It's the same as any '99 to '02 and we'll show you both just replacing the headlight bulbs as well as if you want to replace an entire assembly or both assemblies if yours are clouded, if they've faded, chipped, or broken. To replace headlight bulbs you actually don't need any tools. If you are replacing your entire assemblies you'll need a small flat blade screwdriver, a Phillips screwdriver, and a 10 millimeter socket with a ratchet and extension.
If you're looking to replace a bulb you go right in here behind this headlight and then there's a connector and you have to pull on it and it comes off. Then there's a dust boot here, pull that dust boot off. There's a wire retainer you push in and then pull up and it might take a little bit of force, but it should pop right off. Just bring it out and then your bulb comes out. You can put a new one in just by reversing the procedure. Put the bulb in, wire retainer down and locked into place. Put your dust boot back on and reconnect.
Okay, I showed you replacing the bulb on the passenger side, driver side is the same procedure. Now I'm going to show you how to replace a whole assembly. This will be useful obviously if you need to replace your assembly due to it got broken or if they faded and clouded so you're having trouble seeing at night. New set of headlights from 1AAuto.com will help that problem. The grill is held on by a series of clips. There's one here, one here, two more on the top and then there's a few down at the bottom. What you want to do is go in from the side and the little tab that you press down. You can see I go right here with a small flat blade screwdriver. There's the tab that you want to push down. You'll do this seven times.
Push down on that tab and you pull out on the grill to release it. Push down on the little tab and the grill pulls out. Same thing here located another tab, push down and it comes out. Okay, we go to the top now. Do the same thing with the other side. Go in from the side, push down, pull out. This middle one you come right in from the top. This is the easiest one to see if you want to know how they work. Middle one just push down right there. Phillips screwdriver at the top here. There's a little clip at the bottom, pull it right out. Disconnect that. Grab your 10 mm socket. Bolt right here. Now there are four fasteners that hold the light on and a bolt there. A bolt in underneath there and then two nuts right there.
Again I'll use a 10 millimeter socket with a ratchet and an extension and remove those four fasteners. I removed the two bolts from the inside of the headlight first and then the two nuts from the outside. Pull the light right out and unplug your lead here and pull the lights out. New light from 1A Auto. Exact same as the new light, nice and clear. Just going to plug in exactly the same. Get it onto the two studs over here on this side. Put it in place. Start this bolt over here carefully.
The tip is for these two bolts, put the bolts into the socket on the extension first that way you can reach under there, in there and start them up. That's for the bolts, the first two. Using my extension and just watch it lead in. we'll speed it up, start the bolts in, start your two nuts on and then tighten them up. You want to tighten them nice and firm. You don't need to over tighten them.
Take this small coarse thread bolt, put that trim back on, and tighten that up. You're parking light from 1A Auto it's going to be exact same as your original. If you have one broken or you just want to replace it and make it look nicer. Just make sure that on the side everything lines up properly. Back into place and you're Phillips screw. Okay, before you install the grill take your clips just squeeze them, twist and put them into the new headlight.
Install the replacement grill you basically just put it into place and watch these clips, make sure they all go in correctly and then slide the clips to the side a little bit. To adjust your lights there's an adjuster here that you use a 10 millimeter wrench or socket ratchet on. There's an adjuster down here, okay, with a 10 millimeter wrench or a socket and ratchet. One of them adjust the light up and down and one adjust left to right. Basically on these lights you want the low beam pointing straight ahead and down one inch. You want the concentration of the beam to be down one inch from where the bulb is at 20 feet way. The high beam you want the concentration of the headlight beam to be at the same level as the bulb 20 feet away on a level surface. Obviously you want them pointing straight ahead.
We hope this helps you out. Brought to you by www.1AAuto.com- Your source for quality replacement parts and the best service on the internet. Please feel free to call us toll free 888-844-3393. we're the company that's here for you on the internet and in person.
Shop Products


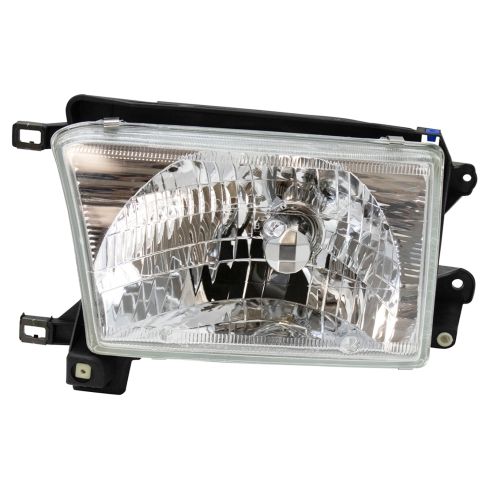
1999-02 Toyota 4Runner Driver Side Headlight Assembly TRQ HLA74205
Part Details:
- Yes
- PC (Polycarbonate)
- Yes

How to Replace Headlights 2004-07 Subaru Impreza WRX
How to repair, install, fix, change or replace the broken, damaged, cracked, faded, cloudy, or chipped headlightson 06 Subaru Impreza WRX
