How to Replace Headlight 2004-05 Dodge Durango
Created on: 2012-07-24
Learn how to replace a broken headlight and headlight bulb in a 04-05 Dodge Durango when you watch this video.
-
DO NOT TOUCH the bulbs- the oil from your fingers will burn into the light and foul your bulb. Clean with rubbing alcohol and a soft cloth if the bulbs do get touched.
step 1 :To Remove the headlight assembly
- Remove the two 10mm bolts under the headlight assembly.
- Remove the 10mm nut by reaching behind the wheel well and opening the little access panel behind the headlight assembly.
- Use your socket, extension, and ratchet to access the nut.
- Pull out the headlight assembly.
- Unplug the harness and bulbs.
-
step 2 :Install the new headlight assembly
- Plug the bulbs and harness back in
- Bolt the headlight assembly back in
- Replace the access panel.
Tools needed
-
Socket Extensions
10mm Socket
Ratchet
Brought to you by 1AAuto.com- Your source for quality replacement parts and the best service on the internet. Hi, I'm Mike from 1AAuto. I hope this how-to video helps you out, and next time you need parts for your vehicle think of 1AAuto.com. Thanks.
In this video, we're going to show you how to service a headlight on this 2005 Dodge Durango. It's a pretty straightforward process. The only tool you'll need is a 10mm socket with a ratchet and an extension. I do run into an issue with this vehicle, and I do need a set of locking pliers as well. Hopefully, you won't run into that problem. We obviously show you the passenger side. The driver's side's the same procedure. This basically is the same procedure for 2004-2006 Durangos.
To remove the headlights, you'll need to remove them, either to change the bulbs or to change the whole assembly if it's broken. Right underneath there's two 10mm bolts in these slots here. Then you'll want to turn your wheel either way, and up under here there's a track door. You slide it up you slide it up, pull the bottom out, and then pull it down. Then back in there, back in there you want to remove that 10mm nut right there. Here's a 10mm socket with an extension and a ratchet, and I'm just going to go in here. Feel around a little bit with the socket until you hit the bolt.
Now here I'm just going to fast-forward as I remove those two bolts underneath, and then the nut on the back-side. On this vehicle what ends up happening actually, is that nut is kind of rusty, so you would probably want to spray some penetrating oil on it. But the, actually the stud ends up coming out of the headlight, which is okay. Once you have the fasteners out, you give a pull on the front of the headlight and pull it forward. Look at the back of the light. Take a flat-blade screwdriver, and you pry out these red safety tabs, which allows you to squeeze the tab on top and disconnect. It is the same thing here. Pull out the red tab, then squeeze, then disconnect. Then do the same thing down here.
I have to pry out this. Pry that out, squeeze and the other thing you can do is actually just turn this counterclockwise. That comes out, and the bolt pulls out. There's your headlight off. So any of these, if you're just looking to change your bulb, this bulb you turn a ring counterclockwise and it comes out. Then you stick it back in. Turn it clockwise to lock it. This one's like the other one. Turn it counter-clockwise, bulb pulls out, and push it back in. If you just put your headlight back in after you change your bulb, you don't have to get this apart. You can just screw it back into your existing headlight assembly, but if you are replacing your headlight assembly, you'll want to get this out in order to install the new headlight. So just lock that set of pliers on there and going back through this side again
Again, I'm doing this step because that stud pulled out of the headlight, rather than the nut just coming off the backside. If yours comes apart cleanly, then you won't have to do this step. Also, if you're just replacing a bulb or something and putting the existing headlight back in, then you can just crank the nut and stud back into the headlight from this position.
New light from 1AAuto. You can see it comes with all the same mounting points and everything. Peel back the plastic here you want to put it in place. Make sure you reconnect the headlight. Press the safety tab in. Plug in your directional. Make sure it's on. Get the safety tab on. Then the little marker light as well. Lock the safety tab on. When you're ready to put the light back in, you have this knob right here, which goes into a plastic clip here. So, what you want to do is get the bottom of the light set. Make sure that your stud here is going into the hole. Peek back in and make sure that's going in. Give it a good hit to lock it in there. You should take these bolts. Put them right into my socket. Look right in there. Lock them into place. Now take this nut. Just kind of just feel it in there. Turn it on.
I'm going to fast-forward here as I just tighten up that nut in the back nice and firm. Then I will tighten up the two bolts underneath the headlight, again, nice and firm. Remember the door. Make sure the up is up. Slide it up in place, and slide it up further. Push the bottom in, and slide it down to lock.
If you need to adjust the light, right under here just use a Phillips screwdriver. Let's see, there's an adjustment screw right there. Turning it one way moves it down. Turning the other way moves it up. Generally, what you want to do is adjust it so that when you have the vehicle 20 feet away from a wall, on a level surface, the low beam should point one inch down from the height of the bulb here, and straight ahead. The high beam should point level with the bulb and be straight ahead from 20 feet back.
We hope this helps you out. Brought to you by www.1AAuto.com. Your source for quality replacement parts and the best service on the internet. Please feel free to call us toll free: 888-844-3393. We're the company that's here for you on the internet and in person.
Shop Products


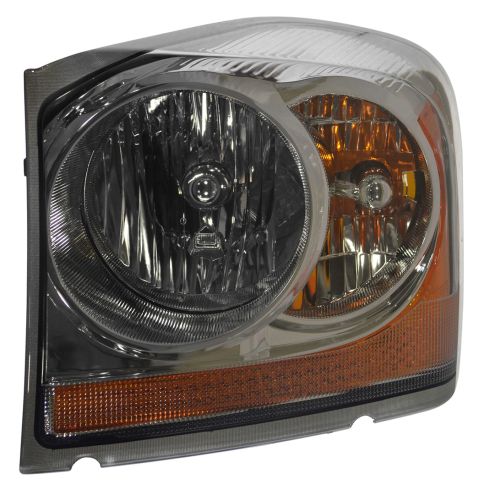
2004-05 Dodge Durango Driver Side Headlight Assembly TRQ HLA78699
Part Details:
- Features and Benefits
- PC (Polycarbonate)

How to Replace Headlights 2011-16 Volkswagen Jetta
Watch this video to learn how to replace the headlights in a 11-16 Volkswagen Jetta.
