How to Replace Headlight 2001-03 Chrysler Voyager
Created on: 2010-01-22
Watch this video to learn how to replace and service the headlight assembly and bulbs on your 01-03 Chrysler Voyager.
-
Note: DO NOT TOUCH the bulbs- the oil from your fingers will burn into the light and foul your bulb. Clean with rubbing alcohol and a soft cloth if the bulbs do get touched.
step 1 :Remove the headlight assembly
- Unscrew the three screws at the top of the headlight.
- Remove the headlight assembly and unplug the bulbs.
-
step 2 :Install headlight assembly
- Plug the bulbs and harness into the new headlight assembly
- Screw in the three screws using your screwdriver.
Tools needed
-
Flat Blade Screwdriver
Phillips Head Screwdriver
This video is brought to you by 1AAuto.com your source for quality replacement parts and the best service on the internet.
Here we are replacing a headlight on a 2003 Chrysler Voyager. This is the same for a 2001 to 2007 Caravan, Grand Caravan, Chrysler Town and Country and as in this case a Chrysler Voyager. This process is actually very simple. The headlight is only held in by three screws. In this case, we're saving this person over $2000 as they got a quote for just over $2000 to replace the bumper cover, the fender and the headlight, obviously including painting. In a case like this where the owner of the car doesn't want to spend that much money on this old vehicle, this works out very well. They can get the headlight on our website www.1AAuto.com, buy it new. It takes about five minutes to replace it and they're up and running. They can pass inspection no problem.
Now we'll get to it. You're going to see the camera fumble around a little bit as they put it on to a tripod. The tools are very basic. It's a Phillips screwdriver and a regular screwdriver. The first thing you do is there are three screws on top, here, here and here. Remove those screws. You can see as he starts removing the screws the headlights start shifting a bit. Now the headlight is free to pull out. First he's going to remove the signal light with just twist and it pulls out. Now he's going to remove the headlight by pulling off the retainer ring and then pulling out the headlight. Then there's a small clip that holds the wiring harness to the headlight. This takes a little bit of finagling I guess, use the screwdriver to press on the teeth of the clip and you can work it out of the hole in the headlight.
Once it's free, you can just drop the old headlight no problem. Now, handle your new headlight with a little more care. Locate it in there. Get the harness and that clip. You're going to want to put that clip right back into that same hole and the new headlight that presses right in. Now this new headlight came with a bulb in there so we had to remove the bulb from the harness so he's just plugging the harness right into the headlight. Then the signal light goes in and twists just like it came out. Then you can slide the headlight in. As you can see on this car the damage wasn't severe enough so the headlight can go in there without any problem. If you hit a brick wall any faster than four or five miles an hour you might have more damage.
Now you take the screws and you put them into place first then take your screwdriver and you press down and in and the screws find their way into the clips. All three screws at once do them lightly at first so you get them all in and then go back and tighten them up afterwards. You can tighten that one. Then check this one and make sure it's tight and then the last one, make sure it's tight. That's it.
Now we'll do a little quick test make sure the headlight and side light works. That's it, so you saved yourself anywhere from $1000 to $2000 if you had a small accident in the front and you broke your headlight which is great on this great. It's a 2003 so we didn't want to spend a whole lot of money. Now it can go and it can pass inspection without any problem. You can find the part at www.1AAuto.com.
This video is brought t you by 1A Auto your source for quality replacement parts and the best service on the internet. We hope this helps you with your project and we thank you for watching.
Shop Products


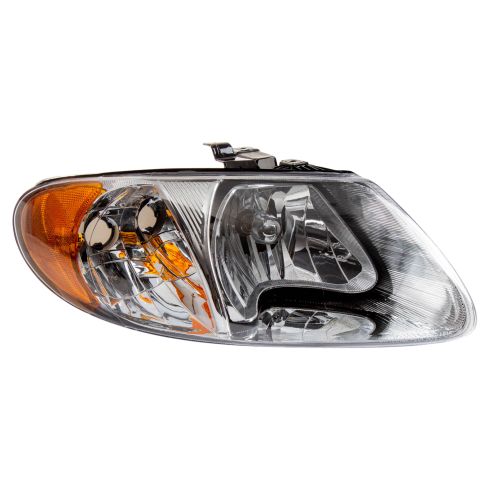
Dodge Chrysler Passenger Side Headlight Assembly TRQ HLA88521
Part Details:
- Features and Benefits
- 9007 High / Low Beam
- PC (Polycarbonate)
- Yes
- Yes
- Halogen

How to Replace Headlights 2007-14 Chevy Suburban 1500
Watch this video to learn how to replace and service the headlight assembly and bulbs on your 07-14 Chevy Suburban 1500.
