How to Replace Harmonic Balancer 2000-13 GMC Yukon
Created on: 2020-04-16
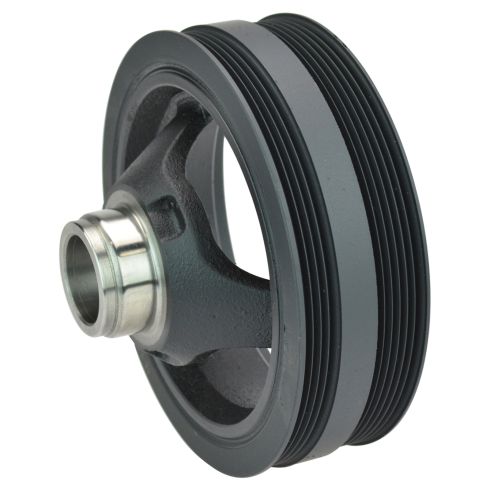
Watch this video to learn how to install a new harmonic balancer on your 2000-13 GMC Yukon.
Tools needed
-
24mm Socket
Adjustable Wrench
15mm Wrench
Torque Wrench
Hammer
Socket Extensions
15mm Socket
Pry Bar
Torque Angle Gauge
Trim Tool Set
Pocket Screwdriver
Harmonic Balancer Puller
Fan Clutch Wrench
8mm Socket
Push Pin Pliers
Drill
10mm Socket
Ratchet
Assistant
Harmonic Balancer Installer
1/2 Inch Impact Gun
Remove this cover. I'm gonna use an 8-millimeter socket. Loosen that bolt up and slide the cover up. And loosen up this worm clamp. You can use an 8-millimeter socket or a straight blade screwdriver. And the same with this one right here. Use a trim tool and just separate this retainer right there or that bracket.
Now, slide the snorkel off right there and pull it out. Just to gain more access, I'm gonna pull this airbox off. Disconnect the mass airflow sensor, grab the airbox, pull it straight up, then you can slide it out. There's two tabs and this holds it in. I'm going to take these two bolts out up top. Use a 10-millimeter socket. Then there's four push pins, two on this side and two on the other side, you can use a push pin removal tool or a trim tool. Just remove these.
Now, take this hose retainer off right here. Just use a trim tool, slide that up, slide this hose out right here. We should be [inaudible 00:01:36]. Just move this hose out of your way. Just slide this cover right out.
I'm gonna use a fan clutch tool with the 36-millimeter adapter. And just go right here, this setup. Once you get it loose, should be able to spin it off just like that. And pull it out.
Now I'm going to remove the drive belt. You can use a 15-millimeter wrench or a serpentine belt removal tool. Just loosen the tension on the tensioner and slide it off the idler pulley, and then take the belt off. Take it off the water pump, off,the power steering pump, set it aside. Grab this panel and just slide it up. Just pull the hose out of the way.
Now I'm gonna take the AC belt off. Just use a extension on a ratchet, loosen up the tensioner, and slide the belt off of the crank. And you can slide it completely off, put it aside. Now we're going to use a 24-millimeter socket. Take the bolt out.
You're gonna need a special puller that has these ears that are gonna hook on to the inside of the crank pulley. And there's this rod that's going to push on the crank itself. It's just gonna line up like that. And tighten this down.
Now I'll tighten it. As I tighten it, it's gonna pull the pulley right out. All right. There it is. Take the new harmonic balancer or crank pulley, line it up. So we're gonna use a harmonic balance installer like this. Get it started. And just tighten this down. As you tighten this down, it's gonna pull the balancer in.
From underneath the vehicle, we're gonna take the shield off. I'll use a 15-millimeter socket. Take these four bolts out. When we go to tighten down the crank pulley bolt, we're gonna need to access behind here and take this little cover off. Just use a small pocket screwdriver. I'm gonna have a friend to help hold this from spinning. Just use a pry bar and just put it right there in between the flywheel and the bell housing of the transmission and just hold that there. That'll prevent it from spinning. There is a special tool that you can use. You have to take the starter motor out and install it there, but we don't have that tool so this will work fine.
First part of this, we want to take the old crank bolt. Install the old crank bolt. We're gonna tighten this up. While holding the crank you're going to torque this to 240-foot-pounds using the 24-millimeter socket.
Now, I'll take that bolt out again. Now we'll take the new bolt, install it. We're gonna start by torquing this to 110-foot-pounds.
All right. Now I'm gonna loosen this 360 degrees. Basically, just loosen it. Then we're gonna torque it again to 59-foot-pounds. That's 59.
And we're gonna tighten this an additional 125 degrees. You can use a torque angle meter if you have one. If you don't, do the best you can. I just mark the socket and judge it the best I can. Okay. So the mark was over here and that's about 125 degrees. Take that off. And install the cover. And this cover, bolts in. And tighten these bolts down.
Take the AC belt, go around the crank and you wanna go to the back of the crank and then go around the AC compressor pulley and around the tensioner pulley. While holding the back of the belt tight, take your ratchet and your extension, put in the tensioner, loosen up the tension. And slide the belt over the crank, loosen up the tension. And that looks good.
Get the lower part of the fan shroud on, pull that hose back, and just slide it in position. That's good. Take the serpentine belt. I'm gonna start at the crank pulley, and then wrap it around the water pump, then around the power steering pulley, then up around the alternator. Then I'm gonna go over to the tensioner first. The belt should stay like that. And then grab your wrench or your tensioner tool. Just make sure that belt doesn't get stuck on that bolt, put a little pressure on it, and go over the idler pulley. Take the belt off. Just take a look, make sure everything's lined up. It's not lined up right there. Adjust accordingly. Just take the fan and just line it up.
Now, if you have a torque ranch and you're able to hold the water pump pulley from spinning, you can torque that to 41-foot-pounds. We don't have that. I'm just gonna use an adjustable wrench and just a hammer. Give it a couple of good taps. And that's good.
All right. Now, take this fan shroud, hold the hose out of the way, line it up with some alignment pins right there on both sides. Put these push pins in, lock them down. Do the same on the other side. Put these bolts in, get those lined up, and tighten these down.
And line this retainer up and right there, put that hose in that position. And slide the airbox back in position. What you want to do is slide this piece. That's going to go right here. It's gonna slide there and then push the two push pins straight down. Push down. It's good to go.
Reconnect the mass airflow sensor. And put the snorkel back on, line this up with the throttle body, and the airbox. And tighten up the worm clamps. And line this bracket back up. Put the cover on, slide it in the back, get the bolt started, snug it down.
Shop Products

How to Replace Install Harmonic Balancer 1997-2003 Ford F-150
Find out how to replace the harmonic balancer pulley yourself by following our experts' steps in this how-to video
