1A Auto Video Library
Our how-to videos have helped repair over 100 million vehicles.
Enter Vehicle Year Make Model

Specify your vehicle's year, make and model to guarantee fit.

How To Replace Fuel Tank Sending Unit 1971-76 Pontiac Grandville

Created on: 2015-12-16

If the fuel ending unit it damaged, malfunctioning, or broken and needs to be replaced, watch this video and learn how

  1. step 1 :Disconnecting the Fuel Filter Harness
    • Disconnect the tank wiring harness located in the back of the trunk
    • Push the wire down through the body
    • Unclip the wire and pull it down through the body
  2. step 2 :Disconnecting the Fuel Lines
    • Jack up the vehicle
    • Remove the 5/16 bolt holding the ground strap
    • Disconnect the two (or three) fuel lines
    • Push down on the tabs and pull them free
    • Place a drip pan underneath the fuel filter and pull the hoses free
    • Let the hoses drain
  3. step 3 :Removing the Fuel Tank
    • Place a block of wood on a jack and jack up the gas tank
    • Remove the 9/16 bolts holding in the gas tank straps with an extension or impact wrench
    • Pull back the gas tank strap
    • Lower the gas tank
  4. step 4 :Removing the Fuel Pump Sender
    • Remove any debris
    • Remove the module retaining ring with a flat blade screwdriver and hammer
    • Pull the harness free from the hose to slide the ring off
    • Use a flat blade screwdriver to pry up around the outside of the fuel pump
    • Let it drain and remove the rest of the way
    • Inspect the tank
    • Drain out some of the gas if needed
    • Use a container and funnel to recover any unused fuel in the tank
  5. step 5 :Installing the New Fuel Pump
    • Push the fuel pump sending unit into place, making sure the arrow is facing the same direction
    • Slide the module retaining ring over the harnesses
    • Apply pressure to the sending unit, twist the ring into place with a hammer and flat blade
    • Re-clip the rubber lines to the new sending unit
    • Wire-tie the sending unit line to the fuel line
  6. step 6 :Reattaching the Fuel Tank
    • Reattach the passenger's side gas tank strap (the longer one)
    • Place the pin in the strap
    • Weave the sending unit wire through the trunk
    • Push the gas tank back up
    • Put the jack underneath the gas tank to hold its place
    • Replace the gas tank straps with the 9/16 bolts
    • Tighten the bolts to 40-50 foot-pounds
  7. step 7 :Reattaching the Fuel Line
    • Reconnect the hoses onto the fuel filter and replace the clamps
    • Reconnect each of the hoses
    • Connect the ground strap with a 5/16 bolt
    • Remove the jack
  8. step 8 :Restarting the Car
    • Reconnect the fuel filter harness
    • Turn the vehicle on and to check the tank

Tools needed

  • Hammer

    Socket Extensions

    Flat Blade Screwdriver

    Vacuum

    Jack Stands

    Ratchet

    Flashlight

    Floor Jack

    Needle nose pliers

    Assistant

    9/16 Inch Socket

    5/16 Inch Socket

Brought to you by 1AAuto.com, your source for quality replacement parts and the best service on the Internet.

Hi, I'm Mike from 1A Auto. I hope this how-to video helps you out, and next time you need parts for your vehicle, think of 1AAuto.com. Thanks.

In this video, we're going to show you how to drop the tank and replace the fuel tank sending unit. This is a 1974 Pontiac Grandville. This process will be the same basically from '71 to '76 full-size Pontiacs, which include the Grandville, Bonneville, Catalina, Caprice, Delta 88, Buick, Centurion a bunch of different cars. It's also pretty much the same for most GM vehicles from the '50s and '60s up to the '70s.

Items you'll need, you'll need new sending unit from 1AAuto.com, jack and jack stands, 5/16s and 9/16 sockets with ratchets and extension (this could be different for your vehicle), flat blade screwdrivers, pair of pliers, a hammer and vacuum, flashlight, and a person to help you out is usually very helpful.

Start by disconnecting the lead on our Grandville. It's behind the trim panel and this is in the trunk right near where the trunk latches down. They're just a little brown wire. It has a black clip pry up on the tab and then pull the wire. Then push the wire down through the body. There's a little rubber plug and then the wire will push down through the body. You can see there's another clip underneath. Small flat blader screwdriver, pry open that clip. Pull the wire down.

Now you want to raise and support your vehicles. You want to put the jack stands in front of where the rear control arms connect, and you want to raise it up high enough that you can bring the tank down and out. Usually, you need about 6-inch, the wheels hanging down, and then 6 inches off the ground or so, which the car is about 18 to 2 feet up. Then underneath, you want to remove this 5/16s bolt which holds the ground strap. Didn't film doing that, but we did remove the ground strap and now we're going to disconnect the two lines. Some cars may only have two lines. Ours has air conditioning, so there are three lines. Just squeezed each clip and slide out of the way, then use your pliers, break the seal between the rubber hose and the metal line, and then pull off the line. Okay. Then I'll repeat that same thing for the other two.

You want to generally start with as little fuel in the tank as you can. If there is fuel in the tank, take the largest line, which is your main line, and use something to create a vacuum and get the fuel flowing. If you hold that line below the tank, then the fuel will just drain right into whatever vessel you might want to put in. You can see right here, I just drained it into a 5 gallon tank. You can pretty much go until it stops. If you have your vehicle up on the jack and jack stands, take your jack and just lightly support the tank.

Then two 9/16s bolt hold the straps in at the front, then we'll remove those. With the straps removed, you can let your jack down slowly. Actually, this is a lot easier with the vehicle closer to the ground because you're just using it for jack. You just pull it down. The tank is light because I've taken the fuel out of it, so I'll just have our helper take the jack out away and then we both lower it right down.

Use a wire brush and vacuum and just vacuum of any of the dirt and debris that's around the sending unit area of the tank. We'll fast-forward as I do that. Now use a hammer and a large screwdriver, and you want to force the ring counterclockwise. There are three tabs on it. Just use your screwdriver and our ring actually comes off fairly easily. Four set retainer ring counterclockwise and then the sending unit comes up and out.

Remove the rubber O-ring, and then you want to inspect the inside of the tank. Ours is pretty clean. It's a midwestern vehicle. If there's a lot of debris or rust and scale that you can see in the tank, you want to replace your tank.

At 1A Auto, we do sell a complete line of fuel tanks for a variety of different vehicles. Replace the rubber O-ring and the new O-ring that comes with the sending unit.

Now put the sending unit down on. Just make sure it fits correctly. There are three tabs that help to locate in place. This one with the lines on, it's pretty easy to locate. Put the retainer ring in around the lines, as well as make sure that the ground strap pulls through. Then make sure the ring goes in correctly. You have to push down on the ring and start turning it clockwise. Make sure all three tabs are going underneath the tank retaining ring. Then you can use your hammer and screwdriver to start evenly twisting the ring to the clockwise position or the clockwise motion. Then you can see I'm not hitting it hard. I'm just tapping it and switching between the three different positions evenly. You want to make sure that these bumps go into those impressions in the tank retainer ring. Keep driving it all the way until they are there.

Transfer the rubber lines. If you have older rubber lines, you want to make sure that they are rated for the newer fuel. The ethanol and other things in fuel can eat away all the rubber lines. The lines on this vehicle replaced within the last couple of years, so they'll still work fine. We're just switching them from the old unit to the new one. Again, it's just squeezing those clamps, then pulling them off. Some vehicles may have clamps that have been replaced. You may have to use a screwdriver or a socket and ratchet, but then just place all three of the hoses on and reset the hose clamps.

Okay, I'm just going to route the route the ground wire underneath and then use a couple of wire ties. There's a little lip on the retainer ring of the tank, and I just want to make sure that that ground wire doesn't rub against the lip of the tank. I just wire tie it to the line there and keep it out of the way. It just helps to make sure that it routes correctly and doesn't get chiefed. Then just put your line, which I think I forgot to show taking that off the old one, but you do remove the line that just pulls off of the old one, and make sure you push it back onto the new one. Then fast-forward here, as I just used the vacuum again and a screwdriver, clean off the top of tank. I used the screwdriver to just scrape out of the weld and loosen up the dirt and then vacuum it out.

Okay. Raise the tank back up into place. Make sure that the harness or the wire for the sending unit goes towards the back, and then have your helper get a jack up underneath the tank to hold into place. Before you get the tank all into place, make sure that the sending unit wire pulls through and push it up into the body. Then make sure you pull it through, so it runs between the tank and the body, and make sure it pushes up all the way through. Set that plug and then you can raise the jack up. Get the tank fairly tight to the body. Make sure it's lined up correctly, especially working on an older car. You can just line up the dirt marks on the tank with the dirt marks on the body.

Start your 9/16s bolts on. You may have to push up on them and turn them at the same time. See, they go right up in. We are using an air ratchet, that's okay. You can use just a regular socket and ratchet. I always tighten up the final amount with hand tools just to make sure that you don't break a bolt or overtighten anything. When you tighten them up, you want to tight them up nice and firm. Probably 45 to 50 foot-pounds. Then we'll keep the fast-forward going here as we route the hoses through the clamp. It's on the body, and then connect them and set the clamps.

Again, always replace the hoses with new hoses that will work with the new gas. Here, I'm going to reconnect the ground strap, but, before I do that, unfortunately, you can't see it very well, but I'm using a wire brush. Just wire brushing a spot to bare metal on the body, so that the ground strap gets a good connection and then use that 5/16s bolt and tighten it up. Reconnect the sending unit wire and make sure that the rubber plug is pulled all the way up through. Then you can see we turn the key on. It used to read full all the time, but now it's correctly reading very low fuel.

Thanks for tuning in. We hope this video helped you out. Next time you need parts for your car, please visit 1AAuto.com. Also check out our other helpful how-to and diagnosis videos.

1967 - 1973  Dodge  500
1997 - 1997  Dodge  500
2009 - 2009  Dodge  500
1996 - 1998  Ford  A9513
1980 - 1998  Ford  F700 Truck
2000 - 2017  Ford  F750 Truck
1997 - 1997  Ford  A9522
1986 - 1997  Ford  CF7000 Truck
1987 - 1997  Ford  CF8000 Truck
2000 - 2017  Ford  F650 Truck
1997 - 2000  Blue Bird  TC1000
2002 - 2017  Capacity  TJ6500
2003 - 2014  Capacity  TJ7000
2011 - 2011  Capacity  TJ9000
2014 - 2014  Capacity  TJ9000
1989 - 2004  Blue Bird  TC2000
1988 - 2012  Blue Bird  Wanderlodge
2016 - 2017  Capacity  Sabre 5
2002 - 2017  Capacity  TJ5000
1980 - 1991  Chevrolet  B60
1993 - 2002  Chevrolet  B7
1960 - 1990  Chevrolet  C50
1997 - 2009  Chevrolet  T7500
1987 - 2017  Crane Carrier  Low Entry
1962 - 1962  Dodge  500
1960 - 1990  Chevrolet  C60
1960 - 1990  Chevrolet  C70
1992 - 1996  Chevrolet  P6000
1997 - 2009  Chevrolet  T6500
2002 - 2016  Western Star  6900XD
1986 - 2015  Volvo  FE
1996 - 2002  Volvo  ACL
2004 - 2014  Volvo  VT
1990 - 2018  Volvo  VNM
1988 - 1998  Volvo  WC
1996 - 2001  Volvo  WAH
2000 - 2017  Volvo  VHD
2011 - 2015  Volvo  VAH
2000 - 2019  Volvo  VNL
1998 - 2004  Volvo  VN
1988 - 2002  Volvo  WG
1988 - 1998  Volvo  WI
1982 - 1998  Volvo  WH
2002 - 2019  Western Star  4900FA
2002 - 2019  Western Star  4900EX
2002 - 2019  Western Star  4900SA
2000 - 2001  Western Star  3700
1982 - 2004  Volvo  WX
1990 - 2015  Western Star  4900
1989 - 2001  Western Star  3800
2008 - 2016  Mack  LEU
1981 - 2007  Mack  MR
1983 - 1994  Mack  MH
1981 - 2007  Mack  RD
1989 - 2005  Mack  RB
1984 - 1993  Mack  RM
1979 - 2001  Mack  MS
2008 - 2019  Mack  MRU
2010 - 2017  Mack  TD700
1981 - 1993  Mack  RW
2008 - 2009  Mitsubishi Fuso  FE180
2007 - 2009  Mitsubishi Fuso  FE145CC
1987 - 2006  Mitsubishi Fuso  FE
2007 - 2009  Mitsubishi Fuso  FE145
2007 - 2007  Mitsubishi Fuso  FE140
1997 - 2019  Oshkosh  H
1996 - 2003  Mitsubishi Fuso  FM
1993 - 2000  Peterbilt  200
1983 - 2012  Oshkosh  S
1996 - 2003  Mitsubishi Fuso  FK
1988 - 1994  Peterbilt  265
2008 - 2013  Peterbilt  220
2008 - 2013  Peterbilt  210
1990 - 1994  Peterbilt  227
1987 - 1994  Peterbilt  224
1995 - 2015  Peterbilt  330
2008 - 2013  Peterbilt  325
2011 - 2013  Peterbilt  337
2005 - 2010  Peterbilt  335
1987 - 2018  Peterbilt  320
2001 - 2003  Peterbilt  270
1981 - 1984  Peterbilt  348
2007 - 2010  Peterbilt  340
1984 - 1987  Peterbilt  349
2010 - 2015  Peterbilt  348
1999 - 2010  Sterling Truck  L9500
1999 - 2001  Sterling Truck  L9511
1999 - 2000  Sterling Truck  L9501
1999 - 2001  Sterling Truck  LT9501
1999 - 2008  Sterling Truck  LT9500
1999 - 2001  Sterling Truck  LT9511
1999 - 1999  Sterling Truck  L9522
1999 - 2000  Sterling Truck  L9513
1999 - 2008  Sterling Truck  LT8500
1999 - 2008  Sterling Truck  LT7500
1999 - 2001  Sterling Truck  LT9522
1999 - 2002  Sterling Truck  LT9513
1989 - 1994  UD Trucks  1800
1999 - 2003  Sterling Truck  ST9500
2001 - 2017  Volvo  9700
1969 - 1975  Volvo  160
1989 - 1994  UD Trucks  2300
1989 - 1994  UD Trucks  2000
1989 - 1994  UD Trucks  2800
1989 - 1994  UD Trucks  2600
2008 - 2019  Peterbilt  365
1981 - 2006  Peterbilt  362
1988 - 1994  Peterbilt  372
2008 - 2019  Peterbilt  367
1981 - 1988  Peterbilt  353
1967 - 1987  Peterbilt  359
1986 - 2008  Peterbilt  357
1986 - 1994  Peterbilt  376
1986 - 1995  Peterbilt  375
1986 - 2001  Peterbilt  377
2006 - 2016  Peterbilt  386
1996 - 2007  Peterbilt  385
2000 - 2011  Peterbilt  387
1981 - 1982  Peterbilt  387
1986 - 2007  Peterbilt  379
1987 - 2007  Peterbilt  378
2008 - 2016  Peterbilt  384
2012 - 2013  Peterbilt  382
2007 - 2019  Peterbilt  389
2008 - 2015  Peterbilt  388
2017 - 2019  Peterbilt  520
1988 - 2018  Spartan Motors  Gladiator
2011 - 2018  Ram  5500 Truck
1999 - 2010  Sterling Truck  A9500
2004 - 2019  Spartan Motors  K3
2013 - 2019  Peterbilt  579
2014 - 2019  Peterbilt  567
2011 - 2018  Ram  4500 Truck
2011 - 2018  Peterbilt  587
1999 - 2010  Sterling Truck  A9513
1999 - 2008  Sterling Truck  AT9500
1999 - 1999  Sterling Truck  A9522
1999 - 2010  Sterling Truck  L7500
2001 - 2007  Sterling Truck  Condor
1999 - 2001  Sterling Truck  L8513
1999 - 2010  Sterling Truck  L8500
1999 - 2001  Sterling Truck  AT9513
2014 - 2014  Sterling Truck  AT9500
2005 - 2009  Sterling Truck  Car Hauler
1999 - 2000  Sterling Truck  AT9522
1995 - 2017  Freightliner  MB Line
1991 - 2015  Freightliner  MB70
2001 - 2018  Freightliner  MC Line
1986 - 1986  Freightliner  MC Line
2001 - 2013  Freightliner  XC
1995 - 2015  Freightliner  XB Line
1996 - 2013  Freightliner  V Line
2015 - 2016  Freightliner  XBA
2005 - 2018  Freightliner  XB Straight Rail
1980 - 1991  GMC  B6000
2005 - 2019  Freightliner  XC Raised Rail
1979 - 1990  GMC  C5000
1993 - 2002  GMC  B7
2008 - 2018  Freightliner  XC Modular Rail
2007 - 2016  Freightliner  XC Lowered Rail
1979 - 1990  GMC  C7000
1979 - 1990  GMC  C6000
1983 - 2002  GMC  School Bus
1992 - 1996  GMC  P6500
2005 - 2010  Hino  185
2005 - 2010  Hino  165
2006 - 2014  Hino  258LP
2008 - 2014  Hino  258ALP
1997 - 2009  GMC  T6500
2005 - 2010  Hino  145
1997 - 2009  GMC  T7500
2008 - 2014  Hino  268A
2005 - 2014  Hino  268
2005 - 2014  Hino  338
2003 - 2004  IC Corporation  FE Commercial
2003 - 2019  IC Corporation  CE School Bus
2005 - 2005  IC Corporation  FE Integrated
2007 - 2011  IC Corporation  FE Commercial
2006 - 2016  IC Corporation  1300 FBC
2008 - 2014  Hino  338CT
2005 - 2015  IC Corporation  CE Integrated
2003 - 2019  IC Corporation  CE Commercial
2003 - 2004  IC Corporation  FE School Bus
2007 - 2008  IC Corporation  FE Integrated
1980 - 1997  Ford  L-Series Heavy Duty Truck
1980 - 1999  Ford  F800 Truck
2008 - 2019  Freightliner  Cascadia
2005 - 2018  Freightliner  B2
2011 - 2018  Freightliner  108SD
2006 - 2010  Ford  LCF Truck
1998 - 2015  Freightliner  Argosy
2011 - 2018  Freightliner  114SD
1996 - 2011  Freightliner  Century Class
2001 - 2009  Freightliner  Classic XL
1994 - 2013  Freightliner  Classic
1991 - 2000  Freightliner  FLB
1990 - 2007  Freightliner  FC80
1991 - 2005  Freightliner  FLC 106
2001 - 2007  Freightliner  Condor
1996 - 2017  Freightliner  Columbia
1999 - 2004  Freightliner  FC70
2000 - 2018  Freightliner  Coronado
1981 - 2005  Freightliner  FLC 120
1981 - 2005  Freightliner  FLC 112
1989 - 2011  Freightliner  FLD 120
1989 - 2009  Freightliner  FLD 112
2003 - 2019  Freightliner  M2 112
2001 - 2019  Freightliner  M2 106
2001 - 2011  Freightliner  FLD 132
1993 - 2011  Freightliner  FLD 120SD
2002 - 2006  Freightliner  M2 100
2015 - 2018  Freightliner  M2
2006 - 2011  IC Corporation  FE School Bus
1979 - 2002  International  2554 Series
2002 - 2002  International  1552SC
1982 - 2002  International  2654 Series
1979 - 2003  International  2574 Series
2003 - 2019  IC Corporation  RE School Bus
2003 - 2016  IC Corporation  RE Commercial
1996 - 1998  International  1552SC
1987 - 1995  International  1452 Series
1979 - 2003  International  2674 Series
1981 - 2005  International  4900 Series
1981 - 2003  International  4800 Series
1986 - 2014  International  5500i
1962 - 2014  International  5000 Series
1996 - 2019  International  4400
2001 - 2019  International  4300
1981 - 2003  International  4600
1990 - 2016  International  5600i
1990 - 1992  International  7300 Series
2000 - 2012  International  5900i
1990 - 1992  International  7600 Series
2001 - 2019  International  7500 Series
2001 - 2017  International  7600 Series
1990 - 1992  International  7400 Series
2001 - 2019  International  7300 Series
1990 - 1992  International  7500 Series
2001 - 2019  International  7400 Series
1990 - 1992  International  7700 Series
1990 - 2017  International  8500 Series
1981 - 2003  International  8300 Series
1986 - 2015  International  9100i SBA
2001 - 2017  International  8600 TranStar
1981 - 2005  International  8100 Series
2001 - 2014  International  7700 Series
2013 - 2013  International  8200 Series
1981 - 2003  International  8200 Series
1993 - 1993  Kenworth  K200
1990 - 1994  Kenworth  K150
2013 - 2017  Kenworth  K270
1988 - 1994  Kenworth  K220
1987 - 1993  Kenworth  K130
2005 - 2006  Kenworth  K100E
2008 - 2015  Kenworth  T170
1993 - 2005  Kenworth  K300
2008 - 2015  Kenworth  T270
1997 - 2011  Kenworth  T2000
1993 - 1997  Kenworth  T450
2010 - 2015  Kenworth  T400
2008 - 2017  Kenworth  T660
1986 - 2015  Kenworth  T600
1995 - 2008  Kenworth  T300
1989 - 1998  Kenworth  T400
2008 - 2015  Kenworth  T370
2011 - 2015  Kenworth  T700
2013 - 2019  Kenworth  T680
1980 - 1980  Kenworth  T800
1989 - 2005  Mack  CH
1981 - 2019  Kenworth  W900
2008 - 2019  Mack  CHU
2006 - 2007  Mack  CHN
2014 - 2019  Kenworth  T880
1987 - 2019  Kenworth  T800
1994 - 1996  Kenworth  T993
1995 - 1996  Kenworth  T953
1991 - 2007  Mack  CL
2008 - 2017  Mack  CHU600 Pinnacle
1985 - 2001  Mack  CS
2006 - 2007  Mack  CXP
2004 - 2008  Mack  CXN
1981 - 2006  Mack  DM
2008 - 2019  Mack  CXU
2006 - 2008  Mack  CTP
2005 - 2007  Mack  CT
1998 - 2005  Mack  CX
2001 - 2008  Mack  CV
1981 - 2003  Mack  DMM
1994 - 2015  International  9200 SBA
1984 - 2011  International  9400
1985 - 2015  International  9300 Series
1996 - 2011  International  9800 SBA
1999 - 2011  International  9700
1962 - 1986  International  CargoStar
1994 - 2018  International  9900
1999 - 2011  International  9600
1986 - 1997  International  9600
1988 - 1997  International  9700
1985 - 1985  International  9700
2005 - 2010  International  CityStar
2002 - 2014  International  DuraStar
2004 - 2008  International  CXT
2009 - 2019  International  LoneStar
2012 - 2013  International  Loadstar
2019 - 2019  International  LT625
2019 - 2019  International  HX520
1996 - 2002  International  Genesis RE
1962 - 1979  International  Loadstar
2019 - 2019  International  HX620
1987 - 1990  International  M1400 Metro II
1969 - 1969  International  M1400 Metro II
2007 - 2008  International  MXT
1987 - 1990  International  M1600 Metro II
1998 - 2018  International  TranStar
2010 - 2014  International  TerraStar
2006 - 2018  International  ProStar
2006 - 2008  International  RXT
1986 - 2002  Isuzu  FS-R
1987 - 2004  Isuzu  FR-R
1986 - 2017  Isuzu  NP-R
2003 - 2008  Isuzu  HVR
2008 - 2014  International  WorkStar 7600
1985 - 2003  Kenworth  K100E
1987 - 2016  Isuzu  NR-R
1987 - 2018  Isuzu  NQ-R
1981 - 2015  Kenworth  C500
1988 - 1989  Kenworth  13-210
2008 - 2019  Mack  GU7
2012 - 2015  Mack  GU5
1995 - 2010  Mack  LE
2008 - 2019  Mack  GU8
2012 - 2015  Mack  GU4
2006 - 2008  International  4100 SBA
2003 - 2008  International  4200LP
2002 - 2019  International  4300LP
2002 - 2019  International  4400LP
1990 - 1990  International  4600UH
1990 - 1994  International  4600LP
2000 - 2009  International  9900ix
2001 - 2003  International  9900ix SFA
1999 - 1999  International  9900 SFA
2000 - 2003  International  9900i SFA
2008 - 2011  International  8500 TranStar
2008 - 2018  International  8600 TranStar
2008 - 2012  International  WorkStar 7700
1992 - 1995  Freightliner  MB60
1990 - 2002  International  4700LP
1995 - 2002  International  4700LPX
2003 - 2007  International  8600 SBA
1998 - 1999  International  9100 SBA
2000 - 2011  International  9200i SBA
2000 - 2011  International  9400i SBA
2006 - 2006  Isuzu  HXR
2005 - 2008  Isuzu  HTR
2000 - 2011  International  9900i
2013 - 2018  International  9900i
1974 - 1974  International  100
1971 - 1973  International  1010
1965 - 1965  International  D1100
1965 - 1965  International  D1000
1965 - 1965  International  D900
1965 - 1965  International  D1200
1966 - 1966  International  1100A
1966 - 1966  International  1000A
1963 - 1964  International  C1200
1963 - 1964  International  C1100
1968 - 1968  International  1000C
1967 - 1967  International  1000B
1963 - 1964  International  C1000
1969 - 1970  International  1000D
1953 - 1957  International  S132
1956 - 1957  International  S120
1956 - 1957  International  S122
1956 - 1957  International  S130
1956 - 1957  International  S102
1956 - 1957  International  S110
1956 - 1957  International  S112
1981 - 1989  International  S1955
1984 - 1984  International  S2375
1986 - 1986  International  S2375
1988 - 1988  International  S2375
1987 - 1987  International  S2276
1981 - 1989  International  S2554
1980 - 1982  International  S2524
1984 - 1989  International  S2155
1980 - 1981  International  S2125
1974 - 1975  International  200
1956 - 1957  International  S100
1984 - 1989  International  S1654
1980 - 1982  International  S1624
1980 - 1984  International  S1724
1980 - 1985  International  S1723
1981 - 1989  International  S1754
1984 - 1989  International  S1753
1988 - 1989  International  S1654LP
1987 - 1989  International  S1853FC
1980 - 1982  International  S1924
1981 - 1989  International  S1854
1981 - 1990  International  S1954
1980 - 1982  International  S1925
1981 - 1989  International  S1853
1980 - 1985  International  S1824
1980 - 1982  International  S1823
2001 - 2011  International  4200
2000 - 2012  International  4100

Shop Products


Heavy Duty Truck Universal Fuel Level Sending Unit Kit (Dorman)

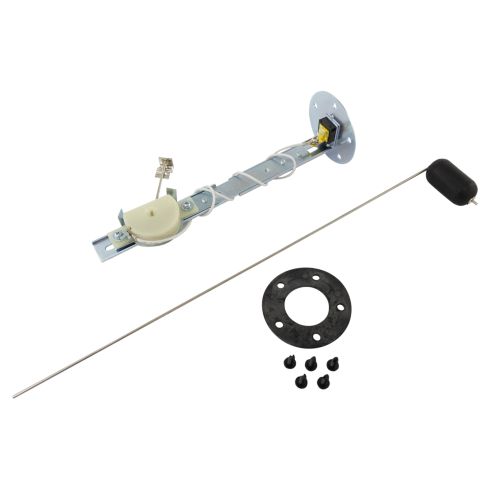
Fuel Tank Sending Unit Dorman Help 55818

Part Details:

  • Universal
  • No
  • 240 Ohms
  • 33 Ohms
  • No
  • 1
  • Spade
$49.95
recommended video

How To Replace Fuel Pump Sending Unit 2000-06 Chevy Suburban

Make your repair go smoothly with this instructional video on how to replace the fuel pump & sending unit on your 00-06 Chevy Suburban.

Share on:
Go To Top

Same Day Shipping

Need your part faster? Choose expedited shipping at checkout.

Guaranteed To Fit

Highest quality, direct fit replacement auto parts enforced to the strictest product standards.

USA Customer Support

Exceeding customers' expectations, our team of passionate auto enthusiasts are here to help.

Instructional Video Library

Thousands of how-to auto repair videos to guide you step-by-step through your repair.