How To Replace Fuel Tank 1983-97 Ford Mustang PART 1
Created on: 2010-09-21
Learn how to properly lower and replace a rusty or leaking gas tank by following the steps in this how-to video
-
step 1 :Raising and Securing the Vehicle
- Raise the vehicle with the jack
- Secure the Vehicle on jack stands
- Consider replacing the tank, straps and sending unit at the same time
-
step 2 :Preparing the bolts
- Spray penetrating oil on the tank strap bolts
- Spray penetrating oil on the filler neck bolts
- Let the bolts soak
-
step 3 :Unbolting the Tank
- Remove the tank bolts with the 8mm socket
- Remove the filler neck bolts with the 10mm socket
- Remove the filler neck bolts near the gas cap with the 10mm socket
-
step 4 :Disconnecting the Wiring
- Undo the electrical connector with a screwdriver
-
step 5 :Disconnecting the Fuel Lines
- Prepare a drain pan
- Pry out the tab on the first fuel line with a screwdriver
- Pull the first fuel line out by hand
- Pry out the two tabs on the second fuel line with a screwdriver
- Pinch and twist the fuel line ears
- Remove the white nylon lock
- Pull the second fuel line off by hand
- Twist the third fuel line with pliers
- Pull off the third fuel line by hand
-
step 6 :Removing the Strap Bolts
- Support the tank with a jack
- Apply more penetrating oil to the tank strap bolts
- Remove the strap bolts with a 13mm socket
-
step 7 :Removing the Tank
- Pull down the straps
- Slowly lower the jack to let the tank down
- Carefully work out the fuel filler neck
Tools needed
-
13mm Socket
Hammer
Flat Blade Screwdriver
Rust Penetrant
Jack Stands
8mm Socket
Chisel
Drain Pan
10mm Socket
Ratchet
Floor Jack
Needle nose pliers
Brought to you by 1AAuto.com, your source for quality replacement parts and the best service on the Internet.
Hi, I'm Mike Green. I'm one of the owners of 1A Auto. I want to help you save time and money repairing or maintaining your vehicle. I'm going to use my 20-plus years experience restoring and repairing cars and trucks like this to show you the correct way to install parts from 1AAuto.com. The right parts installed correctly: that's going to save you time and money. Thank you and enjoy the video.
In this video we're going to replace the tank in this '92 Mustang, really the same procedure for any car. Unhook the lines, the electrical connections and then pull the tank. Tools we'll need are pretty basic and in addition to this you will need jack and jack stand we'll need to raise the car up.
If you think about replacing a tank or you have to replace a tank in an older car like this . this is an old Mustang . you really want to consider the tank, the straps and the sending unit. The reason I'm replacing the tank in this car is because it's starting to rust out and it's leaking. I definitely am going to replace the straps because they're going to be rusty. I want to make sure that they don't break. I also want to think about replacing the sending unit because as you pull it down chances are if that sending unit is rusty and the lines on it are rusty and crusty, they may break and just spring a leak. The owner of this car has supplied me with the tank and straps, but no sending unit, so I'm going to try and do it without hurting the sending unit.
The first thing I'm going to do is I'm going to take some penetrant with one of these red tubes and spray like crazy and hopefully I get a lot on to the other end of this bolt and then also the other one that's up over here and then there's another bolt for the fuel filler neck. While we're letting those bolts soak, we're going to take out 5 bolts here. This is an 8mm. You can also use a 5/16th inch wrench. Now, there are four 10mm bolts right up here and even though this car is a little crusty they do come off pretty easy.
Here on the top side, there are three more 10mm bolts up here. Now I'm using a screw driver here, I'm doing the electrical connection at the rear of the car. You can see I'm near at the bumper where the Mustang insignia is. There are two fuel lines up here. I'll do my best to show you how to disconnect them.
The first one has got this little tab in it that you could kind of pry out with a screwdriver and then you can pull it with your hand and when you pull this one off . I'm going to change around here. When you pull this one off you're going to get a lot of gas, so you want to have a catch palm underneath. And then your second one is this one here. What it is, is on two sides is these little tabs and you want to force a screwdriver between that tab and the black bezel here. I'll do them on this side first. You push it really well and work your screwdriver between there and pull that black a little bit and then on the other side same thing, push. Once you push it up there's actually ears up here that you grab on to and then twist and this little white nylon lock comes out and then you have to pull that one off. Then there's your white nylon.
Right here, there's a line right behind the wheel. I'm kind of looking from the other way. There's a line right here. What you want to do is put a pair of pliers on right here, twist it, and then it will pull off.
Okay, so we get our jack, pretty much right in the center of the tank here. That's just the plastic that I'm lifting on right now. We will lift it up pretty good to hold the tank right in place.
Our penetrating oil has had some time but we're not going to be shy here with it. Spray a little more up in there. Same with the other side. These are 13 mm bolts. Let's hope for it to do something good, that it doesn't rust and just break. That looks pretty good. These actually are designed that if they break off, there's just a little clip here and you would ask either a hardware store or Ford to give you a clip that works.
I'm going to speed things up here a little bit and then the other side. Okay, so I'm pleased with that, no breaking. I've got my straps, the tray here and I've got my fuel lines undone, my electrical connections undone, so now I can just star slowly Letting the tank down. Now it's a matter of basically letting the tank down slowly and working that fuel filler neck out.
There's my tank out.
We hope this helps you out. Brought to you by www.1AAuto.com, your source for quality replacement parts and the best service on the Internet. Please feel free to call us toll-free, 888-844-3393. We're the company that's here for you on the Internet and in person.
Shop Products


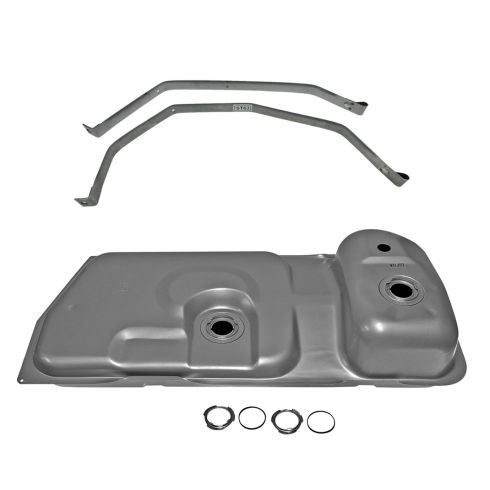
Ford Mustang Mercury Capri Fuel Tank Kit TRQ FTA09364
Part Details:
- 15.4 Gallon
- (1) Fuel Tank
- (1) Fuel Tank Strap Set
How to Replace Fuel Tank 1997-2001 Lexus ES300
This video shows you how to install a fuel tank on your 1997-2001 Lexus ES300.
