How to Replace Fuel Pump 2001-05 BMW 325 Xi
Created on: 2019-07-24
Watch this video to learn how to replace a fuel pump in your 01-05 BMW 325Xi and other 3 Series vehicles. 1A Auto shows you how step by step!
-
step 1 :Removing the Fuel Pump
- Pull up on the rear seat then slide it forward to remove it
- Remove the insulation around the fuel tank access panel
- Remove the four 10 mm tank access panel nuts
- Remove the access panel
- Disconnect the fuel pump electrical connector
- Clean any debris
- Run the engine with the fuel pump electrical connector disconnected to remove pressure from the fuel line
- Loosen the 10 mm negative battery cable nut and disconnect the negative battery cable
- Remove the fuel line hose clamp
- Disconnect the fuel line from the pump
- Remove the lock ring adhesive
- Tap the fuel pump lock ring with a hammer and brass punch to loosen it
- Twist counter-clockwise to remove the fuel pump lock ring
- Remove the fuel pump and place it in a drain bucket to avoid spilling fuel
-
step 2 :Installing the Fuel Pump
- Install the seal around the fuel pump
- Install the seal onto the tank opening
- Install the pump into the tank
- Reinstall the lock ring
- Twist the lock ring clockwise to tighten it
- Tap the lock ring tight with the brass punch and hammer
- Add a new hose clamp to the fuel line hose
- Reconnect the fuel line hose and secure it with the hose clamp
- Reconnect the fuel pump electrical connector
- Reconnect the negative battery cable and secure it by tightening the 10 mm nut
- Turn on the accessory power several times to prime the fuel pump, then attempt to start the engine
- Run the engine for 30 seconds
- Check the fuel pump area for leaks
- Reinstall the fuel pump access panel
- Reinstall the four 10 mm access panel nuts
- Reinstall the access panel insulation
- Reinstall the rear seat by sliding the rear of the seat under the seat back and then pushing it down to lock it in
Tools needed
-
Socket Extensions
Hammer
Brake Parts Cleaner
Safety Glasses
Pick
Gloves
Flat Blade Screwdriver
3/4 Inch Hose Clamps
10mm Socket
Drain Pan
Brass Punch
Ratchet
Cloth Rags
Needle nose pliers
What's up, guys? I'm Andy from 1A Auto. In this video, I'm going to show you how to replace the fuel pump. This one's made by TRQ. We sell it at 1A Auto in this 2001 BMW 325 XI. If you need this part or other parts for your vehicle, click the link in the description and head over to 1aauto.com.
Grab under the front part of the seat and just pull up just like that and then you're going to go on the other side. Do the same just like that. You can twist this up and slide it forward. There is a little connector right here. You should move that. Slide it up.
Underneath here, this insulation stuff is crumbling because it's old. It's almost 20 years old. So just take that off and I need to remove these nuts right here. Just going going to take a 10 millimeter socket extension and ratchet. Take these out. Now you can grab under here, slide this cover up. Ooh, some acorns in there. All right, so there's a lot of acorns in here. There was mice in here. Luckily there's no fuel leaking, otherwise I wouldn't be able to use the vacuum. I will use the vacuum now. But if there was fuel in here, you don't want to do that because you can blow your vacuum up.
You're going to disconnect this connector right here. Just use a straight blade screwdriver. This slides this way. When this slides off, you can pull the connector straight up just like that. You want to clean this a little bit. I'll just take a little brake parts cleaner. Just wipe any of the sand away. You don't want that getting into the tank. When you take this off, use a rag. You can use some other types of cleaners as well. Now before I take this line off, there is pressure in there. I want to bleed off that pressure. There's a couple different ways you can do this. If you still had this connected, you could disconnect the fuel pump fuse and try to start the car or with this disconnected we're going to try to start the car and then the car should die and that'll bleed off the pressure. You could also go under the hood and add the Schrader valve. Loosen up the Schrader valve and bleed off the pressure that way. All right. I'm just going to start the car and pretty much let it die out.
All right. Sometimes it won't even start, which is okay also. So the pressure should be bled off. At this point before I pull the fuel line, I'm going to go disconnect the battery because I don't want any external sparks by accident or I don't want the pump. There is a lift pump on that side that actually pumps fuel from that side of the tank over to this side of the tank when it sees a decrease in fuel level over here. So we don't want that coming on by accident. So we'll just disconnect the battery. The battery is in the trunk over here on the passenger side. If there's a cover over here, you're going to need to take that cover off. Access the negative cable. Just take a 10 millimeter wrench, loosen this up.
Once that's loose, wiggle the connector off and disconnect it. Slide that out of the way. I am going to take some of these absorbent pads and stick them right here. I am going to pull this carpet up a little bit. Stick this under here just so if any sprays, it doesn't spray onto the carpet. Just flip it over like that. Now we want to take that hose clamp off. Now what you're going to need to do is get a new hose clamp because you can't reuse that. So get a hose clamp that's going to work. So I'm going to use a straight blade screwdriver and some needle nose pliers. Just get in here. Try to loosen this up a little bit. You could also try some diagonal cutters and try to cut this off. That works as well sometimes. A slightly bigger screwdriver. There we go. We can release it just like that and just slide that off. Throw it away.
I'm just going to take a couple of rags, stick them underneath here just to collect some of the fuel and then I can take a right angle pick. Just get in under here. It's a good idea to wear safety glasses while you're doing this. You can just take one of the rags and put it over so it doesn't spray everywhere. Take some hose pliers. Wiggle the hose back and forth. You can try to do this with some regular pliers further back so you don't crush the fuel pump fitting unless you're replacing it. But then it's still pretty hard to get that off. So all right, got that out. Minimal fuel spray, which is good. You can use something to plug this up. Just plug that up and then push that out of the way or you could even use some locking pliers and then hold that out of the way like that. So there's a little bit of a rubbery adhesive right here. I'm just going to take a screwdriver. Just try to slice it. Just get it out of the way. Now we need to twist this lock ring off.
What I'm going to do is use a brass punch and a hammer. The reason why you use brass is because it won't spark. You can try with a screwdriver. Just be careful. I'm just going to hammer on these locations. There it goes. It's starting to budge a little bit. Yeah, that's moving. So just go around, give it a couple of taps all over. I just put the rag there so that some of the fuel won't go all over the place. There we go. All right, so we got that loose, which is good. Take that ring off. If this ring got beat up too much, then you're going to want to replace it. This one's not too bad, a little bit. But we'll reuse this one. So I'm going to get a drain bucket. You could use a regular bucket or even a kid's sand bucket. Something to put the fuel pump in once we pull it up so we don't get fuel all over the car. So grab it. There's a little handle right here. Grab it from that. Slide it up. There's a little seal. You can pull a seal up as well.
There's this hose right here. You want to make sure that's out of the way and you're going to twist it this direction and then twist it to the side just like that. Pull it up just like that.
Here's the old part. Here's the new part from 1Aauto.com. This is a TRQ pump. It's got the same float to tell you the level of the fuel. It's got same pump configuration on the back with the filter on the bottom. The connector is the same, has the same handle and the same fitting for the fuel line. Get yours 1aauto.com and you'd be ready to rock and roll.
All right. The new pump comes with a seal. So we're going to install the seal right over the pump. Just be careful of the level sensor. You don't want to damage that. It is pretty sensitive. Now the pump's going to slide in just like this, level sensor down first. Slide in that position right there. Once you get it to there, then we're going to install the seal just around. Go into the fuel tank and it's going to go with that more like a skirt looking side of the seal down and the more flat part is going to be up. All right, so that's completely installed. Now this little tab is going to go right there. Just slide that in position there and then push down on the pump. So now we're going to install this. Look for the lowest section of where the threads are on this lock ring. They're right there and you want to start it right around that location. So just move that fuel line out of the way. Start spinning that on.
Spin it as far as you can by hand and then take the brass punch and just tap it in. That's pretty good. You want it pretty much generally in the position it was when it came off. It's pretty close here. So that's good. So now we can take our fuel line and take our new clamp. Just take this sleeve off of the fuel pump, pull this plug off the fuel line. Put the hose clamp on and then reinstall the fuel line, fuel hose. Take a straight blade screwdriver. We'll just snug this up, snug this one clamp up. Not too tight because it is plastic.
Wiggle the hose if it needs snugging up a little bit more. We'll just clean up any excess fuel that spilled. We didn't do too bad, which is good. Take the electrical connector. You can hook that up. This is going to go in this location just like this. Let's see. This is slid out. As you slide it down you're going to push this connector together just like that. That's locked in place. Now before I put this cover on, I want to reconnect the battery and then I want to prime the fuel system and run the engine and double check. Make sure I don't have any leaks. If I don't have any leaks and I can put this all back together. I'm to hook up the battery, hook up the negative posts, take a 10 millimeter wrench, tighten this up, snuggle that up, grab the terminal, make sure it's tight. That's good. If you have that battery cover, you're going to want to put that on now. At this point, I want to prime the system. There's going to be air in the fuel lines. So what I'm going to do is turn the key on.
Let it sit for 10 seconds. You should be able to hear the fuel pump kick on. Shut it off. Turn it back on for a couple of seconds and shut it off. I'll do that three times and then I'll try to start it. I can check around and see if there's any leaks at this point. If there's no leaks, you're good to start it. I'll start it and it starts right up. Let it run for a second and then I'll shut it off and I'll check for leaks.
So I'm checking for leaks. I don't see any, which is perfect. So now we can put this back together. This cover goes right here, going over the studs. There's an arrow on the cover and that goes towards the front of the car. Just going to push down on that, just like that. Take these nuts and put these back on. Take a 10 millimeter socket extension and ratchet and tighten them. Just snug those down and it's good. Just remove these mats and if you want to reinstall this rubber insulation, this is more sound-deadening material, install that. Then we can put the seat back in. All right, I'm just going to slide this over here. Take the seatbelts. I'm going to pull the seatbelts through. I'm going to angle this underneath in the back. Tuck some of that excess seat material in. It's going to go underneath there and then just push down on the front just like that.
Thanks for watching. Visit 1aauto.com for quality auto parts shipped to your door, the place for DIY auto repair and if you enjoyed this video, please click the subscribe button.
Shop Products
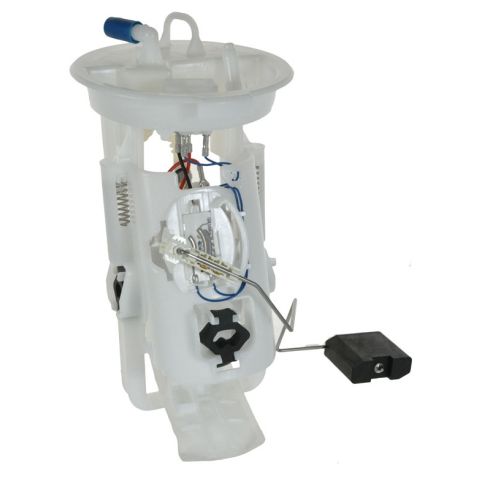
BMW Fuel Pump Module Assembly TRQ FPA61923
Part Details:
- 33 gph
- No
- Yes
- Gas
- Strainer
- Yes
- Electric
- 394 Ohms
- In Tank
- 108 PSI
- 9.5 mm
- Yes
- 116 PSI
- 1
- 70 Ohms
- 36.98 gph
- 0
- No
- Hose Barb
- No
- 29 gph
Fuel Pump Connector Issue Tips 1A Auto
Learn a few tips about connecting a fuel pump adaptor in your GM vehicle in this 1A Auto video.
