How to Replace Fuel Pump 1994-2002 Dodge RAM 1500
Created on: 2020-09-22
This video shows you how to install a new fuel pump on your 1994-2002 Dodge Ram 1500.
Tools needed
-
Torque Wrench
Socket Extensions
Rust Penetrant
Jack Stands
10mm Wrench
Safety Glasses
Pocket Screwdriver
Pick
Air Blow Gun
Rubber Mallet
Gloves
Flat Blade Screwdriver
Socket Driver
Paper Towels
Wheel Chocks
Brass Punch
Ratchet
Floor Jack
Okay. Friends, before we get started on this job, I just want to cover one thing. You want hands and eye protection, of course. One last thing, it's a tech tip. If you can have your fuel level as low as possible for this job, it's gonna help you out. Let's get started.
Okay. Friends, one of the first things we need to do here is disconnect our negative battery terminal. Something that I want you to think about is with your battery, you wanna make sure you have a full charge. If your battery is weak, you might have an issue after you've done your installation. Set that aside so it can't make connection.
The next thing we need to do is remove fuel pressure from our system. Right up along your driver's side fuel rail, you're gonna see this little cap. Go ahead and remove it, and then you're gonna find a pressure valve right there. Take a nice rag, go around it and then go ahead and press in on the center of the valve. There we are. I relieved pressure. Now, I'm gonna go ahead and make sure I put that cap back on because you definitely don't wanna forget it.
The next thing we need to do is locate it underneath the vehicle. We're gonna go ahead and spray down our mounting hardware where our straps are that hold the tank to the vehicle. And then of course, on the other side, we're gonna go ahead and spray down the area where the clamps are. We wanna make sure that those are nice and lubricated and they'll come off of there easy peasy.
Okay. So, now we need to go ahead and loosen up those clamps that are holding our hoses to the fuel inlet. Next, we're just gonna take a nice peek and just try to come in between the hose and the piping itself. This is gonna help break it free, so we don't have to worry about damaging anything. Go ahead and remove your hoses. You'll probably notice that the main inlet does not wanna come off at this point because what we need to do is lower the tank down and slowly draw it off.
Now, the next thing we need to do is find a jack that's gonna have something nice and level and flat on the top. So, we can apply a little bit of pressure to this fuel tank and that way there, we can remove our straps and start carefully lowering this down.
Now, for the forward bolt, what you're gonna notice is you more than likely have a bolt coming from the bottom and a nut up along the top. Go ahead and hold onto the top and remove the lower aspect. Watch that strap. Don't let it potentially hurt you. Let's do the rear one. This one should be a stud with a 15-millimeter nut. Let's go ahead and pull these down. Remove this shield. Okay. Let's get these down a little bit.
At this point, what we're gonna need to do is slowly start to bring our fuel tank down. You wanna be careful because it's a nice long fuel tank, so you wanna make sure that the fuel doesn't tip to one side and potentially fall over, and/or hurt you. All right. I've got this coming down slow. Something to think about is that you have your fuel filler neck that's still connected on the other side. So, we wanna make sure that that's drawing off of there and we're not just ripping the tube out of the body of the vehicle. Okay. Let's slowly bring this down a little bit more. Remember that there's still lines and wiring connected along the top.
The next thing we're gonna do is disconnect our electrical wiring harness. Looking at the red area, that's a lock. You need to pop that lock and then squeeze this tab and separate the two pieces. I'm just gonna come with a screwdriver. Here we are. That feels good. Go ahead and squeeze your tab, separate the two. I always like to take a peek to make sure there's no issues with my electrical connector. This looks great. Set it aside.
Next, we're gonna remove the hose from this area right here. There we are. So now coming from the driver's side, if I was to look, I could see a nice little green tab on my last remaining fuel line. Go ahead and press in on that, and then you should be able to draw this off of here. I have to knock some dirt out of there. Go ahead and push on that tab. Give it a nice twist and carefully draw it off. Fuel might come out. There we are.
The next thing we need to do is get our straps out from under here. So, I'm just gonna go ahead and move them and twist it, and they should wanna unlock. Here we are. You can see there's a couple of little hooky do's, they just fit up into that square. Let's go ahead and lower this down now. Awesome. Now, this is gonna be easiest on the ground.
The next thing I wanna do is just take a couple of rags and I'm gonna put it right inside here. This is gonna help keep the dust out and it's also gonna keep the vapors in. Now, the next thing that we're gonna do is gonna be super important. You wanna make sure that you get all this crud off of here. If any of it that falls into the tank could potentially be an issue down the line.
Now, before we go ahead and take our fuel pump out of the fuel tank, what we need to do next is go ahead and remove this right here, and then we're gonna get this wiring off of there as well because, of course, that's gonna cause an issue. All right. So, let's go ahead and try to get this off of here. It's actually pressed in there and it has a nice seal on it, so I'm just gonna use this little tool right here. Try to get under and try to pry it up and out of there. There we are.
Now, you, of course, need to check your seal and make sure it's not damaged in any way. This one looks great, but when I go to install it, I'll show you what I'll do. All right. Now that we have that out of the way, we wanna be very careful not to make any sparks because, of course, this is open and there's fuel inside.
Let's go ahead and bonk this little lock right here. We're gonna try to break it free. So, then, of course, we can get this out of here. Squeeze our tab and then I'm just gonna try to pry this off. We'll set that aside for recycling.
Next, we're gonna take our little punch here and a nice rubber mallet. We don't want anything that's gonna make a spark and we're gonna turn this counterclockwise. Something to think about is that your fuel pump is gonna be spring-loaded inside here. So, once it breaks free, you might potentially feel this popup, so don't get too nervous.
Okay. So, that broke free. Let's give it a little wiggle. There we are. Take your lock, inspect it, make sure it's not broken or damaged in any way. If it needs to be replaced, now is of course time to do it because you need to have a good seal for your fuel pump to your tank.
The next thing we're gonna do is go ahead and take our pump and we're gonna put it into our recycling receptacle because there's gonna be fuel in it and we wanna make sure it doesn't go to the ground. Right here is your fuel level sensor. And of course, if you're looking at the bottom of the pump right here, this is where you're gonna see where that initial fuel filter is. So, if you see any gunk on that, you know that that's an issue.
All right, friends. Now, the next thing we need to do is do a quick product comparison next to each other because, of course, you wanna make sure you're dealing with the same part. You wanna make sure you have your fuel pressure regulator right up along top, as we do. You wanna make sure you have your connector up here and, of course, the boot on there. There's supposed to be a hole there because of the part that we removed. And aside from that, what you're gonna notice in your TRQ kit is it comes with a nice brand-new seal, which is all important and, of course, the electrical harness that you're gonna need it as well. With all that said, let's go ahead and get ready for our install.
Okay. Now, let's go ahead and go over to our tank and remove that seal. I like to give it a quick look over just to see if there's any issues. We're not reusing it, but it couldn't hurt to take a look. We'll set that aside.
The next thing we need to do is, of course, clean up this area. Go ahead and use a nice rag and wipe it down. Try the best you can to keep any dirt or debris out of the inside of your tank. Let's go ahead and take our seal. We're gonna line it right up on there and it should sit in perfectly. That feels great.
Let's go ahead and slide this down. Watch for that arm. As this goes down, you wanna make sure that your seal isn't rolling over. So, now before I go ahead and push this down any further, you wanna go ahead and check that seal. Make sure it's not rolling over and it's not falling into the tank anywhere and then slowly continue pushing this down, all keeping in mind that this needs to be facing towards the driver's side of the vehicle.
The next thing we need to do is put our lock ring on. I'm just gonna push it. As you're putting it on, you wanna make sure that you get it as level as possible. You definitely don't want to try to cross thread this because then you won't have a good seal. Find the first. There it is. Let's go ahead and make sure that that's nice and tight. Perfect. Double-check to make sure it's seated all the way around and it's as level as possible.
Now, let's go ahead and take our new wiring. Make sure your lock is on done. Squeeze it on there and then, of course, click it in to give it a nice tug. Now, the next thing we need to do is go ahead and get this off of there, and then we're gonna inspect that as well. You wanna make sure it's in good working order. This looks great. I'm just gonna take it and I'm gonna go right along like this and start it right into the groove all the way around. That feels good.
Clean that down. And now I'm just gonna use a tiny bit of grease or lubricant, whatever you might happen to have. Put it around there and that's gonna help make it so this can go in nice and easy. There we are, perfectly situated.
At this point, it looks as though we're ready to start installing back into the vehicle. Let's go ahead and start putting this back up into the vehicle here. Just pay attention to your hoses. Make sure you still have coverings on them. And then, of course, once we get high enough, we're gonna pull them so they come up and over the frame. Let's go ahead and connect in our wiring here. Give it a nice click, lock it. There we are.
Let's go ahead and reconnect our fuel line. Listen for that click. Give it a nice tug. And then, of course, don't forget your little EVAP line here. Push it right on there. Make sure it's nice and secure. Let's continue going up.
So, now, of course, we're gonna put our strap back in. Awesome. Push this into position and go ahead and jack it up so it's maxed out. Let's go ahead and get the shield back up. I'm gonna start with the rearward strap because all I need is a nut to hold it. Now, let's go ahead and reconnect our front. Let's go ahead and get our rag out of here.
Now, of course, we're gonna get our hose back reconnected. Just wiggle that. It should come right out. We'll do the same to the other one. Perfect. Go ahead and grab one of those clamps or replace the clamps if needed, but you need clamps. Tight. Tight.
Okay, friends. Now, the next thing we need to do is get back underneath the hood. We're gonna reconnect our negative battery terminal. One thing I wanna make sure you understand is you definitely don't wanna have any fuel vapors in the area or fuel on your hands. Let's go ahead and make a connection. Just remember, it might arc a little bit. There we are. Go ahead and push this down as far as it'll go. Now, of course, you're gonna make sure you tighten it right up. You want this to be nice and snug, so there's no way it can move around. Perfect.
Okay. So, the next thing we're gonna do is inside the vehicle. We're gonna go ahead and take our key, turn it two clicks to the on position. Wait until that pump primes the line. Turn it back off, then go ahead and do it again and start the vehicle. Here we go. That sounds nice. Now we're gonna, of course, check for some leaks. You wanna make sure that you don't have any leaks anywhere and then we'll go ahead and take it for a road test.
Shop Products
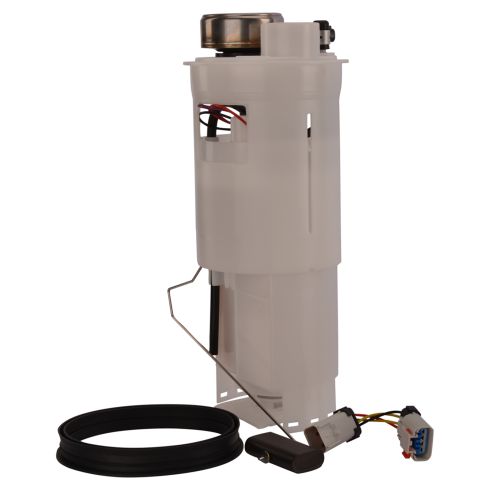
Dodge Ram 1500 2500 3500 Fuel Pump Module Assembly TRQ FPA61902
Part Details:
- No
- Yes
- Gas
- Strainer
- Yes
- Electric
- 9.49 mm
- 112 Ohms
- In Tank
- Yes
- 47.55 gph
- 1
- 49 PSI
- Yes
- 4 Ohms
- 53 PSI
- 0
- Yes
- 40 gph
- Quick Connect
- 44 gph
How to Replace Electric Fuel Pump 1997-2006 Toyota Camry
If the electric fuel pump needs to be replaced, this video will show how to remove and install the fuel sending unit and the fuel pump
