How To Replace Fuel Injectors 1997-2004 Ford F-150
Created on: 2017-07-20
Check out this video on how to replace the fuel injectors on your 97-04 Ford F-150.
-
step 1 :Removing the Fuel Injector
- Release the fuel pressure by twisting off the Schrader valve cap
- Remove the two 10mm bolts from the fuel rail
- Pry the fuel rail and injectors up
- Disconnect the clip
- Remove the injector and check that it has its two O-rings
-
step 2 :Installing the Fuel Injector
- Place a bit of the right motor oil around the seal
- Insert the injector into the intake manifold
- Connect the wiring harness
- Press on the fuel rail
- Tighten the 10mm bolts to the fuel rail
- Tighten the Schrader valve cap
Tools needed
-
Gloves
Socket Extensions
Paper Towels
10mm Socket
Ratchet
Safety Glasses
Engine Oil
Pick
Hi, I'm Mike from 1A Auto. We've been selling auto parts for over 30 years. We're dedicated to delivering quality auto parts, expert customer service, fast and free shipping, all backed by our 100% satisfaction guarantee. Visit us at 1AAuto.com, your trusted source for quality auto parts.
Right here on the passenger side of the engine is the fuel rail, with the four yellow injectors. Before we pull injector parts out of the vehicle, we want to release the fuel pressure that's in the system. We'll take off this little cap that's right here. There's a little Schrader valve on the top of the fuel rail. And then making sure to wear gloves and safety glasses, of course.
What I like to do is just surround this in a paper towel or a rag, and I'll take a flat tip screwdriver and just poke down into the Schrader valve. It looks like there probably wasn't much fuel pressure in there. It didn't release much. At this point, I know that I'm safe to disconnect the fuel rail and replace an injector. I'll put the cap right back on, and now we can move on to removing these two 10 millimeter screws.
We'll go to the rear one first. I'm going to use a 10 millimeter socket on a 1/4 drive ratchet. This is actually the upgraded intake manifold on this, so it's a plastic intake manifold. Yours might actually look a little bit different. These came with an aluminum intake manifold. Nevertheless, the procedure for this is actually exactly the same, just probably slightly different bolts.
Here's the first one, again. 10 millimeter on a quarter drive ratchet. At this point, the fuel rail is actually loose. You can see the injectors are wobbling around. What you can do is just pry in between the injector and the fuel rail, and you'll be able to lift the fuel rail right off the injectors.
Looks like this one, a couple of them had the injectors come out. You can see two of the injectors came out, and two of them left the injectors in. At this point, you can see that it doesn't take a whole lot to remove these injectors. You can disconnect the clip right here. All the injectors should always have an O-ring at the top. This one fell off when we pulled it out, but you always want to make sure that it has the O-ring in the top and the O-ring in the bottom. That's what makes it seal the fuel inside the fuel rail.
Once you have the connector off, all these come out the same exact way. They just basically sit inside the fuel rail, and they sit inside the intake manifold. There's nothing holding them in, other than these two 10 millimeter bolts and a little bit of pressure.
Down here, you can see two of the injectors are still stuck in the manifold. What we can do to get those out is just unplug them with the clips on top. You just squeeze the connector to pull it out. Here's a good example. You can just squeeze these tabs, and then it pulls right off. With it disconnected, you can just pull straight up on the injector, and it pops right out of the hole. Again, just make sure that it still has the seal on the top and a seal on the bottom. Sometimes the seals will stick inside the fuel rail or stick inside the intake, and you'll want to pick them out with a small flat screwdriver, or even a pick. You just don't want to damage them.
Here we have the old injector and the new injector. You can see there they do look a little bit different, especially down on the bottom end. That doesn't necessarily mean it is a problem. This is just an updated design, so it will fit in just like the original one did. You can see the connectors are actually the same. They have the same seals at the top. The seals are actually in the same places at the bottom. There's just no little cap on the end. It's just an updated design, not a whole lot different. It'll fit and function the same exact way as the original.
Whenever I'm installing injectors, you don't want to put the seal together dry. You always want to take a little bit of motor oil, and just wipe the top of the seal with the motor oil. That way, it'll slide into the intake manifold, and it'll slide into the fuel rail really easily. Here's the first one. We're going to just put it right down into the intake manifold right here. With the oil on it, it just slides right into place. We'll go to the next one, wipe that with a little bit of oil on the top and the bottom, and we'll slide that one right here. Here's the last one that we have to install, again, wiping it with oil, then pushing it right down into the hole.
With all the injectors in place and the top seal being oiled, you can now take the fuel rail and start pushing it down over all of the injectors. I like to start at the rear-most one and work my way up to the front. That's usually the way it works best for me. You'll feel them snap right into place. I believe that there's actually a groove inside the fuel rail that it sits on, or that the seals slide into. You'll have a good idea of when it's in place as soon as it snaps down smooth.
Now we're going to take these two 10 millimeter screws, and we're just going to start threading them into the intake. Then we'll use our 10 millimeter socket and quarter drive ratchet to screw the bolts in. Now we're going to start plugging the injectors into their electrical connections. All you have to do is push straight down on the electrical connection, and it'll latch right onto the fuel injector. Here's our new one, and there we are.
We just replaced an injector on the passenger side of the engine. The driver's side is actually the exact same process. There's just a few extra hoses in the way. You'll want to take off this cover, probably, to get a little more space in there with your ratchet. But other than that, it has the same two bolts that hold the fuel rail in place, and there's just a couple extra hoses that are hampering the visibility over here. Once you wiggle around the hoses, it's the same exact process.
Thanks for watching. Visit us at 1AAuto.com for quality auto parts, fast and free shipping, and the best customer service in the industry.
Shop Products


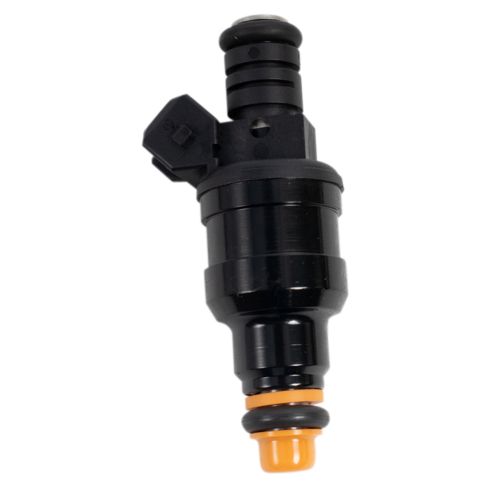
Ford Lincoln Mercury Fuel Injector TRQ FIA60319
Part Details:
- No
- 0.98 in
- 44 PSI
- Male
- No
- 2
- Male
- 2
- No
- Plastic
- Gas
- Denso
How to Replace Fuel Injectors 2000-06 Chevy Tahoe
This video shows you how to install new TRQ fuel injectors on your 2000-06 Chevy Tahoe.
